Monday, January 30, 2017

How to be a good rebounder

Solomon Kairu
P4
Rebounding the ball is the process of catching the ball after bounces off the rim or backboard from a missed shot or layup. Due to the fact that rebounding revolves around who can grab the ball first, you rarely see short players in a basketball game trying to rebound. Generally it's the taller and bigger players such as the power forward and center that grab rebounds due to them being taller.

According to Clive Grafford, the author of the book "Basketball", says "Good rebound requires strength and determination. You can expect some contact when competing inside a crowded lane for the ball". (Grafford 34). What he's saying is that rebounding also requires determination and strength since they're many other players besides you trying to fight for the ball so you need the strength to fight for it. I applied this in my games because whenever my friend missed a lay up or a shot, I'd had to rebound for him. This knowledge has helped improve my overall skills. Anyway to do a proper rebound you have reach your arms out and cover your opponent. Then quickly jump and extend arms to grab the ball. Will you use this technique in your next game?


Sunday, January 29, 2017

How to dribble a ball

Solomon Kairu
P4
Like mentioned earlier in my 2nd blog basketball isn't just about scoring. It's also about protecting the ball and getting past the defenders by dribbling. Dribbling is considered a basic technique that can be easily mastered by anyone, including you reading this. A dribble is used when going for lay ups or to put yourself in a better position on the court. Don't dribble to be flashy or to show off to the crowd as this is unnecessary and could potentially lead to a steal and a turnover. Another thing about dribbling is that you shouldn't be carrying the ball under your hand when dribbling. That's a carry which is a penalty. But you don't just use the dribble for lay ups. You mainly use them to get past defenders. Using your dribbling skills to get past a defender is called a cross over. Cross overs requires you needing to use both of your hands when dribbling the ball and switching hands. Meaning just like with lay ups, skilled basketball practice dribbling with either hand. Clive Grafford mentions in his book "Basketball" that "Top players work tirelessly in practice so that they can dribble with both hands.This always them to get past opponents on either side" meaning that this a skill used by many basketball player to go through opponents on the left side and on the right. I've applied this to me to get defenders off me when in a game.

But that's not the only form of dribbling possible. They're more advanced dribbling techniques such as the "between the legs" dribble and the "behind the back" and the spin move. These techniques are harder to master than a regular cross over dribble but they can make getting past a defender easier. To do a regular dribble though you keep your knees flexed, then as the ball bounces on the ground reach for it with your fingertips. Don't dribble with your palm. Use your fingertips. If you want to dribble forward then you keep the ball ahead of you. Then move your wrist a little upwards to receive the ball before it bounces


My question to the audience now it this. Will this article help you cross people in a game?


How to make easy lay ups.

Solomon Kairu
Period 4
Scoring is a major skill needed in basketball. Like mentioned in the previous blog, they're 2 ways of scoring in basketball; shooting or making a lay up. But I already covered shooting so now it's time to talk about the lay up. The lay up is considered by many the easiest way to score in basketball since it doesn't require much accuracy or skill. To do a proper lay up, first you must dribble towards the backboard. As you get closer to the backboard take 2 steps while carrying the ball in both hands. After the 2nd step, hop of the ground with 1 foot and gently release the ball from 1 hand. While doing a lay up, aim for the backboard or the hoop. While most players only do lay ups with their dominate arm, a skilled hooper masters the lay up with both arms. The main reason skilled players master the lay up with both hands is because it givers the player more scoring options. Instead of doing lay ups only from the right side of the hoop, you can do lay ups from both the left side and right side now.
But those aren't the only type of lay ups you can do. They're more advanced versions of a lay up. The first advance version of the lay up is the reverse lay up. According to Clive Grifford's book "Basketball" he says " A reverse is a lay up made from opposite side of the basket. It is trickier to master but is useful because the hoop helps protect your lay up from a defensive block". What this means is that the reverse lay up is harder to master since it involves more accuracy but it can be useful to protect the ball.


But basketball isn't just about scoring. To be able to score you must learn how to protect the ball from steals and to get past defenders. To do this you must learn how to dribble properly. My question you now is this. How would you use this advice and apply this to your hooping skills?


Improve your body for soccer

Having on field skill is great, but in order for your body to perform these tasks, you must be strong and in shape. In order to do so, you must workout and get stronger so you can power through contact from your opponents. Ace says "To be on your game all of the time, you need to make sure that you are getting in the right work outs" (McCloud). While I have played baseball my whole life, my idea of work outs consist of a lot of upper body and core work.

One workout Ace recommends to do is Power Jumps. "When you can do a powerful jump, you are getting some new effects on your leg muscles. You can work all parts of the leg with these jumps" (McCloud).

"Then use all of your might to jump as high as possible" (McCloud)
"Get into a half squat to start" (McCloud) 

I completed 10 sets of 20 reps each of this workout. Ace was right, these power jumps truly engage all of your leg muscles. Doing these types of workouts will surely add to your muscle strength and endurance, both of which will pay huge dividends on the pitch. What do you do to get stronger? Comment some workouts for the sport you play.

Natural Makeup Look P2: Eyes and Lips Makeup Masterclass

Hello and welcome back to my Makeup Journey! In my last post, I worked on part of of my natural look, doing the base of the look. In this blogpost, I will be continuing on from the base look and working on features such as my Eyes, Brows, Lips, Lashes, and more! These are the finishing touches that will make or break a natural look. these features all depend on color choice, if you use a color that does not fit your skin tone, your features will look to dramatic, and less natural. Today I will be using Jemma Kidd's Makeup Masterclass tips for olive natural skin.

Finished Brows
First, I began by working on my brows. Although I am not striving for a drastic 'Fleeky Brow' however, due to the fact that my eyebrows have a more arched and precise shape, they naturally do look very similar to the trend. for natural brows Kidd does not state to do much, simply stating to "Groom and Define the brows" so I just filled them in as I do naturally, filling them in with a KBeauty brow pencil filler, and then correcting any mistakes with concealer.

Then, I moved onto eyes, Kidd instructs to "subtly define the eyes with a blend of light shimmery beige gold and mushroomy brown powder eye-shadows. apply a wash of beige gold over the lid, then intensify the color at the socket and outer corner of the eye with a darker shade, blend well. Curl lashes and apply black lengthening mascara" I followed the eye shadow color chart for olive skin and then used her instructions to create the perfect natural eyeshadow look first priming my eyelids with elf primer and then using my ELF browns palette and my Blackheart palette , then finishing the eyes with the ELF fiberlash mascara.


Kidd's Natural Eyeshadow Chart
Finally I moved to lips. for lips Kidd instructs to "Keep lips moisturized and protected with a rose tinted lip balm. if using lipstick, use a darker nude which gives a light sheen of natural color." For my lips, I first applied a Chap-Stick Watermelon soft pink tinted lip Balm, and then decided to go with Jeffree Star Cosmetics Velour Liquid Lipstick in the shade 'Celebrity Skin' which in my opinion is the perfect natural nude for my skin tone as its a darker nude with a brown undertone. After applying my liquid lipstick my makeup look was complete!
Celebrity Skin in comparison to lip chart

Final Finished Product
Overall I think I did very well! Aside from the brows, which could use a bit of work, the look is extremely natural! using the shimmer in the corners of my eyes really gave a natural brightness into my eyes, and the nude lipstick is almost unrecognizable. I will continuing on with Kidd's instructions for a natural everyday makeup look for olive skin as the tutorial really did work! My question to you all is what feature do you think I could work on a bit more when doing natural makeup, and how should I fix it?

Natural Makeup Look P1: Base Look Makeup Masterclass

Natural makeup is one of the biggest mysteries out there, mostly because the term 'natural' is used very loosely. Natural simply means that no matter the amount of makeup you apply, you are aiming to look as if you are not wearing any at all. Today I have decided to use Jemma Kidd's Makeup Masterclass to help me achieve the perfect natural makeup look. This is part one of the look, where I will be working on the base of the look. Today I will be working on foundation, concealer, powder, blush, and more.
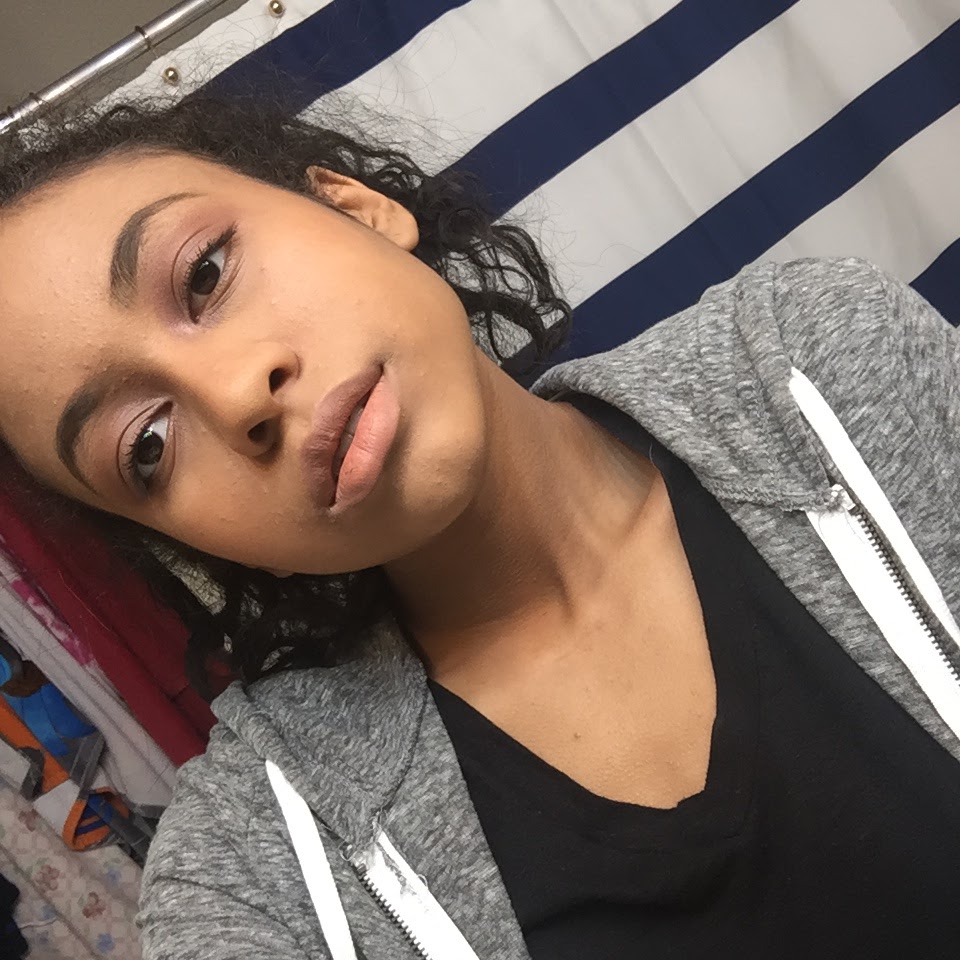
Before attempting this look, I would like to show how I have previously done natural makeup on myself:
As you can tell, the base is natural foundation/powder shade-wise, but the cheek area is very unnatural blush/contour wise.

For the base of the natural look you will need:
Liquid Foundation in your closest shade (When finding foundation, swatch off of the back of your arm rather than your hand, as it is closest to your skin tone)
Powder (translucent or foundation powder)
After
Color correcting concealer
Concealer a shade lighter than your skin tone (this is to brigten features)
Blush
Kabuki or Powder brush
Foundation Brush or Beauty Blender

NYX Color Correcting Concealer
To start off my base look, following Kidd's instruction, I began with foundation. When doing your foundation, Kidd states "Even out skin tone using either a light liquid foundation, or a mineral foundation if your skin is prone to oiliness." I used my Revlon '24Hr Colorstay' for combination/oily skin in the shade 'Toast.' This is the foundation I previously explained about in my last blog post, and it is mineral infused which is perfect for my skin according to Kidd. I used a 'Beauty Blender' to dab the product into my skin and blend. 

Next, I used NYX color correcting concealer. Color correcting concealer is green, to contrast redness on skin. Then I went over the green with regular concealer, as Kidd states "Hide any blemishes with dabs of concealer"
After blending


After application of blush and powder


 After applying concealer, Kidd instructs for olive skinned people that "if you've used a liquid foundation, set with a light dusting of translucent or foundation powder, then give the apples of the cheeks  a natural flush using a blend of soft peach and sandy beige powder blush." I used a foundation powder to set my makeup, and added a Peachy Beige LA Colors blush over top. Blending the powder with an ELF Kabuki Brush and an angled contour brush for Blush.

And with that, my base of the natural look was finished! overall I think it turned out well. There were many noticeable differences to my face, however they look very natural and are hard to pinpoint unless you had seen my face before the application! I also find this natural base to look much more natural and flawless than my previous natural makeup look that I showed in the beginning. Overall I have improved much more on my natural base and am very happy with the result! My question to you all is how do you think I did? what do you think I should do to improve my natural base?

Skin Care Makeup Masterclass

SKIN CARE AND PRODUCT USAGE

What comes on, must come off. Makeup is a great way to enhance your features, however it can be very damaging/harmful to your skin as well. To avoid this, you should attend to your skin before and after wearing makeup, by using skin care products. But with thousands of different products, comes the hard question of what skin care products do I personally need? Everyone's skin is different, so you must cater to your skin when choosing products.

My skin is oily, so I used Jemma Kidd's guidance on skin care products for oily skin. According to Jemma "Skin produces an oil called sebum, which keeps it supple and healthy and protects it from environmental aggressors. Overactive sebaceous glands result in greasy skin with larger open pores. it can be more prone to breakouts, as the excess oil blocks the pores and makes the surface shiny, which also makes it harder for some kinds of makeup to stay on." This explains why I tend to have more open pores, and am very prone to acne/breakouts as well as why my skin has a more shiny appearance.

First, I found a moisturizer that would cater to my skin. Jemma makes it clear on what type of moisturizer men/women with oily skin should use stating "Keep the skin hydrated as it will try to produce more oil if it feels dry. Use water based moisturizers or those formulated for oil control." After looking around at moisturizers I finally settled on one that I felt fit. I decided to purchase the Aveeno 'Positively Radiant Daily Moisturizer.' This moisturizer felt like the perfect fit as it is a water based hydrating moisturizer and it also includes Silica, which according to Kidd is a chemical that helps to absorb oil.
Next, I worked on finding acne products/face wash for my skin. when looking for face wash Kidd states "use an Oil based or water based cleanser to dissolve excess sebum... Avoid oil stripping products with a high alcohol content, these make the skin feel fresh short term, but are to harsh and will make the skin worse long term." The product I decided to go with for my acne, that would work with my oily skin was the Clearasil 'Ultra Rapid Action Face Scrub and 5 in 1 Pads.' These face washes are perfect as the wipes work to diminish oily skin, redness, acne, blackheads, and blocked pores. To simulate how the product works with oil, I put coconut oil onto my hand and then applied the products
Before cleaning
After Cleaning with rapid action 


 Finally, I purchased a foundation that would work to work with my skin, rather than fight it. once again I strived to find a foundation with Silica, and that was water based.  After looking around, I found the perfect one. I decided to purchase the Revlon 'Colorstay 24hr Oily/Combination Skin' This foundation is perfect as it not only is water based, but it also includes silica and minerals, which Kidd states "Mineral foundations are perfect for very oily skin, giving it a natural finish.

Now that I have the proper knowledge on skincare and the products that are right for me, I will continue using these in the future.
QOTD: What type of skin type do you have? what products do you use to cater your skin?
 - Rahzia Johnson


Receiving the Ball

On my quest to continue to grow my offensive arsenal, I came next to receiving and controlling a pass. You must have a good first touch to set the ball up in a spot where you can either dribble or shoot. Also, having a bad touch could lead to a turnover if the ball gets too far away from you.

As is the picture above, my touch pushed the ball away from me, and made it easy to steal. Ace McCloud says, "All players should be able to receive the ball with just one touch. Using more touches increases the time that the other player can catch up to you and take the ball away"(McCloud). This touch of mine caused me to use more than one touch to gain control. This simply would not do in a game time situation.

Now after some more reps, I started to get the hang of it. My first touch left the ball right next to my feet. With doing so, I am easily able to control possession. I could shoot, dribble, or pass to a teammate instantly, which is essential to correctly receiving a pass.

Passing and receiving the ball are two of the most quintessential techniques in the game. They are used constantly throughout a match but are not easy to master. It takes a lot of time and effort to perfect these moves, especially when preforming them at game speed. So what do you think? What are some tips for controlling the ball better? Should I receive a pass off of my chest, knee, or leg?

Felting With Phoenix - Part 5

My friends, the time has come: Today is my last and final post for this project. For the last creation of this blog, I made a chipmunk. I'm very excited to show you guys this project, as I feel like it was a good opportunity for me to put together all of the new techniques I've learned from my book, Little Felted Animals. I noticed my major problem with my past projects is that the proportions are slightly off, making them look less realistic. To combat that, I put extra effort into creating "each part, referring to [the] full-size parts diagram as a guide" (Nishida and Tomoko 66). I used a new technique from the book that I learned in my first project, using a wire base to give the animal mobility. Putting wire through the base of the tail allows me to bend it into any position for display. I also learned how to add additional wool around the joints when attaching the parts to create a smoother look (Nishida and Tomoko 66). After I created all of the parts with reference to the full size image, this is what my base looked like:
Next, it was time to add the patterning. I expected this to be quick but actually took a lot longer than anticipated. The chipmunk has a series of stripes in light brown, dark brown, and a creamy white. I used the technique of "punching" in the lines to create a smooth finish, avoiding any fuzzy wool strands sticking out. Finally, I got to the face. I used an awl to pierce holes for the eyes, then put them in. I didn't have big enough eyes to give it the look I wanted, so I just punched in some black wool around them to make them appear larger. I added some wool to make the cheeks poke out in the signature chipmunk look, and punched in some stripes and ears. Finally, my last creation was finished:


In retrospect, I wish the face looked a little more realistic to match the reference picture. Despite that, I think that the body looks good and I'm proud of the patterning. The shape of the tail actually makes it look more like a squirrel than a chipmunk, but I don't mind.
Now that I've finished all of my projects, what do you guys think? Have I improved at all since the beginning, and what could I do differently? Have you ever tried to felt something on your own, and if you haven't would you want to?

Citation: Nishida, Kyoko, and Tomoko Kodera. Adorable Felted Animals: 30 Easy & Incredibly Lifelike Needle Felted Pals. Tokyo: Tuttle, 2015. Print.

Difference Between Lefties and Righties

Lefty Curve
To me, being a lefty baseball player has always made me feel like I have a bigger advantage over the players who are right-handed. There are not as many positions that a lefty would recommend playing in the infield, but there are definitely positions that lefties have the upper hand in. As explained by Robert Adair, everyone knows that a right-handed batter has more trouble hitting off of right-handed pitcher, and lefties have more trouble hitting off of left-handed pitchers (71). I find it a lot easier to hit off of right-handed pitchers, and I usually feel uncomfortable seeing a lefty on the mound. I'm not exactly sure why, but seeing a left-handed pitcher forces me to think more than any other situation in baseball.
My left-handed stance
My right-handed stance


Recently, I switch off between swinging on my left and right sides, depending on the situation (right vs. left-handed pitcher). Most of my power comes from my left side because it's my most used/comfortable swing. But, against lefty pitchers, I have a better batting average when I swing in my right-handed stance. I never really understood why, until Adair explained it: "the left-handed and right-handed pitchers throw from different angles" (73). After reading about this, I wondered how I never thought about this before. To any type of batter, a left-handed pitch will move left-to-right and a right-handed pitch will move right-to-left. This clearly creates an advantage because it's a lot easier to see a ball that is coming towards you rather than starting towards you and drifting away.

A small portion of baseball players believe that right-handed and left-handed pitching has the same effect on the batter regardless of the hitter's stance. Do you think that there's an advantage in hitting between right and left-handed players?

Adair, Robert Kemp. The Physics of Baseball. New York: Harper & Row, 1990. Print.

Cooking: Mini Sausage Burrito


Today I made some mini chicken burritos, a great appetizer to have before dinner. First off, I cut the sausage up and fried it until it was light brown. After that, the book said to cut up the zucchini and fry it until it's golden brown on both sides (Williams 53). Using this zucchini instead of the classic lettuce adds a zesty flavor to the burrito. Then, you take the tortilla and cut it in half. After that, I built the burrito by putting on the sausage, zucchini, and shredded cheese on top, and folded the burrito. Afterwards, the book said to, "Put the burrito on a heated pan and warm it up for 1-2 minutes on both sides" (Williams 53). So I did that, and served the burritos. It was a simple, unique recipe and a really tasty dish. It's a perfect appetizer before any dinner and a good meal for beginners to make. What are some other vegetables I could add to the burrito in order to make it a little less bland?


Williams, Carolyn Land., and Rachel Quinlivan. The Ultimate Kid-approved Cookbook: Delicious Food Kids Will Eat, Nutritious Meals Mom Will Love. New York, NY: Oxmoor House, 2011.

3-D Geometric Origami Post #5

Nathan Cho
Geometric Origami #5

For my last post I decided to make a Three-Loop Cubohedron. Personally the piece seemed really easy until it came to assembly which was the most difficult and confusing part of the piece. The books says "When reading a step of the diagram you must pay careful attention to all of the information in the step" (Gurkewitz and Arnstein 10). The way the book usually shows directions that are pretty easy to follow but this piece got pretty confusing towards the end. A quick note all  make before going into how to  make it, the module pieces are fold the exact same way as my very first piece, the Puzzle Cube.

Step 1: You're going to want to start with six of the modules used to create the Puzzle Cube
 Step 2: Next, you're going to want to connect two modules by unfolding the center of the piece and put the point of another piece into the center of the open module and fold it closed. Connect four of them to create a circle and connect the remaining two together.
Step 3: For this step you're going to collapse all the triangles inbetween the diamond patterns on the circle and other piece.
Step 4: The assembly process of both parts isn't easy to describe but one tip i have is to make a a triangle with three of the diamonds like shown in the picture below.

Notes:
I definitely think the easiest part was creating the modules because of how i had already made it before. Without a doubt the hardest part of this creation is that the assembly. Not only is the assembly process awkward and difficult but the instruction are pretty vague and unclear.

Question:
So when the instructions to something aren't clear do you try to decipher the directions or do you go on your own trying to do it you way? 


Cooking: White Spaghetti


Today I made some white spaghetti with chicken on the side, one of my favorite meals for dinner. First off, the book said to boil the spaghetti in water for 15-20 minutes (Williams 72). Then, after I did that, I drained the water and put the spaghetti in a bowl. Finally, the book said, "Grind 1/2 a pound of feta cheese on top of the spaghetti and stir" (Williams 72). That gave the spaghetti a nice, cheesy flavor. I then added some chicken wings on the side for a more fulfilling dish. Overall, it was a fairly simple recipe and easy to make. Even with the simplicity, it was still very delicious. What are some other dishes to make with feta cheese as a main ingredient?


Williams, Carolyn Land., and Rachel Quinlivan. The Ultimate Kid-approved Cookbook: Delicious Food Kids Will Eat, Nutritious Meals Mom Will Love. New York, NY: Oxmoor House, 2011.

Cooking eggs

Eggs were always a breakfast that I really enjoyed, but didn't really know how to cook. Luckily, this cookbook taught me the ways! First off, the book said you have to put one tablespoon of olive oil on the pan and spread it (Williams 26). So that's what I did, after I heated up the pan. After that, I broke the egg by hitting it on the side of the pan and put it in. Next, the book said, "Put a pinch of salt and pepper to the eggs" (Williams 26). So I did that to add that bit of flavor so the eggs wouldn't be so bland. Furthermore, I added a slice of toast with cheese on the side to make the breakfast more fulfilling. What's your favorite side dish to go with eggs?


Williams, Carolyn Land., and Rachel Quinlivan. The Ultimate Kid-approved Cookbook: Delicious Food Kids Will Eat, Nutritious Meals Mom Will Love. New York, NY: Oxmoor House, 2011.


Origami Rose

Since this is my final post, I wanted to try a particularly tricky origami. I picked the rose since it not only look complex, but it also required attaching multiple parts with difficult folds.

The piece started off with making six of the same piece. This starts off by folding the paper in half diagonally and then to fold it corner to corner to create a crease.

The next fold is to fold the triangle corners against the crease I just created. Since this is a fold that typically ends up messy for me, I turned to the beginning of the book to see if there was a trick that could help me. The books says "hold the corner in place with your left forefinger and make the crease with your right thumb" (Nakano 6). I'm glad to say that my fold turned out significantly cleaner than it was previously. 
The book then says to "overlap the two front flaps and glue them together" (Nakano 57). 
I repeated this five more times as stated by the book to not only have everything ready for the next step but to also let the glue dry for each piece. 
Once every piece was dried, I folded the overlapped corners forward as instructed by the book (Nakano 57).
I then glued the sides to each other as shown in the book. However, I ran into a problem with gluing as I used liquid glue as well as the fact that I did not wait for the glue to dry because I wanted to just glue it all at once. I also felt that I did not understand the diagram well as the folded corners got in the way when I tried to attach it all. I guess it was a little too complex for me.
The final product doesn't look the best. I'd like to be able to create a vase of origami flowers. So, is the any other way to fold the rose origami or just any other flower origami, that anyone knows of? 

Setting Up for the future (post 5)

So as this is my last post I thought I should reflect on the progress I've made over this time period while also showing what I'm going to do following this.

The best way to show the improvement I've made is through not only my pure times but also through the swim diary that Salo had talked about keeping. This shows more of the statistics that are all extremely important to how I ended up getting the time I got.

Displaying File_000.jpeg
(The Top is the current and the bottom is the original)

Now I went back to the book to try and figure out where exactly I should go from here. What I found where I should go from here is what Salo calls Period swimming. Salo explains it as, "the scientific and systematic process of designing a season by breaking it into various phases" (Salo 185). He then goes on to explain what explains the phases are. First you would start off your season off with preparation and training then moving on to build stroke specific strength. Then you should finish that phase in time for your big competition part of the season and once that ends spending some time with rest and recovery. (Salo 186).

So what I'll do now is talk to my coach about how we can work in the sets and training I've learned in to book into our actual practice. The final question I really have is whether or not you have noticed these four phases in some way in your sport season?

Decorating with Many Techniques - Post #5

For my final post I thought that I should include some color to my cupcakes. To add color I used four different colors to make a swirl frosting. I did three different designs for my cupcakes this time. The first design I did was a swirl. In this design you need a piping bag with a large nozzle tip or plain nozzle tip (45). To start the design you have to start from the outside edge and slightly lift the piping bag in a circle. This technique is amazing for the swirl frosting as well. This really brings out all the colors in the frosting. The next design that I did was the rosette. In this design you need a star nozzle for the piping bag. To make a rosette you have to squeeze the icing onto the cake and pull up sharply to break the icing (45). For all these designs you need to keep your hand very still. I made a couple of mistakes from moving too quick and not pulling up sharp enough. The last design I did was the blobs which need a plain nozzle tip for the piping bag. According to the book, "it's easiest working in ever-decreasing circles" (45). This design does not sound flattering at all but it is quite unique. It looks as if you put a lot of time into it, even though it was the quickest design that I have ever done. This design is very simple but can look effortless if you make the design the correct way.


Do you think by mixing the colors for my frosting that it made the cupcakes stand out more even with simple designs?

First Cake Decorating: Simple Cake Designs for Beginners. London: Collins & Brown, 2014. Print.