Showing posts with label Cake Decorating. Show all posts

Sunday, January 29, 2017

Decorating with Many Techniques - Post #5

For my final post I thought that I should include some color to my cupcakes. To add color I used four different colors to make a swirl frosting. I did three different designs for my cupcakes this time. The first design I did was a swirl. In this design you need a piping bag with a large nozzle tip or plain nozzle tip (45). To start the design you have to start from the outside edge and slightly lift the piping bag in a circle. This technique is amazing for the swirl frosting as well. This really brings out all the colors in the frosting. The next design that I did was the rosette. In this design you need a star nozzle for the piping bag. To make a rosette you have to squeeze the icing onto the cake and pull up sharply to break the icing (45). For all these designs you need to keep your hand very still. I made a couple of mistakes from moving too quick and not pulling up sharp enough. The last design I did was the blobs which need a plain nozzle tip for the piping bag. According to the book, "it's easiest working in ever-decreasing circles" (45). This design does not sound flattering at all but it is quite unique. It looks as if you put a lot of time into it, even though it was the quickest design that I have ever done. This design is very simple but can look effortless if you make the design the correct way.


Do you think by mixing the colors for my frosting that it made the cupcakes stand out more even with simple designs?

First Cake Decorating: Simple Cake Designs for Beginners. London: Collins & Brown, 2014. Print.

Wednesday, January 11, 2017

Decorating with Many Techniques - Post #4

For this next technique I will be making simple designs. I am using a piping bad with a plain nozzle. This is a good choice if you want simple lines or dots. I am making beads that need icing of slightly softer consistency so there are no sharp points of the end of the beads (64). I feel the best type of frosting is a whipped form. Whipped icing is much softer and easier to work with when making simple designs.


At first I was having a hard time with the beads at the ending of the chain. The bead at the end had a sharp point and I couldn't figure out why. At the end of the paragraph the book states to, "smooth off the beads with a damp finger if necessary" (64). That helped majorly with my third try at making the chain of beads. I noticed also that I needed to pull up more sharply to break the icing completely. With both of those suggestions, the beads turned out very good in my opinion.

Do you think that more simplistic designs are as eye catching as more difficult designs?

First Cake Decorating: Simple Cake Designs for Beginners. London: Collins & Brown, 2014. Print.

Sunday, January 8, 2017

STEP-BY-STEP Cake Decorating Pt. 5 -- Ritu Buttar

Decorating Cakes
For my fifth and final blog post I decided to decorate another Bundt cake using 4 different piping techniques. At first I messed up my design using royal icing because the cake was too warm, but then I tried to cover it up by using whipped cream icing techniques.
"This trend is possible thanks to the multitude of tools and specialty ingredients that are now available, and the help of decorating classes, blogs, websites, online videos, books, and programs that are devoted to the subject" (Sullivan). So many more people are entering the art of cake decorating because of all the resources that the world has made available. There are so many ways to learn how to decorate cakes on the internet and in libraries. For this blogpost I made royal icing and whipped cream frosting.
Ingredients:
  • 3 large free-range pasteurized egg whites
  • 1 tsp lemon juice, plus extra if needed
  • 6 cups confectioner's sugar, sifted
  • coloring paste, optional
(Sullivan 35)
The next type of frosting is whipped cream frosting which is a lot lighter than buttercream, it is also easier to pipe with. This recipe wasn't in my book but it still tasted great.
Ingredients:
  • 1 pint heavy cream, well chilled
  • 1 cup sifted icing sugar
  • 1 teaspoon vanilla
Directions:
  • Beat the heavy cream until it becomes frothy
  • Add the icing sugar and vanilla
  • Turn the mixture of hand held beater on high speed until the frosting becomes thick.
The first frosting I used was royal icing to decorate my cake. I attempted to do "Filigree" piping - "This delicate piping work is created with a small writing tip and long piped lines of random patterns. Dust with luster dust to highlight" (Sullivan 81). As I tried to do this, my frosting melted because my cake was too warm, so it was a fail.

After my royal icing failure I decided to use whipped cream frosting. I used three different piping techniques. The first one was a do
t border - "Create a row for symmetrical dots or beads with a medium round tip" (Sullivan 77). This is the easiest decoration because all you have to do is apply a little pressure to make dots.
 

The second technique I used was a pulled bead border - "Use a medium round tip to pipe beads and then slowly release the pressure as you drag each bead" (Sullivan 77). I had previously done this and it wasn't very hard, as it is kind of like connected the dots.
The last technique I used was a draping technique - This is where I basically made "drapes" with my frosting (Sullivan 82). I didn't really do a good job, but for my first time I think it turned out okay.

Overall I think that my decorating skills definitely improved from when I first started. I learned a lot more about the various techniques there are and how to make frosting from scratch which most benefitted me because store bought frosting is always too sweet. I will still try to improve my decorating skills with piping whenever I bake other things.

Which of my cake decorations were the best?
Sullivan, Karen. Step-by-step Cake Decorating: Hundreds of Ideas, Techniques, and Projects for Creative Cake Designers. London: DK, 2013. Print. 


Sunday, January 1, 2017

STEP-BY-STEP Cake Decorating Pt.4 -- Ritu Buttar

Cake Decorating
I decorated cupcakes for my fourth blog post, using the star tips. I think it turned out okay, but I would definitely stick to regular cakes since you can just do much more on a bigger surface.
"We are no longer afraid to bake, and our creations are becoming more sophisticated and adventurous as time goes on" (Sullivan). As time goes on people are learning how to add their own unique touch on things, exploring what they can do in the world of cake decorating. For this attempt at cake decorating I used Italian meringue buttercream frosting and chocolate ganache.

Ingredients: Italian meringue buttercream
  • 5 large free-range pasteurized egg whites
  • 1 1/4 cups granulated sugar
  • 2 1/4 cups unsalted butter, softened
  • flavoring, optional
(Sullivan 26)
Ingredients: Chocolate ganache
  • 3/4 cup heavy cream
  • 7 0z (200g) good-quality dark, milk, or white chocolate, broken into pieces
(Sullivan 38)
Directions:
  • Put the broken chocolate and heavy cream into a pot.
  • Put the pot on the stove and stir over low heat
  • Let cool for 1-2 hours before spreading
(Sullivan 38)

First I spread the ganache on the cupcakes and then started piping stars on the cupcake - "Create Individual stars (below) or link them together as a border, using a medium open-star tip" (Sullivan 76). It was really easy to get the hang of piping stars, since the tip is so easy to use.
I also attempted to do the Rosette technique - "Use a medium open star tip to swirl tiny rosettes that can be linked or used individually. I tried to do a really big Rosette in the middle of my cupcake, and it didn't really turn out well. Instead it turned out looking like a swirl.


All in all I think that I'm going to stick to decorating cakes because they are easier to decorate since they have bigger area for decorating.

What are some themes that I could base my decorating on?
Sullivan, Karen. Step-by-step Cake Decorating: Hundreds of Ideas, Techniques, and Projects for Creative Cake Designers. London: DK, 2013. Print.   


STEP-BY-STEP Cake decorating Pt. 3 -- Ritu Buttar

Cake Decorating
For my third blogpost, I decided to switch things up and decorate a Bundt cake. The simple design I made turned out great.
"Some techniques are simple, others require practice" (Sullivan). This book shows the reader how to create easy and simple designs which the reader can master through time and practice. It offers many piping techniques which I found to be very useful in cake decorating. For this blogpost I made Italian meringue buttercream and used it to decorate my cake.
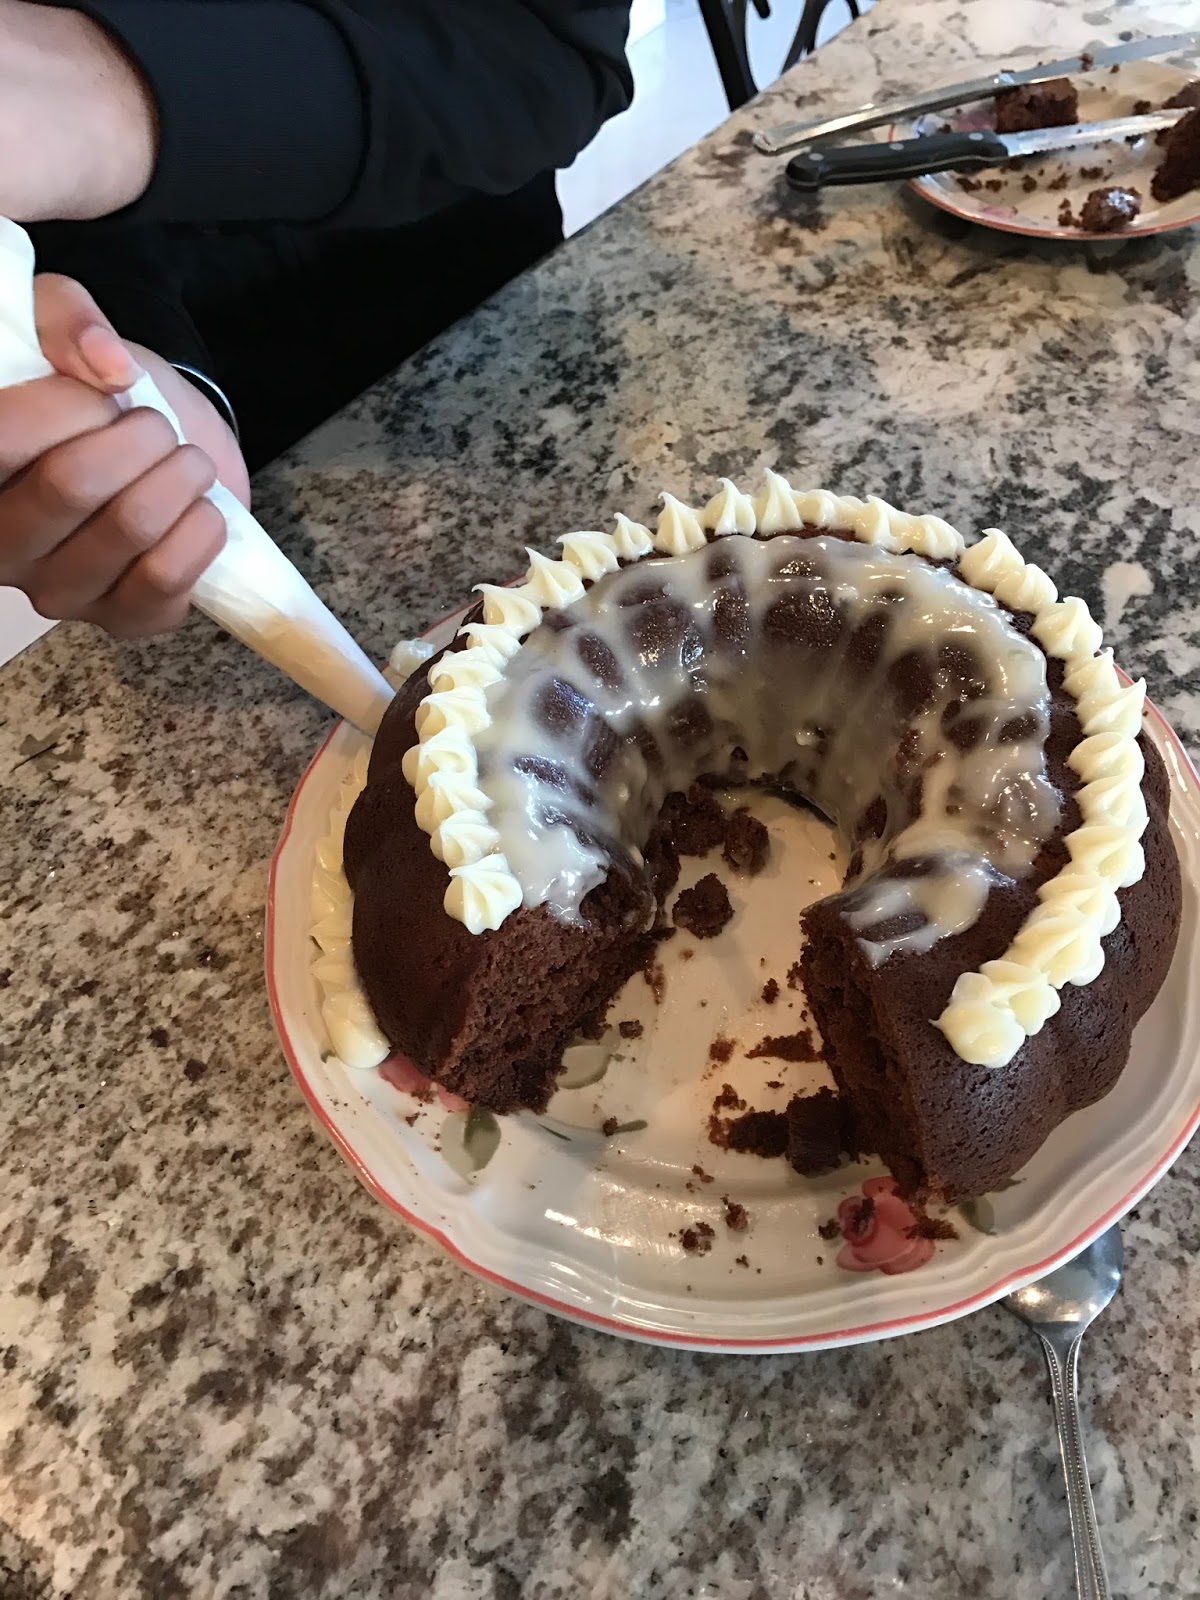
Ingredients
  • 5 large free-range pasteurized egg whites
  • 1 1/4 cups granulated sugar
  • 2 1/4 cups unsalted butter, softened
  • flavoring, optional
(Sullivan 26)


 After I made the buttercream, I warmed it up in the microwave to make it a little thinner and easier to work with. At first I spread buttercream on the inside of the Bundt cake to make sure it was evenly distributed. I then used a star tip to start piping star borders on both the bottom and top of the cake - "Create Individual stars (below) or link them together as a border, using a medium open-star tip" (Sullivan 76).
 

Overall it think this simple design is suited for every occasion and turned out really well. I think that this cake decoration helped me improve on piping, especially with star tips.


What other piping techniques should I try?
Sullivan, Karen. Step-by-step Cake Decorating: Hundreds of Ideas, Techniques, and Projects for Creative Cake Designers. London: DK, 2013. Print.   


Thursday, December 29, 2016

STEP-BY-STEP Cake Decorating Pt. 2 -- Ritu Buttar


Cake Decorating


I decided to use a Christmas theme for my second attempt at decorating a cake. It turned out a lot better than my first try.


"Like all skills, cake decorating can take some time to learn and a little patience to master" (Sullivan). There is always room for improvement because things take time to master. The main goal of these blog posts is to show improvement through time. This blog will be showing people how I used techniques from Sullivan's book, to create my own design. I will be working with buttercream frosting to decorate my cake.


Ingredients
  • just over 1 cup unsalted butter, softened
  • 2 tsp vanilla extract
  • 3 cups confectioner's sugar
  • 2 tbsp. heavy cream or milk, plus extra for thinning
  • 1/2 cup cocoa powder
  • coloring paste, optional
(Sullivan 24-25)


If you do not have a piping bag, I showed how to make one out of parchment paper in my last blog.


In my decoration I used the Pulled Bead Border - "Use a medium round tip to pipe beads and then slowly release the pressure as you drag each bead" (Sullivan 77). Piping the border was a lot easier than I expected it to be.


 I also used the Ruffle effect - "Use a medium petal tip, dragging the frosting back on itself and then forward again" (Sullivan 77). This was a little harder and didn't look like ruffles at all, but there's always room for improvement.


Lastly I just added some of my own decorative snowflakes to complete the cake and add some sort of Christmas theme to it.


Overall I think my cake turned out good, and looked a lot better than my first attempt at cake decorating. I will keep trying to improve my cake decorating abilities, so it will soon look great.


What could I improve on my decorations?
Sullivan, Karen. Step-by-step Cake Decorating: Hundreds of Ideas, Techniques, and Projects for Creative Cake Designers. London: DK, 2013. Print.   

Friday, December 16, 2016

Decorating Cupcakes with Many Techniques - Post #3

For this post I will be doing something very different from my other posts. I will be doing an extra step before I frost my cupcakes. Before icing them I fill my cupcakes with extra icing. To do this you need a piping bag with a plain nozzle tip (44). Then, using that piping bag with the plain nozzle tip, you squeeze the frosting into the cupcake.


Next, I did a simple flower design on the cupcakes. Since elegant type of designs are my favorite, i made it look quite elegant and neat. According to Collins and Brown, "the icing on the cupcakes is almost as important as the cake underneath it" (44). I definitely agree with this statement. If you decorate a cake and the cake underneath it isn't nice, the whole pastry is ruined. I learned this a while back when i first started to bake. It helped a lot when it came time to actually decorating the cakes.


Do you guys agree with the statement about the icing and cake?

First Cake Decorating: Simple Cake Designs for Beginners. London: Collins & Brown, 2014. Print.

Wednesday, December 7, 2016

Decorating Cupcakes with Many Techniques - Post #2

Decorating pastries is a relaxing hobby that I enjoy a lot. There are so many techniques and tools to help you with decorating. There are also so many designs that you can create. I will be using many piping designs for this post. To first create piping designs you need disposable piping bags with different shaped tips to use. Next, you need icing that is not too stiff nor runny to help with controlling placement (63). The tips for the piping bags I used are the plain tips and star shaped tips. The plain tips are used for lines and simple designs and the star shaped tips are for more complex designs like flowers.


After baking the cupcakes, I let them cool down for about 10 minutes. Then, I put chocolate frosting in the piping bags to decorate. I used three different tips. I used a plain tip, a star shaped tip and ribbon nozzle tip. To create most of these designs you need to hold the piping bag at an angle.


To make simple lines, the book recommends, "Holding the piping bag at a 45-degree angle and 5mm above the surface, then pipe towards you, securing the beginning of the line to the surface with a little pressure" (64). At first, I had a hard time trying to make the endings of the lines sharp and clean. But I noticed that holding the piping bag at an angle really helps with the precision of where the frosting is going to begin and end.


The last design is the flower (rose) design which uses the star shaped tip. To make this design the book suggests to, "Press out some icing to the size of the rosette you want, lifting the bag slightly to give the rosette space (64). By lifting the piping bag, it gives the flower a more realistic look to it. My favorite design was the flower. It makes the cupcake look very elegant.

Question: What other techniques should I try to make the pastry look elegant?

First Cake Decorating: Simple Cake Designs for Beginners. London: Collins & Brown, 2014. Print.

Tuesday, November 29, 2016

Decorating with Many Techniques - Post #1

Making pastries has been a part of my life for a while. Ever since I was young, I have made cakes, cupcakes, pies, and more. I used to watch my grandma in the kitchen make cakes and she would let me help her. Ever since then, I have loved to make pastries. Something that is even better than making pastries alone is decorating them. Cake decorating has changed so much over the recent years and there is so many thoughts you have to put into it like the type of cake, the size of the cake, the flavors of the cake and icings, and so much more (6). That is the joy of making pastries. There is so much you can do with baking. That is why I enjoy it so much.


The technique I used here is called feather icing. This creates an elegant look on cupcakes. The icing I used here is called glacĂ© icing. This icing is very thick and leaves a shiny effect after the icing dries. To make this effect on the cupcakes, this book suggests, "Draw a cocktail stick or fine pointed knife through the piped icing in one direction and then in the opposite direction to create the feather pattern. Work quickly or the icing will form a skin and set before the pattern has formed" (69). The first cupcake I decorated looked a little messed up because I didn't work fast enough like the book stated. In the picture the person was using a toothpick, but I didn't have a toothpick so I used a small knife.

Question: What kind of pastry should I decorate next? What kind of decorations should put on it?

First Cake Decorating: Simple Cake Designs for Beginners. London: Collins & Brown, 2014. Print.                         


Monday, November 28, 2016

STEP - BY - STEP Cake Decorating -- Ritu Buttar


Decorating and Filling Cakes

Ever since I was little, I loved baking and helping my mom decorate cakes. I would watch "Cake Boss" every night and watch how Buddy would decorate his cakes so nicely, which is why I chose to do cake decorating. In this blog I will be showing my step-by-step processes of filling and decorating a cake.


"CAKE DECORATING has enjoyed a huge surge in interest over the last few years, with enthusiastic beginners creating celebration cakes, exquisite cupcakes, and perfect cake pops in their own homes" (Sullivan 7). Spectacular designs can be created right in your home. Once you learn some of these basic decorating techniques, you won't need a store bought cake to fulfill your needs. This blog only explains how to decorate a cake, so make sure you have baked a cake before hand.


The first step is to prepare the frosting. The first type of frosting we will be preparing is buttercream frosting. It is fluffy and not too sweet, perfect for filling a cake.


Ingredients

  • just over 1 cup unsalted butter, softened
  • 2 tsp vanilla extract
  • 3 cups confectioner's sugar
  • 2 tbsp. heavy cream or milk, plus extra for thinning
  • coloring paste, optional
(Sullivan 24)

The next type of icing is royal icing, which sets to be a little stiffer than buttercream icing. It is really good for decorating cakes because the icing will stay put, it won't smudge. It also tends to be sweeter than buttercream frosting.


Ingredients
  • 3 large free-range pasteurized egg whites
  • 1 tsp lemon juice, plus extra if needed
  • 6 cups confectioner's sugar, sifted
  • coloring paste, optional
(Sullivan 35)


How to make a piping bag
  • Using a piece of parchment paper, fold the lower corner of the parchment paper upward so that it is folded in half diagonally. Run your finger along the fold.
  • Fold over the whole of top folded section without creasing it, rolling it over until you have a cone shape.
  • Fold the bottom of the folded section around the outside. Using your hand, expand it out, and then secure with a little masking tape.
This tip came in handy because I did not have any piping bags and didn't want to bye them at the store. It is a quick and easy way to make your own piping bad at home!

(Sullivan 73)


Directions for filling the cake (with buttercream frosting):
  1. Place the base layer of your cake and a board on a turntable, leveled side up. Fill your piping bag with frosting and pipe around the inside edge.
  2. Using a spoon, place a large dollop of frosting in the center and spread to the edges with a palette knife, until smooth.
  3. Place the next layer of cake on top of the cake you just filled.
  4. If you want more layers just repeat steps 1-3.
(Sullivan 28)

Directions for decorating the cake (with royal icing):
  1. Fill the piping bag with royal icing.
  2. Hold the bag in your dominate hand between your thumb and first two fingers. Be sure to hold the bag steady with your other hand.
  3. When the tip touches the surface of the cake, gently squeeze out the icing.
  4. Even pressure is crucial, so make sure that you have control over the icing.
  5. When you have finished piping a certain decoration or line, gently pull the tip away form the surface, letting the icing fall
(Sullivan 75)


Once I finished decorating my cake I put it in the refrigerator to cool, it turned out okay. Overall I think that I just need to work on designing my cake a little better, and being more creative. The frosting surprisingly tasted great and so did my cake. I strongly recommend these recipes and baking tips.

What kind of other cake decorations should I do next time?
Sullivan, Karen. Step-by-step Cake Decorating: Hundreds of Ideas, Techniques, and Projects for Creative Cake Designers. London: DK, 2013. Print.