Mecha Model Guide for Beginners, Derick Siu
So, let's say that you've finished assembling your very first mecha kit. You're really happy that you put so many hours, or even days, into carefully building it. You just can't wait to pose it and show if off, right? Well... building the kit itself was only the first step of making your kit. There are still a couple more steps until the model is considered to be "finished" in the public eye. Depending on your how you want your mecha to look, you can stop right after building the robot and just showcase it or go on and put more work into it (either is fine, really).
During the build process, you've most likely had encounters with stickers. They're usually applied for the sensors (eyes) and various armored parts. When putting these on, you were hopefully careful and thrived to get the best fit possible. During this process, you must've adjusted the stickers, applied them again and again, and rubbed them down to make sure there were no bubbles. This may have been frustrating but I'm about to show you something possibly even worse than stickers.
Now introducing... DECALS! These are similar to stickers but are smaller in size yet bigger in quantity. Decals tend to be small prints placed all over the mecha, usually consisting of caution signs or logos for the mecha's pilot. Yes, these are very small details but once you apply all of them, the realism and appearance of the mecha really just pops afterwards!
Now before I continue, I want to mention that there are two types of decals. There are waterslides and dry transfer decals, both of these tend to be very frustrating since there are a ton of them and they're extremely small (as mentioned before). Due to these conditions, they take a considerable amount of patience and precision. Understand that you don't need to apply all of these, only do the ones you want!
 |
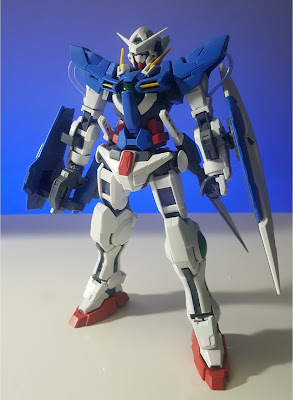
| Fully built MG Gundam Exia model kit with no decals |
Rather than using personal methods, I'll be using those in the book, Mecha Model Guide by Derick Siu. Starting off with waterslide decals, the process of applying these decals tend to be easier (in my opinion) when compared to it's dry brother. In order to do this, you need to first cut out the decal you want from the sheet full of waterslides. From there, you "submerge the decal in warm water for 30-60 seconds." (Siu, 77) Doing this will loosen the bond between the decal and the backing paper, allowing you to put the decal on to the plastic. After removing the decal from the water, you use a toothpick to hold the decal in place and lift the backing paper from underneath the decal. Now that the decal is on the kit, you can reposition it with the toothpick. Don't use too much force, as it may rip or damage the decal! Once you have the decal positioned the way you want, you use a Q-tip or any other similar thing to absorb the soak up the excess water from the surface of the kit and decal.
As for dry transfer decals, application is not as time-consuming but can be much more stressful. When you have dry transfers, you have a paper sheet separate from the sheet full of decals. This prevents the decals from transferring to any surfaces unintentionally. You're going to want to keep this sheet behind the decals until you're ready to transfer them.
When you use dry transfer decals, you start out cutting a decal as you would with a waterslide decal but just leave a little space around the decal itself (it's OK to cut into the paper behind it too). From there, you lay the decal onto the kit. Line up the decal to where you want it on your part, making sure that it's straight. Then, you take two strips of tape to keep it secure.
From here, you apply the decal. This step is basically just rubbing the decal onto the kit with a coin of any kind. Derick Siu explains, "Rub the decal firmly with a coin. You will be able to see the color of the decal changing slightly as it transfers from the plastic sheet to the Gunpla piece." (Siu 77). The process is simple yes, but you only have one shot at this. If you maybe already applied the decal yet have it off of where you wanted it to exactly be, you can't really fix it. Some sheets come with extra decals for the smaller ones, which is real handy!
 |
| The same MG Gundam Exia model but WITH decals |
The results after applying decals to a model is astonishing in my eye! Although I made a ton of mistakes here and there, but I personally enjoyed the end result and think that some of the time and effort was worth it (since my kit only consisted of dry transfer decals)! My question to any other model kit builders is do you personally like to add decals to your gunpla? As for those who don't build, do you think the process is worth it?
Siu, Derick, Mecha Model Guide for Beginners (Volume 1), CreateSpace Independent Publishing
Platform; 1st edition, 2013
No comments:
Post a Comment