Showing posts with label tips. Show all posts

Monday, January 29, 2018

Building Mecha Kits: Topcoat

Fadila Soehedi
Mecha Model Guide for Beginners, Derick Siu

If you've been keeping up with my blog posts until now, you can hopefully tell by now that we're almost finished with the process of building our figure. I've already built the model, put on decals and stickers, and weathered it. By now, it looks almost ready to display! All we need is a little cherry on top that actually isn't a cherry... It's just a top coat for your gunpla.

What exactly is a top coat? A top coat is basically an extra layer of clear plastic you apply to your model to protect its decals and weathering affects since these can easily rub off. There are three types of top coats, that being a gloss, semi-gloss, and flat clear coat. These can "dictate the final look of your kit and ultimately affect your overall presentation of it" (Siu 42).


Flat clear top coat spray can
The differences between these three top coats are very basic and self-explanatory. Gloss being a coat that gives a smooth and shiny surface, mostly being used for car and motorcycle models. Semi-gloss gives your model a look that's neither dull nor shiny surface, it's somewhere between there. Finally, a flat coat gives your model a rough surface with no reflections of any sort, these are mostly used with military models. These can all be to top off a gunpla, but the most commonly used ones are the semi-gloss coat and flat coat.


Comparison of different top coats on spoons on pg. 42
Gloss (left), semi-gloss (middle), and flat (right.
Before applying a top coat, you must be aware of the hazards that the substance holds. First, it's extremely flammable, you'll want to be in a well ventilated area that's dry yet slightly cool. Second, there's an abundance of chemicals in it, be sure to avoid any contact with skin and do not ingest or inhale the particles! With these in mind, please be careful when handling and be mindful of the precautions you should take.


Relative distance of how you should spray your kit
(featuring: my hand)
When you apply a top coat, you'll want to spray the front, back, sides, top and bottom of the model with the coat of your choice.  You'll want to apply a coat to every side about 3 times with 5 minutes of drying for each coat so keep in mind how much you'll be spraying. Doing this will ensure a solid barrier of protection for the plastic as well as make the effect of the coat more visible.
Be sure to shake the can before you spray! While spraying, you'll want to spray as if you're simply spray painting something... If you haven't done anything like that, Derick Siu helps by explaining that, "a suitable distance for spraying is 6-10 inches. Slowly move the can horizontally across the model, releasing the nozzle once you have fully passed the piece" (Siu 53). Spraying in this manner evenly spreads the particles coming from the can, avoiding bubbles and dripping. 

When you're finished applying the coats, you will want to give it about 24 hours to cure. The ending result should be a marvelous and detailed intergalactic military-grade battle robot thing that's been shrunken down into a mere figure that YOU made! With the top coat sealing the deal, you're now completely finished with your model kit! As for me, I think my model turned out really nice seeing how I used methods from the book and a little background knowledge. I've certainly picked up a thing or two from the book that I'll most likely be using in the future.

What do you think? Is all the time and effort required to build a decent-looking gunpla really worth it in your eyes? Please give me some insight to help me determine if I'm using my time wisely or not!

Siu, Derick, Mecha Model Guide for Beginners (Volume 1), CreateSpace Independent Publishing           Platform; 1st edition, 2013

Saturday, January 27, 2018

Stretching for Aerials blog post 5

          Hello! Thank you for coming back to my blog. This will be my final blog post! For my 5th blog post I'm not focusing on how to do my aerial, I am showing stretches recommended by Jeff Savage from Gymnastics Skills, Tips, and Tricks. It is a given that flexibility is very important in gymnastics, It's also very crucial you stretch to keep your flexibility also warm up your muscles so you don't pull one.
          Stretching is a key factor to be able to do tricks. You want to spend plenty of time stretching so your body can form in many ways. The reason I wanted to focus on stretching was because I know it is important, but I never stretch before doing tricks. Since I have been able to do most of the tricks I know for a long time, I don't feel the need for stretching. I am interested to see if stretching before doing my aerial would change and make doing aerials easier. Jeff Savage talks on how you must warm up first (Savage 42). Savage has many good ideas for stretching and warm up. He started off by saying "You need to get your heart pumping and blood flowing. Warm up with some jumping jacks or a light jog around the gym" (Savage 43). I used Savage's idea by doing 50 jumping jacks. This really got my heart racing and ready to stretch. Savage talks on how you must do splits, lungs, and neck rolls (Savage 43). Jeff Savage specifically explains how to do one of theses stretches by saying "Take a wide stance. Reach down and touch the floor" (Savage 43).  For stretching, I did that as well as all splits, rolling my neck and back stretches. While reading and analyzing the quotes, I was guessed these ideas would help me get over better in my aerial. After stretching, I was ready to try doing an aerial. 


          After stretching I tried doing an aerial and honestly there wasn't an aerial and honestly there wasn't a difference. I still got over perfectly fine, but not any better. Even though it didn't change my aerial, I decided I am still going to do this before I flip. The stretching felt really good and can help prevent from injury. Also stretching can help you from not being sore the next day which i like a lot! From past knowledge, I know stretching before and after you workout or do any physical activity is key for preventing soreness. Along with drinking water and coconut water. 
          I would like to thank you all so much for tuning into my blogs! It has been very fun sharing my passion for dance and gymnastics with you all! Thank you again for following me on this journey!

What tricks can you do? What's your favorite stretch?

Savage, Jeff. Gymnastics Skills, Tips, and Tricks. Enslow Publishers, Inc., 2012. 

Wednesday, January 24, 2018

Building Mecha Kits: Weathering and Battle Damage

Fadila Soehedi
Mecha Model Guide for Beginners, Derick Siu

Throughout my years of building gunpla, I've always been conflicted with how I showcased my figures. After building them and throwing on all the stickers, I would always try to pose the figure to try and tell a story. Of course, these robots were found as fighting machines, so I had to make it look as if it just finished a battle or is in the middle of one. But, no matter how much depth I tried to put into the gunpla, something always felt off...

Now, these were MASSIVE fighting machines about 20 meters tall fighting on Earth or in space. They had monster swords, guns, lasers and more, the robots could really cause some damage! How could small, shiny plastic figures be seen as battling robots? Thinking about this, I realized what I was missing; battle damage and weathering. These are small indentations in the armor or frame to represent scratches, bullet holes, and such. Weathering made a gundam look as if it's old or has been used, showing rust and dust on the mecha. These small details in the surface and color of the model could really say something! I wanted to make them look like they were giant defenders shrunken down into a small figure, not some plastic toy.

Fitting a giant robot into a small form factor is already difficult enough, but fitting in all the details is worse. Gunpla, or mechas, tend to range in size and detail (smallest having the least amount of detail and functions). When I put signs of damage on the gunpla, I have to keep in mind the scale I'm working with. I can't exactly have a shield with a scratch that's really the size of the Hollywood sign, right? As you chip and scratch the model, Derick Siu advises that "chipping occurs mostly on the edges. Keep in mind that chips should be inconsistent" (Siu 64). These two factors give a more realistic look to the battle damage done.


Tamiya weathering kit that I utilized
"Weathering, on the other hand, requires little to no damage done to your model." (Siu 63). Some people prefer to do weathering only since they don't have to risk making any unintentional marks on the kit. The method I used for weathering is a simple, fast, and a somewhat affordable one. I bought a Tamiya Weathering Master Type C to highlight the parts I wanted to weather on my gunpla. It has about 3 colors on it, that being gunmetal, silver, and orange rust. The weathering kit came with a small sponge and brush to apply the effects of the weathering. I felt the sponge was a little flimsy so I used some eye shadow sponge applicators instead. 


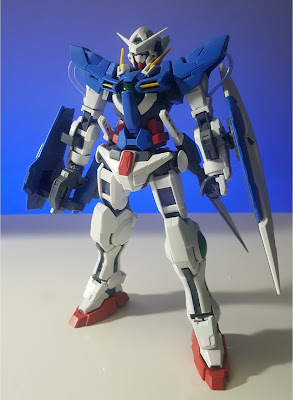
A slightly weathered MG Gundam Exia
(the camera doesn't pick up the details well due to the lighting)
When weathering, you mostly apply the effects on the edges (same as battle damage). This will make the edges stand out more, giving the model a more detailed look. I mostly used the gunmetal and silver colors on my kit for weathering since I don't have any exposed areas that would show possible signs of rusting or just orange dust collecting.

With my kit, I decided to only weather a bit since I think my kit looks better off without the damage (and because I didn't want to risk anything). This was maybe my sixth time weathering a model kit so I was still fairly inexperienced. Although I only used a single weathering kit, my gunpla turned out alright! If I continue this hobby, I doubt I'll be solely depending on this method and will maybe move on to using paint.

This pretty much concludes this post. To any other model kit builders, how do you apply weathering effects on your models? Please share! I'm willing to try other methods to get better results. As for those who don't build, do you think weathering makes any difference? It didn't have a large effect on my kit, but I personally like it a little better.


Siu, Derick, Mecha Model Guide for Beginners (Volume 1), CreateSpace Independent Publishing             Platform; 1st edition, 2013


Air Time in Aerial (blog post #4)

          Hello everyone! Welcome back to my bog. If you have never been to my blog, the purpose of my blog is to fix techniques in my aerial while in the air. This time I chose to fix what is did in the air. In the book Gymnastics Skills, Tips, and Tricks by Jeff Savage, there are many ideas to what to be working on mid-flight. I mostly focused on my head and arms. Throughout these blogs I have changed a lot about my aerial and have kept those changes. They have made my aerial a lot easier and I can see/feel a tremendous difference. One thins I was curious about was my mind air position. I never really focused on that, I only paid attention to getting over. 
          Author Jeff Savage, talks on body position as well as where your head should be in an aerial. As far as your body position you should be in a basic "straight" position in the air. The straight position is basically a pencil torso with scissor legs (Savage 6). Jeff Savage describes this in detail by saying "Hold your arms to your side, stand straight, hold your body tight by squeezing your muscles" (Savage 6). I believe the straight position is used to whip you around the fasted while making the trick look effortless and clean. The second technique to focus on in the air is your head position. Similar to blog post three, you have to spot, but this time you spot the ground. It is very important important to spot the ground in acrobatic tricks (Savage 12). Savage goes in to a deeper understanding of this by saying "Make sure you look down to see where you are going, At the the top of the move, you should be completely apart" (Savage 13).  I think this idea has a good concept but personally I'm guessing this won't help me. I feel the head position described would make me bend more backwards when the trick is suppose to be in a straight line. I sounds very dangerous.
          After trying these new techniques, there were a few problems. Like I had guessed, having your head arched back makes it nearly impossible to do an aerial. I couldn't take a picture because I put my hands down every time because it felt so uncomfortable and risky. To prevent injury, I decided to stop. For some people, this technique could have been helpful, which is why Jeff Savage wrote about it. On a good note, keeping my hands by my side looked very clean! It felt very comfortable and helped me whip a round fast.  


          My aerial is now very clean with all the changes made through this book! I am very pleased will the the results and feel all aspects of my aerial has been recognized and progressively gotten better. With this, my next blog will be on something other then flipping! Tune into my next blog post when I steer away from tricks and try something new!


What are your favorite stretches? What stretches do you think would be most helpful for aerials?


Savage, Jeff. Gymnastics Skills, Tips, and Tricks. Enslow Publishers, Inc., 2012.

Tuesday, January 16, 2018

Building Mecha Kits: Dry Decals

Fadila Soehedi
Mecha Model Guide for Beginners, Derick Siu

So, let's say that you've finished assembling your very first mecha kit. You're really happy that you put so many hours, or even days, into carefully building it. You just can't wait to pose it and show if off, right? Well... building the kit itself was only the first step of making your kit. There are still a couple more steps until the model is considered to be "finished" in the public eye. Depending on your how you want your mecha to look, you can stop right after building the robot and just showcase it or go on and put more work into it (either is fine, really).

During the build process, you've most likely had encounters with stickers. They're usually applied for the sensors (eyes) and various armored parts. When putting these on, you were hopefully careful and thrived to get the best fit possible. During this process, you must've adjusted the stickers, applied them again and again, and rubbed them down to make sure there were no bubbles. This may have been frustrating but I'm about to show you something possibly even worse than stickers.

Now introducing... DECALS! These are similar to stickers but are smaller in size yet bigger in quantity. Decals tend to be small prints placed all over the mecha, usually consisting of caution signs or logos for the mecha's pilot. Yes, these are very small details but once you apply all of them, the realism and appearance of the mecha really just pops afterwards!

Now before I continue, I want to mention that there are two types of decals. There are waterslides and dry transfer decals, both of these tend to be very frustrating since there are a ton of them and they're extremely small (as mentioned before). Due to these conditions, they take a considerable amount of patience and precision. Understand that you don't need to apply all of these, only do the ones you want!
(no decals)
Fully built MG Gundam Exia model kit with no decals

Rather than using personal methods, I'll be using those in the book, Mecha Model Guide by Derick Siu. Starting off with waterslide decals, the process of applying these decals tend to be easier (in my opinion) when compared to it's dry brother. In order to do this, you need to first cut out the decal you want from the sheet full of waterslides. From there, you "submerge the decal in warm water for 30-60 seconds." (Siu, 77) Doing this will loosen the bond between the decal and the backing paper, allowing you to put the decal on to the plastic. After removing the decal from the water, you use a toothpick to hold the decal in place and lift the backing paper from underneath the decal. Now that the decal is on the kit, you can reposition it with the toothpick. Don't use too much force, as it may rip or damage the decal! Once you have the decal positioned the way you want, you use a Q-tip or any other similar thing to absorb the soak up the excess water from the surface of the kit and decal.

As for dry transfer decals, application is not as time-consuming but can be much more stressful. When you have dry transfers, you have a paper sheet separate from the sheet full of decals. This prevents the decals from transferring to any surfaces unintentionally. You're going to want to keep this sheet behind the decals until you're ready to transfer them.
When you use dry transfer decals, you start out cutting a decal as you would with a waterslide decal but just leave a little space around the decal itself (it's OK to cut into the paper behind it too). From there, you lay the decal onto the kit. Line up the decal to where you want it on your part, making sure that it's straight. Then, you take two strips of tape to keep it secure.
From here, you apply the decal. This step is basically just rubbing the decal onto the kit with a coin of any kind. Derick Siu explains, "Rub the decal firmly with a coin. You will be able to see the color of the decal changing slightly as it transfers from the plastic sheet to the Gunpla piece." (Siu 77). The process is simple yes, but you only have one shot at this. If you maybe already applied the decal yet have it off of where you wanted it to exactly be, you can't really fix it. Some sheets come with extra decals for the smaller ones, which is real handy!
The same MG Gundam Exia model but WITH decals

The results after applying decals to a model is astonishing in my eye! Although I made a ton of mistakes here and there, but I personally enjoyed the end result and think that some of the time and effort was worth it (since my kit only consisted of dry transfer decals)!  My question to any other model kit builders is do you personally like to add decals to your gunpla? As for those who don't build, do you think the process is worth it?

Siu, Derick, Mecha Model Guide for Beginners (Volume 1), CreateSpace Independent Publishing
    Platform; 1st edition, 2013


Wednesday, November 29, 2017

Simply Glamorous: Eye shadow fundamentals

Hello, my name is Ashley, and recently I have been really into make up. Previously I have always done my make-up one basic way and never tried anything to fancy. I have been interested in learning new techniques and new ways to do my make up and that's when I got interested to buy a make-up techniques book. Today, more precisely I am working on the fundamentals of eye-shadow. This reflects on eye shape, eye and hair color, shimmers, matte, etc. After reading Gary Cockerill Simply Glamorous make up book, I have been introduced to the right techniques for different eye shapes, and the right colors to be applying due to eye and hair color. Here are some pictures of the look I created:


These are the colors I used to create the this look
As you can see there is shimmery pinks on my eyelids and hints of gold/brown in the upper crease. I was inspired to use these colors from Gary Cockerill,"Hazel eyes: Purples, rich gold, yellowy browns, dusty pinks, taupes... Red hair: Pinks, golds, greens, olives, black" (Cockerill 119). After reading this, I became much more clear on which colors to use on me to enhance my features. I really focused on the pinks as you can see in the picture.  Here are the colors for different eye colors, skin tones, and hair colors:


Also I was introduced to the eye shape I have. My eye shape is, "upturned, almond".  Knowing your eye shape will help you know where to apply the eye-shadow to give you the best look possible. Personally for me, according to Gary Cockerhill, with my eye shape I can apply eye shadow under the eyes. "The lower lids can sometimes be as pronounced as the top lids, which means you can put eye shadow under the eyes as well, for extra drama" (95). I decided to use this and it truly did complete the look. As you can see in the pictures below my eyes, I included a darker brown/gold color under the lash line.
Here are all the eye shapes that Cockerhill introduces:
This is the eye shapes Cockerill introduced

After reading these few pages from this book I already feel much more confident, and I hope this can a step to you being more confident in your skin! Knowing the right colors and where I should be applying these colors has made me much more confident to leave the house with eye shadow on. I hope you can include some of these tips the next time you are applying eye shadow. I also hope you can use the colors I used to create a look, especially if you have hazel eyes, like me. Also, looking at those pictures I included will help you significantly!

What colors do you think looks best on you? Are you an eye shadow kind of person? What is your eye shape?

Cockerill, Gary, et al. Simply Glamorous: Make-up Transformations to Make You Look & Feel Fabolous. Jacqui Small, 2015.

Monday, November 27, 2017

Building Mecha Kits: Nib and Stress Marks

Fadila Soehedi
Mecha Model Guide for Beginners, Derick Siu

I have been building models kits for years, mostly consisting of the mecha (robot) types. These are plastic figures you build from the "ground up". Being only provided with small plastic pieces and instructions, building can be a challenging yet rewarding experience (a little like LEGO's).
Half of the pieces provided in an average master grade level kit

Getting into the hobby can be fairly difficult as you need to be patient, careful, and precise with the plastic that you build with. The plastic is extremely fragile, you can quickly snap, scratch or bend the pieces you have. Since there are no extra pieces provided, the only way you can replace these parts is by buying another kit or buying parts from Japanese Ebay sellers. Either way, its fairly expensive.

Locations of nib marks are circled on this
Gundam's arm
Now if you use the right tools, you can get around these issues and build a very pretty little robot. Although tools can significantly help with the building process, a large amount of builders use them incorrectly and may not have the correct ones. The most common issue with newer builders is that they leave nib or stress marks and a LOT of them. "Nib marks are small, white indentations in the plastic left when cutting pieces out of their runners, these marks can be very unsettling and can have a negative affect on the presentation of the finished model." (Siu 48)

Nib marks and stress marks are most commonly left by simply cutting out the plastic with clippers or cutters positioned in a way where they are cutting as close to the piece as possible on the gate. Some people try to get rid of this by sanding or cutting the mark only to realize that they created or made a bigger stress mark on the piece by trying to level out the plastic. The size and appeal of the piece will be significantly reduced.

Diagram of a still-attached piece
(to help with explanation on the right)


There is a handful of methods that help avoid this but I will be discussing the one I use. In his book, Derick Siu states, "In order to avoid nib marks, you must cut the gate as close to the runner as possible, not the piece. Now, you'll be left with a chunk of the gate on the piece. From here, you cut away the excess plastic from the gate little by little and slowly with a clipper and razor blade. The idea is to cut until you leave a thin layer of gate and cut that last." (Siu 26) The logic behind it is that the less volume of the gate you cut, the less strain/stress is produced on the plastic, therefore preventing the white strain marks to appear after the cutting. With the mark gone, the plastic will look much smoother and will feel better on the model.

Comparison of the locations of contact that have been cut on these similar heads.
The left was incorrectly treated, the right was cut correctly.

Comparison of contact points on the back of the heads


Throughout my years of building, I realized my mistakes and have tried to improve with my building. Only recently have I been utilizing a razor blade for cutting and the difference in cuts are phenomenal. Although it takes more time, the technique that uses both the cutter and razor blade is much preferred. Each piece needs about 5-10 minutes of work and can really make your fingers sore but the final product is all worth it!

To other model kit builders (who are less likely to see this), what methods do you use for avoiding nib marks? Do you sand down the gate or cut it like I do? If you use neither, please tell me how you do it!
As for those people new to the concept of model kits, what do you think about it? Would you consider trying the hobby?

Siu, Derick, Mecha Model Guide for Beginners (Volume 1), CreateSpace Independent Publishing
    Platform; 1st edition, 2013

Monday, January 25, 2016

Weird yet dope braids

For my last blog post I wanted to try some of the braids that I was scared to try before. I first tried the leave out braid, then the upside-down braid. Both of these styles actually took me a month to master, this is why I had to make it my last one. These two styles I tried out on my soccer team mates, on our trip to Spokane. First up was the leave out braid, it is a french braid, but you only take out a little piece of hair, then skip a few inches down and grab another. It is difficult to explain in words, but the point of it is to look like a cool pattern, rather than to pull your hair back. At first this braid is quite simple, you start of with just a normal braid, next from the book I read, "Carefully grab a small section of hair and bring it to the braid, repeat this like a french braid. It's pretty much the same except you  have to go down an inch before you take another piece, making a noticeable gap in the braid" (Smith 1222). At first when I read this I was very confused, but after I tried and looked at the pictures it made sense. It took me 17 tries, but finally I got what it is supposed to look like:
This is my good Friend Katherine, (our right mid) everyone say "Thanks for modeling Kat". OK Now that one wasn't too hard for me, it was time to do the scariest of all, the upside down braid. I have tried this before and failed. It is a french braid on the back of your head instead of the top, typically girls will do this when they have their hair in a pony-tail, for instance I have seen girls do this for soccer. I did not really know how to go about this braid, but my book had some suggestions for doing this on someone else. "Have the model lay on a bed or some sort of flat surface, you must be above them. Make sure they tuck their chin in, and have all of their hair forward" (Smith 1734). I combined this new technique with what I have already learned about French braiding from my first post. Surprisingly it turned out really cool! a big thank you to Taylor for modeling (her hair is colored and it makes it look cool) Well that is all for my blogs, I hope everyone learned some valuable tips on braids because I sure did! I challenge you ladies or dudes with long hair to try rocking some cool braids to school! Bye guys!

Thursday, December 31, 2015

Braiding my own hair pt. 2

Much like my last post I will be focusing on mastering one type of braid on myself. This next braid is a rope braid, which can be very hard if you don't have 3 arms. Every time I have tried to do this on myself so far things have gone wrong, in the book, Smith says "Take the two peices of hair and twist, I always twist towards my face, but the two strands must be going in the same direction." (Smith, 487) So i put this to the test and began twisting them towards my face, this actually made it a lot easier to keep track of. however holding all of this hair in my hands was a little too much for me. In the book it says "If its too hard to hold and twist both in your hands, do one first and after bite down on the end, it may be gross but it keeps the twist." (Smith, 498). Reluctantly I tried doing one first than putting it in my mouth, surprisingly this help out a lot more than I thought. After i had twirled both towards my face, I twisted them together the opposite direction like I previously learned how to do on my first post. These new techniques definitely helped me out, I can now do this braid quickly and easily for when I'm running out to the store or something. So far which braid do you guys think looks best? Also when do you think one of these quick braids could come in handy for you?

Monday, December 28, 2015

Braiding my own hair

Now that I have been practicing braiding my sisters hair, I will try to braid my own hair. This is a difficult and sometimes frustrating task, it also hurts your arms! The braid I want to see most in my hair is a Double Dutch braid.
 In my last blog I learned how to do a dutch braid, now I will be performing it on myself. I'm always the worst with starting my braids, so of course I read some tips from my book. I first split my hair in two, I found it easier to set one half aside in a ponytail. now the author says "take a rather large section from the front. Mine is from about my temple to the end of my part." (883, Smith) I tried this technique and took a larger portion of my hair to start.
 It took a couple of tries, but over all I think I got the hang of it. I learned from this type of braid that your hair must be fully brushed, and any hair that you don't use should be separated . Again the author said that after a couple of tries you can get the perfect braid, after you do make sure to pancake it, (vocab word from last blog). (smith, 890)
Remember, a dutch braid is a french braid but you take the pieces of hair under instead of over the middle. To reflect I have definitely gotten better at braiding other peoples hair, and I still really need to work on mine. All it takes is practice on getting a solid start! ladies, what do you think the hardest part of braiding your own hair, versus braiding someone else's hair?
 
Displaying IMG_4836.JPG