Showing posts with label cooking. Show all posts

Thursday, January 25, 2018

The Frugal Gourmet: Hunan Onion Cake

I'm back with another recipe! This time, I decided to cook a dish that I could have as a quick appetizer, so I went with Jeff Smith's Hunan onion cake recipe.

Ingredients

Smith's recipe for Hunan onion cake is straightforward and only requires tortillas, sesame oil, green onions, egg, and frying oil. The reason why the dish is very simple is because, "The Chinese dinner does not have a single dish that is the center of the meal. Rather, many dishes are served, in small amounts, of course" (Smith 351). With this in mind, I knew that the onion cake would be a sort of 'snack' rather than a whole meal.

The recipe itself uses a method of pressing tortillas brushed with an egg mixture together, with green onions in between. It's a much simpler version of a Bengali dish which I have grown up with-Mughlai paratha. Mughlai paratha is basically bread with an omelet inside. You have to fold it in a way so that the egg doesn't spill out of the bread when frying, which can be harder for newer cooks. Smith mentions that recipes with wheat are very common in the Hunan region of China, and it's usually made from scratch but he recommends using tortillas instead of homemade dough for a more precise result (Smith 352).

I mixed the sesame oil and water into the whisked egg, and then brushed this onto one side of a wheat tortilla. Next, I sliced up some green onions and sprinkled my desired amount onto the egg-coated side of the tortilla.To make it into a 'cake', you take another tortilla and brush the egg mixture onto it, and press down against the tortilla with the green onion. This method is very similar to making a sandwich!
Brushing on the egg wash

Sprinkling on the sliced green onion

I repeated this process three times, and placed wax paper between each tortilla to ensure they wouldn't stick together. When I completed the preparation of the onion cakes, I put weight on the stack per Smith's instructions, for about fifteen minutes. You can see below that I used jars and bottles in my kitchen, and also a meat tenderizer to ensure that the edges were sealed.

Pressing the onion cakes

To cook the cakes, I fried them in canola oil. The recipe suggests peanut oil, but I used canola instead since it was handy. The frying process is short and only takes a few minutes, but if you haven't sealed the edges properly the cakes will displace.

These cakes were crispy and delicious! I admit to being skeptical that Smith didn't add any salt, but the sesame oil ended up flavoring the tortillas very well. I would say this is the most successful dish I have done so far, since I enjoyed cooking it and can repeat this recipe again.

The finished cake, cut into wedges

Have you eaten a dish from outside of your culture that reminded you of a dish that your family enjoys? If so, have you recreated the dish before?


Smith, Jeff. “China: Hunan Treasures.” The Frugal Gourmet, Ballantine Books, 1984, pp. 351–352.


Monday, January 22, 2018

Taste of Vietnam: That's a Wrap

Taste of Vietnam: That's a Wrap

Nước Chấm 

made by Brandon Nguyen 


OVERVIEW

As I had said before, cooking is no easy task. I wanted to prep something simple, so I decided to try out a nước chấm recipe in Ân: To Eat

Nước chấm is a dipping sauce Vietnamese folks use on mostly everything. I most commonly eat spring rolls with nước chấm. However, I wanted to prepare broken jasmine rice, accompanied with a fried egg, sliced tomatoes, and glazed beef. I enjoy this sauce for its versatility. It can be enjoyed on almost anything. As stated by Helene and Jacqueline An, "We use it as a dip for spring rolls, to brighten seafood, to add tang to protein as a dressing for noodles and rice, and as a marinade for meat" (An Helene & Jacqueline 274). 


PREPARATION

Cooking the beef was probably the hardest procedure. To give it flavor, I first had to glaze it, using my mother's recipe. For the searing, I referenced the book. In the section "Basic Techniques," Helene and daughter Jacqueline An explains to readers how to add protein. Most helpful was when they said that, "To sear quickly and correctly, food needs enough room. Don't overcrowd the pan, as that can lead to food steaming instead of searing" (An Helene & Jacqueline 35). Frying an egg was rudimentary, and slicing the tomatoes was not difficult at all; these were things I had done before and have mastered. 


For the nước chấm, I added sugar into warm water and stirred until everything was dissolved. I then added fish sauce, rice vinegar, and garlic. To balance all the flavors, I put in some chili paste. 


Making this was not a hassle. This is something I can make on my own. I am glad I chose to make this, for it is straightforward. After making the fried rice and noodles, I found that I was overestimating myself. It became manifest that I was doing more than I can bear. 


TAKEAWAY?

My takeaway is that mastering the art of cooking is not something that happens overnight. A book cannot simply make you a better cook; only you can do that. I advise all beginner cooks to start with basic recipes. Also, follow all the instructions. Later on, you can alter the recipe to best suit your taste, but make sure to do what the book tells you to. You will find that by taking baby steps, you will eventually grow.

Creating these recipes has given me a chance to explore my culture. Vietnamese cuisine is something that means a lot to me, especially since it reminds me of my grandmother. Though I may be American, I will never forget my Vietnamese roots. I thank you all for reading these posts! I hope I had taught you all something new. Has anything given you a hard time? How can you improve?


Works Cited: 
An, Helene, and Jacqueline An. Ăn: to Eat: Recipes and Stories from a Vietnamese Family Kitchen. Running Press, 2016.

Sunday, January 21, 2018

The Frugal Gourmet: Spaghetti with Mushrooms

Hi friends!

For my third post, I decided to take on a dish that could be a little more challenging for me, concerning the preparation. So, I decided to take on a spaghetti dish with two different types of mushrooms!

This recipe required lots of multi-tasking. First, I had to soak dried mushrooms in warm water, then give them a rough chop. I also had to slice mushrooms but I purchased pre-sliced to save time. For washing the mushrooms, Smith mentions, "If you must wash them, just rinse them quickly, and then drain and dry them before cooking them" (Smith 231). I followed this method and let the mushrooms dry off while I prepared the spaghetti and sauce.

Re-hydrating the mushrooms


When cooking spaghetti, it's important to salt your water because your pasta will be tasteless without it. Smith recommends fresh pasta for these dishes, but if that isn't available to you pasta made from semolina or durum wheat is preferred since it isn't prone to becoming soggy (Smith 140).

After the spaghetti was cooked and drained, I began to prepare the sauce. First, I heated up olive oil in a steep pan and added pureed garlic since I didn't have fresh garlic. I also added garlic powder for more flavor. Second, I added the two types of mushrooms and let them cook for about six minutes.

Finally, I added the remaining ingredients including heavy whipping cream, salt, and pepper. Following this, I let the mushrooms cook in the pot for a few more minutes. This step took the longest because I had to decide when the mushrooms seemed to have soaked up enough of the cream.  I added the cooked spaghetti into the sauce pot and incorporated it into the sauce. It ended up being too dry, so I added in the rest of the cream instead of just the initial quarter cup.

Mushroom sauce with added cream

 If I were to make this dish again, I would have added the sauce to the pasta when serving rather than mixing it in. Jeff Smith actually recommends this, but I overlooked this step in the recipe. It ended up being a challenge to fully incorporate the sauce when the pasta was in the same pot. Additionally, I would have added less dehydrated mushrooms into the pasta. Fresh mushrooms have less flavor compared to the dry kind; the dehydrated mushrooms pack a punch!
Mixed spaghetti with sauce and cheese

This dish was really creamy and you could definitely taste the mushrooms. If you aren't a fan of mushrooms, you will not enjoy this recipe. This is a perfect winter time dish because it really fills you up! If you'd like a little less mushroom flavor ringing through, I'd suggest adding in shredded mozzarella or Parmesan.

Do you have specific techniques for cooking mushrooms? Have you cooked with fresh pasta before and seen a difference in flavor?

Smith, Jeff. The Frugal Gourmet. Ballantine Books, 1984.

Monday, January 15, 2018

Taste of Vietnam: Helene's Wok Noodles

Taste of Vietnam: Helene's Wok Noodles

Made by Brandon Nguyen 


I wanted to make something special; something different and unique. I decided to try chef Helene An's wok noodles with stir-fried vegetables, a recipe she shares with us in Ăn: To Eat, and also a featured dish that has been a menu item at her restaurant, Crustacean Beverly Hills. 

Bok choy is a spinach-like vegetable.
I have stir-fried before when I made fried rice. The process is the same with the noodles; it is nothing more than pouring canola oil into a wok and stirring in the vegetables. This was great review. Helene An says that "this preparation will work with any vegetable; feel free to try it with your favorites" (An, Helene & Jacqueline 143). I was amused to find out because this gives me a chance to experiment. I got to work with bok choy (right) and snow peas, vegetables that were new to me. 

I had a little bit of help from my mom. Okay, I had a lot of help from my mom, but you cannot just hop into a kitchen and expect to be Gordon Ramsay. Cooking is something that takes time and practice, and learning from my mom really helps me. 


Snow peas are not easy to cut!
No fingers were cut when shaving the carrots.
The snow peas (left) were difficult for me to cut. I became afraid of the big, sharp knife I was using. This is when my mom really stepped in. She cut all the snow peas. However, having experience with doing it for the fried rice, I managed to shave and grate the carrots (right).


Garlic is added before anything else.
Before putting in any vegetables, I added cloves of garlic to the oil (left), told by Helene An that, "As in Italian cooking, where the garlic and onions are added first to help flavor broth, in stir-frying we do the same, adding shallots, garlic, onion, and ginger first" (An, Helene & Jacqueline 34). Garlic is an aromatic, and helps enhance the flavor of any dish. The trick is to constantly stir and flip the garlic so that it does not burn. 

Next, now that the vegetables are all dry, I tossed in the vegetables, occasionally stirring them so that they fully cook. When the vegetables are cooked, I added the noodles, which have been soaked in warm water.


The final touch is the sauce, which consists of oyster sauce, soy sauce, sugar, and chili paste (bottom-right). The sauce is what gives this dish flavor. It is savory, yet with the chili paste, gives a spicy kick. The dish comes to life as I pour the special sauce over the hot noodles. I am finished!


Flavor comes from the sauces.
I may have overestimated myself. Stir-frying noodles is not the same as frying rice. My mom's assistance really changed the outcome of this dish. Without her, this would have been a major flop, and my post would have been about me failing. My advice to you? Have someone experienced by your side when you are cooking. They can act as your guide, and their advice will help you grow as a novice. I guess my mom and I make a great team.

This dish was definitely something else. It was simplistic yet sophisticated. I like how it was non-traditional. That really gave me a chance to play around with different flavors and ingredients. What can I say? This dish truly broke boundaries! I learned that following four easy steps from a book cannot help you become a better cook. They are only there for reference. Cooking is not revolved around a book teaching you the right or wrong ways. What challenges you as a cook? How can you overcome that challenge? 


Works Cited: 
An, Helene, and Jacqueline An. Ăn: to Eat: Recipes and Stories from a Vietnamese Family Kitchen. Running Press, 2016.

Wednesday, December 27, 2017

Taste of Vietnam: Cheers for Chè

Taste of Vietnam: Cheers for Chè

Chè Chuối - Brandon Nguyen 


I remember the times when my grandmother would prepare special desserts for the entire family. Every night, it was something different; I don't know how she did it. Probably the most memorable dessert to me was her signature chè chuối, described in Ăn: To Eat, by chef Helene An and her daughter Jacqueline An, as "banana pudding" (An Helene & Jacqueline 252). I chose to make chè chuối on behalf of my grandmother, the wonderful dishes she would make for me, and my fondest memories of her that will forever live in my heart. 


The recipe calls for five bananas halved lengthwise. As I previously mentioned, cutting is extremely challenging for me. I am terrified of knives and hate being around them. I was relieved because bananas are super easy to cut. Despite the simplicity, cutting the bananas was good practice. From thereon, I realized that making this was like a walk in the park. 


The bananas sit in two tablespoons of sugar for 15 minutes after they have been halved.
Challenging for me was making sure that the tapioca pearls do not stick to the bottom of the pot. The trick is to watch your pot and stir gently for several minutes, making sure that the tapioca pearls do not "pop when stirring or they'll flavor the chè too early" (An Helene & Jacqueline 252). The pearls are ready when they appear to be translucent. I was ignorant and did not watch over my pot; therefore, I burned some tapioca that became stuck on the bottom of my pot. No one wants to do extra cleaning!

Moreover, boiling water in a pot was something that was new for me (it is humiliating, I know). In the chapter, "Basic Techniques" in Ăn: To Eat, Helene and Jacqueline An suggest leaving "enough room in your pot for the liquid molecules to expand as they heat up" (An Helene & Jacqueline 36). In other words, make sure there is enough space for your water to bubble; it was pretty straightforward and, in addition, I successfully boiled water.

Tapioca pearls are added once the water is brought to a boil.


Overall, this recipe was simple. I would play around with the level of sweetness, for my chè was not sweet enough. On top of that, it had a soup-like consistency and could have been a little thicker. If I were to make this again, I would just eyeball the ingredients instead of measuring them and make small adjustments from the book's recipe. Sure, the chè I made is nothing compared to my grandmother's, but I think I deserve a pat on the back. What do you think? Is it better to eyeball the ingredients and have a taste test or measure the ingredients out exactly? How can I improve? 


Resources: 
An, Helene, and Jacqueline An. Ăn: to Eat: Recipes and Stories from a Vietnamese Family Kitchen. Running Press, 2016.

Monday, December 25, 2017

The Frugal Gourmet: French Style Potatoes

Happy holidays! Hope you've all been having a relaxing break.
For my next dish, I wanted to make something that could be eaten during Christmas dinner; a last minute side to something like chicken or steak. I was drawn to Jeff Smith's potato recipes because he explained the intricate background of the starch, mentioning, "The bulb was brought to the American colonies during the early 1700s, and it proved to be a lifesaver. It also proved to be a problem. People began to depend upon the potato for daily food..." (Smith 246). Potatoes are very versatile and because of their lack of a sharp taste, can be blended into many dishes. So, I decided to make Jeff Smith's old French style potatoes.
Chopped potatoes

After washing the potatoes, I peeled and cut them into eighths instead of fourths, since they were quite large. Smith mentions to parboil the potatoes in salt water, which reduces cook time in the oven to around twenty minutes since uncooked potatoes take longer to fully cook (Smith 250).

Parboiling in salt water 

After parboiling the potatoes, I mixed a sauce with olive oil and flour. Smith advised adding parsley, but I chose rosemary since we didn't have any other fresh herbs. I advise you to really whisk this vinaigrette well, because the oil doesn't always fully mix with the salt and flour.

I first added lemon rind into the sauce per Smith's recipe, but then the sauce became very bitter so I decided to omit this ingredient. Instead, I decided to add garlic powder when I re-made the vinaigrette.

After mixing the vinaigrette, I put the potatoes on a buttered baking pan and poured the sauce on top, then mixed them. Jeff Smith's recipes suggest cooking them in a 450 degree oven, but since the potatoes weren't as crispy as I wanted them, I put my oven on broil and crisped them for a good three to four minutes after cooking them for twenty minutes at 450.

The finished product

I really enjoyed this recipe! The potatoes came out really flavorful and it was fun to experiment with tastes rather than fully follow a recipe. You shouldn't feel that you have to follow a recipe completely when cooking, because some of the best dishes turn out to be improvised!

Would you try improvising in the kitchen after reading this? Which dish have you made that was improvised?

Smith, Jeff. “The Potato.” The Frugal Gourmet, Ballantine Books, 1984, pp. 246–250.

Sunday, December 17, 2017

Taste of Vietnam: Wok 'n Roll

Taste of Vietnam: Wok 'n Roll

Fried Rice - Brandon Nguyen


Rice has become essential to Vietnamese diet. Originated in China, rice has made its way downtown and has shaped our culture ever since. For this next dish, I am making fried rice, stepping it up to the next level and will be following the recipe and procedures directly from Ăn: To Eat, by executive chefs (as well as mother-daughter duo), Helene and Jacqueline An. 


Fried rice made in a wok. 
Fried rice has always been the "go-to" dish for my family. It was the ideal dish for when we were in a hurry and had little time to cook. Chefs Helene and Jacqueline An describe the dish as "easy and quick, this dish is a weeknight favorite. . ." (An Helene & Jacqueline An 62). 

For the best result, it was extremely important to follow the recipe and procedures accordingly. I added onion and cloves of garlic for a "fragrant kick" (An Helene & Jacqueline An 62) and salt, sugar, and Maggi seasoning sauce to bring out all the flavors. In addition, I put Chinese sausage (lập xưởng), fried egg, carrots, peas, corn, and shrimp. I also decided to modify the An's recipe and added some squid.

Typically, fried rice is made in a wok (left), a bowl-shaped frying pan. As a Vietnamese, I can proudly say that we use woks for everything; from frying egg rolls to whipping up chow mein noodles (mì xào). 

The rice turned out to be perfect, but in reality, I was nervous. Everything was fast-paced, and I had to work quickly in the kitchen. The rice was not too dry but moist, and the squid gave the dish an interesting texture, making it "fun to eat." 


The carrots were shaved and then diced. 
Probably the most challenging procedure for me was cutting the vegetables (right). Fried rice requires you to either mince or dice vegetables into small, easy-to-eat pieces. To be completely honest, I have never cut anything smaller than an apple. The good news was that I did not lose any fingers and that I gained a bit of experience; however, I will never lose the fear of being around sharp objects, such as knives. 

My tip? Get creative and let your imagination roam free; don't always rely on the recipe. What was the first dish you made? How did it go? If you haven't made anything yet, what do you plan on making? Do knives scare you as well?


Resources: 
An, Helene, and Jacqueline An. Ăn: to Eat: Recipes and Stories from a Vietnamese Family Kitchen. Running Press, 2016.

Wednesday, November 29, 2017

Grilling Tri-Tip Steak

Grilling is a dry-cooking method that cooks meat and other foods over hot coals or gas flame. "The radiant heat of the grill sears the meat- shrinking the muscle fibers on the outermost layer- and imparts a hearty, smoky flavor as the meat cooks." (Stewart 160). This method is used in many styles of cooking and in many countries, and Martha Stewart hypothesizes that it "has to do with being outdoors and feeling less restricted than in the kitchen" and that the aromas and sounds of grilling are very appealing (160). With grilling comes the question of how long and what heat to cook your food. While grilling you use either direct or indirect heat. "Some aficionados consider the time it takes for the food to cook as the deciding factor..." (160) This passage goes on to talk about the different heats (direct, indirect) for different meats, and explains that when you use lower heat that is when grilling becomes barbecuing. There are many different tips listed for grilling, and some of the most helpful ones were that bringing meat to room temperature before grilling helps meat cook more evenly, and that there are many factors that lead to flare-ups and that moving the meat around and trimming it helps prevent or stop them from happening. Martha Stewart's Cooking School provides interesting information that goes into detail about many different topics, methods, tools, and foods. Along with tips and background information, it provides recipes that allow for practicing the techniques and methods.
When I cooked the steak, I seasoned it with basic spices, and served it with a compound butter that was recommended to go with the steak in the book. I used direct medium high heat and cooked until medium-rare (internal temperature of 125 degrees).

This book talks about many different things, from herbs to knives to cooking methods. What cooking techniques, cuisines, or specific meats/vegetables, should I try next? (Again, this book covers pretty much everything).
Stewart, Martha, et al. Martha Stewart's Cooking School: Lessons and Recipes for the Home Cook. Clarkson Potter, 2008.

The Frugal Gourmet: Cheese and Tomato Omelet

I've always loved seeing people cook; any given Saturday morning my mom is usually chopping onions with ease and turning a few simple ingredients into a masterpiece. Food is a personal thing. Recipes reflect a person's taste. I, myself, am not very talented in the kitchen. Baking is more my forte; but this time, I decided to step out of my comfort zone.

I decided to turn to Jeff Smith's book, The Frugal Gourmet, to help me become better at cooking for myself. Today, I attempted Smith's cheese and tomato omelet.

For breakfast, I tend to turn to cereal. This time I decided to put a spin on eggs, something that I could eat as an alternative for breakfast. Jeff Smith offers his own method to make a basic omelet, and mentions, "Never use milk in the egg mixture. Use only water. Milk makes your omelet watery since it will not blend with the eggs. Water blends and keeps the omelet high" (Smith 106). This technique was foreign to me; I'm accustomed to seeing omelets made with milk. When I did add the water into the mixture, it was more thick than I'm accustomed to seeing. It kept the eggs smoothly together rather than separating apart.

Whipping the eggs

Heating up the pan
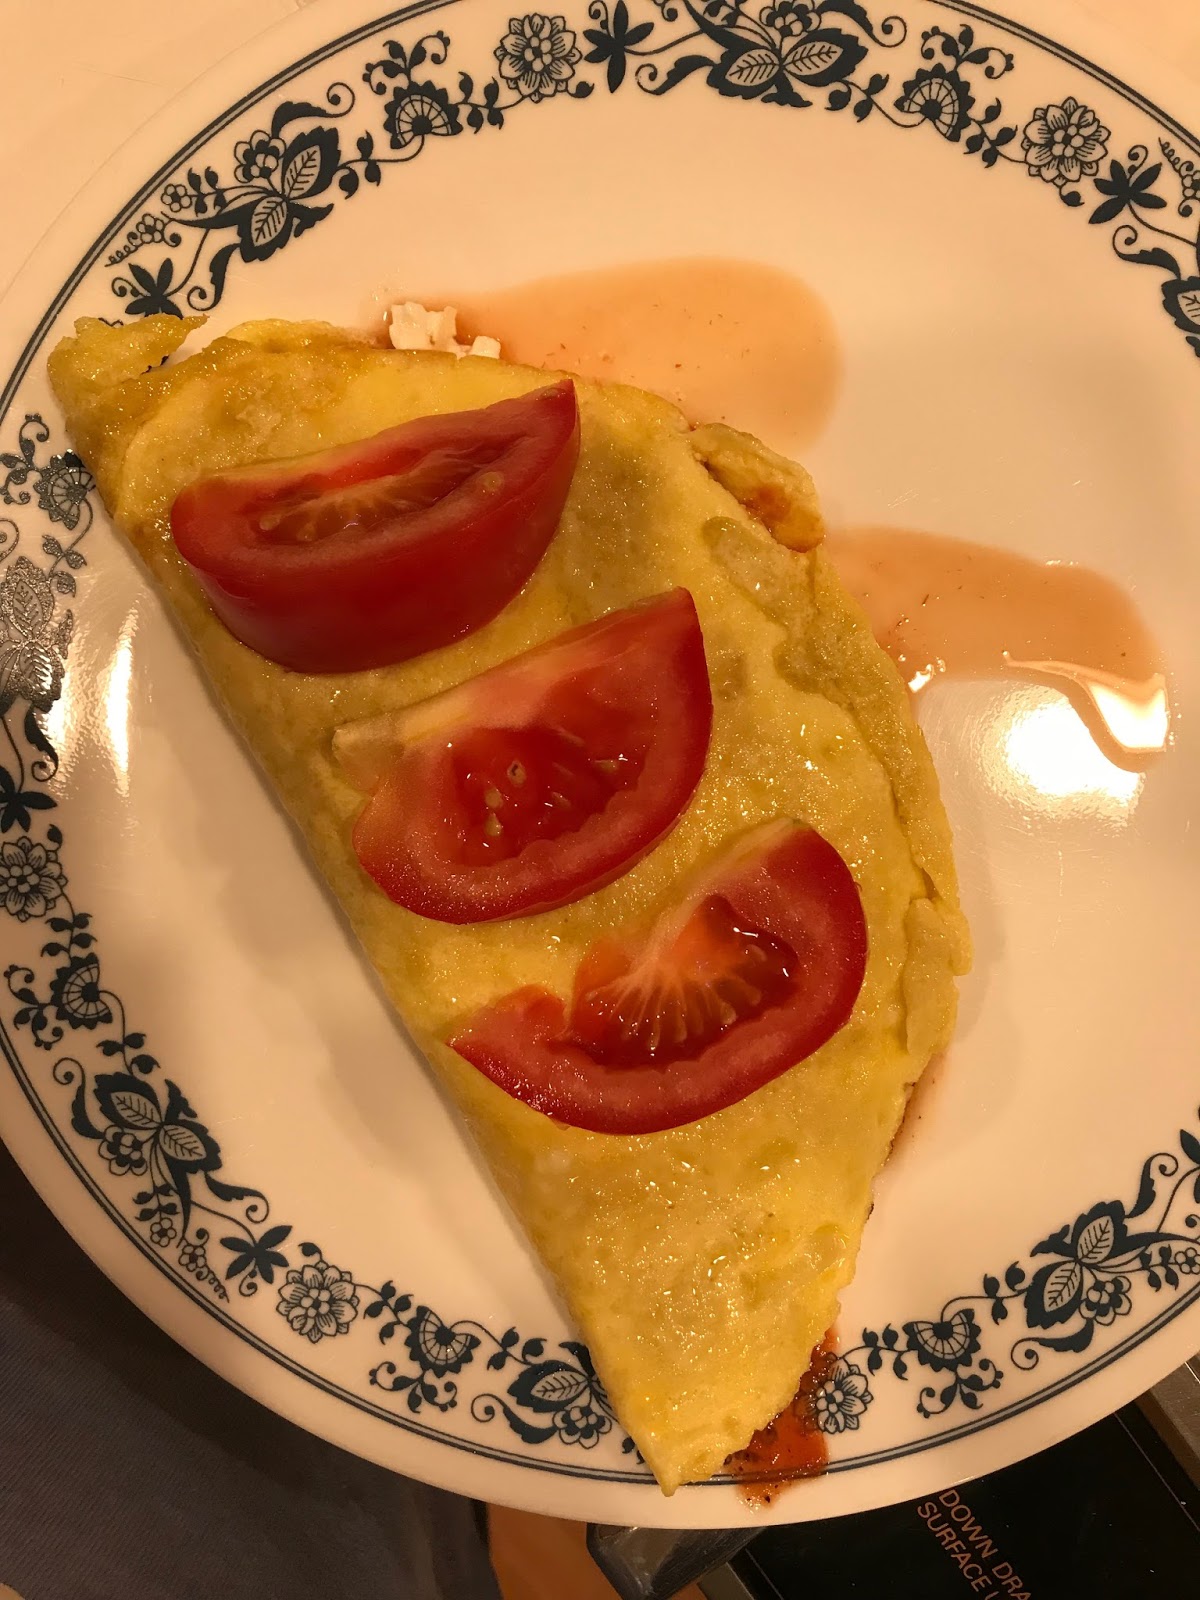
I then heated up the pan with oil and butter. Cooking the eggs wasn't challenging, but getting the uncooked egg to drip down the sides and cook was hard. Instead, I flipped the omelet over.  It was fluffy and rose as mentioned, the kind of omelet you usually want. I think the fluffiness is on account of Smith's technique, which mentions to skip mixing salt into the omelet mixture and instead adding salt when the egg is cooked to prevent hard eggs (Smith 106).  When I have made eggs in the past, I made this accident.  They turned out to be rubbery if not eaten freshly cooked. Eggs should be fluffy!

Overall, the recipe consisted of making a basic omelet and adding the cottage cheese, sauce, and then Parmesan. This recipe isn't for a grab'n'go breakfast. It's for days when you have a little extra time. I did like the combination of familiar flavors; cheese and tomato are versatile ingredients that you can whip up into any meal. Overall, this recipe is a nice shake up if you want to try something new for breakfast! It reminds me a lot of spaghetti because of the sauce inside, but it also is creamy because of the cottage cheese and Parmesan.

Finished product-some sauce spilled over
Which dish for breakfast have you made that requires a little bit more prep time? Is a meal for breakfast you would never attempt to make?


Smith, Jeff. “The Classic Omelet.” The Frugal Gourmet, Ballantine Books, 1984, pp. 105–108.

Saturday, November 25, 2017

Taste of Vietnam: The Perfect Cup

Taste of Vietnam: The Perfect Cup

Sweetened Vietnamese Coffee - Brandon Nguyen 


Vietnamese cuisine brings me back to the childhood days, where my grandmother would prepare special dishes in her kitchen. In a world where the food of Chinese, Japanese, Americans, Italians, French, and Mexicans dominate, traditional Vietnamese food is often overlooked. From beef phở to crispy spring rolls, executive chef, Helene An, and daughter Jacqueline An share many recipes directly from their Vietnamese kitchen in Ăn: To Eat

Ground coffee in a phin filter.
For novices, cooking can be quite a challenge. Having little to no experience in the kitchen, I decided to start simple with sweetened Vietnamese coffee, or cà phê sữa. According to Helene and Jacqueline An, "Vietnam is second only to Brazil in coffee exports, but surprisingly, the rich flavors of Vietnamese coffee are relatively unknown outside the realm of coffee connoisseurs" (An, Helene & Jacqueline An 269). What makes Vietnamese coffee unique? Unlike any other coffee, Vietnamese coffee is bitter with just a touch of sweetness. A small word of warning, this coffee is extremely strong. I remembered drinking sweetened Vietnamese coffee one day in the afternoon and not being able to go to sleep!

The coffee is ready to be served!

For the coffee, a special metal drip filter (top) called a phin is used. If you learn to master the phin, everything else is simple. Though I am embarrassed to admit, it took me two attempts to make the perfect cup. Despite the fact that it took second effort, the ingredients are simple. We pour hot water over the ground coffee in the phin. The water drips into a cup with about two tablespoons of sweetened condensed milk. A lid is placed over the filter to retain the water's heat (right). This takes approximately four minutes. I learned it the hard way that by rereading the instructions slowly and carefully I was less vulnerable to mistakes. 


Typical Vietnamese breakfast.
To adjust the flavor, I definitely played around with the amount of sweetened condensed milk and ground coffee that was being added, making multiple cups to find the right ratio of bitterness and sweetness that was ideal for me. I even tried adding ice cubes to make cold coffee. As stated by the mother-daughter duo, "Experiment with different coffee brands and the measures of coffee and condensed milk to find your preference for the perfect cup" (An, Helene & Jacqueline An 269). 

In the end, I brewed more coffee than my family could even drink. In fact, it was enough for the entire neighborhood! Creating this recipe has immediately transported me back to my childhood days again. It has brought my grandmother back in the kitchen and most prominently, revived all the great memories I had with her. If you could make any Vietnamese drink or dish, what would it be and why?

Resources: 
An, Helene, and Jacqueline An. Ăn: to Eat: Recipes and Stories from a Vietnamese Family Kitchen. Running Press, 2016.

Sunday, January 29, 2017

Cooking: Mini Sausage Burrito


Today I made some mini chicken burritos, a great appetizer to have before dinner. First off, I cut the sausage up and fried it until it was light brown. After that, the book said to cut up the zucchini and fry it until it's golden brown on both sides (Williams 53). Using this zucchini instead of the classic lettuce adds a zesty flavor to the burrito. Then, you take the tortilla and cut it in half. After that, I built the burrito by putting on the sausage, zucchini, and shredded cheese on top, and folded the burrito. Afterwards, the book said to, "Put the burrito on a heated pan and warm it up for 1-2 minutes on both sides" (Williams 53). So I did that, and served the burritos. It was a simple, unique recipe and a really tasty dish. It's a perfect appetizer before any dinner and a good meal for beginners to make. What are some other vegetables I could add to the burrito in order to make it a little less bland?


Williams, Carolyn Land., and Rachel Quinlivan. The Ultimate Kid-approved Cookbook: Delicious Food Kids Will Eat, Nutritious Meals Mom Will Love. New York, NY: Oxmoor House, 2011.

Cooking: White Spaghetti


Today I made some white spaghetti with chicken on the side, one of my favorite meals for dinner. First off, the book said to boil the spaghetti in water for 15-20 minutes (Williams 72). Then, after I did that, I drained the water and put the spaghetti in a bowl. Finally, the book said, "Grind 1/2 a pound of feta cheese on top of the spaghetti and stir" (Williams 72). That gave the spaghetti a nice, cheesy flavor. I then added some chicken wings on the side for a more fulfilling dish. Overall, it was a fairly simple recipe and easy to make. Even with the simplicity, it was still very delicious. What are some other dishes to make with feta cheese as a main ingredient?


Williams, Carolyn Land., and Rachel Quinlivan. The Ultimate Kid-approved Cookbook: Delicious Food Kids Will Eat, Nutritious Meals Mom Will Love. New York, NY: Oxmoor House, 2011.

Saturday, January 28, 2017

Asian-Style Mango Nata


Asian-Style Mango Nata

Welcome back to my blog! Previously, I made Turon which is a Filipino dessert. For my fifth and last blog post I am making another dessert, it is the Asian-Style Mango Nata. Compared to the dishes I previously made, Asian-Style Mango Nata is easier to do. I decided to make this dessert to finish off my blog for this project, because I believe that it embodies the Filipino culture the most. The dessert itself exhibits the simplicity of the Filipino way of living. The mangoes represent the sweet personality of Filipinos. As a matter of fact, the Philippine mango is the national fruit of the Philippines. 

Let's start cooking!

Ingredients:
  • 1/2 cup water
  • 1 tablespoon white sugar
  • 1 tablespoon cornstarch dissolved in 1 tablespoon water
  • 2 pieces whole mango, meat cubed
  • 4 cups mango juice
  • 1/2 cup all-purpose cream
  • 1 bottle nata de coco, drained and wash
  • 1 cup crushed ice

Procedure:
1. Boil water and sugar until sugar has dissolved.
2. Pour the cornstarch water mixture into the syrup.
3. Stir over low heat until the mixture is smooth. Let cool.
4. Add cubed mango, mango juice and all-purpose cream into the syrup mixture then stir.
5. Mix in nata de coco, and stir.
6. Chill before serving.
7. Scoop some crushed ice into each glass before topping with the mango nata cream.

(Ozaeta 122)

Timpla Tip:
"Using cream gives you a thicker consistency when serving this dessert. Be sure to chill the dessert for at least an hour to give it time to set" (Ozaeta 122). Through this Timpla tip, it didn't just help me in making this dessert, it also taught me a lesson that I would be able to use for future dishes that involve using cream.

Even though making it isn't as complicated as the other dishes I made, I was still able to learn some quite significant things. One of it is that the ingredients being used are important, the mangoes should neither be too ripe or unripe. The components should be properly proportioned too, so that one won't overpower the other.

This dessert is indeed refreshing, it reminds me of the hot climate in the Philippines. It is something that is recommendable to serve during the summer. The Asian-Style Mango Nata I made was sweet and it was actually tasty. I enjoyed creating it, especially the last part where I get to put on the glass and make it even more appetizing.


My blog may have come to and end, but I will continue my cooking journey to venture and taste more kinds of flavors from different cuisines. Throughout this cooking journey of mine, I was able to learn many different types of cooking techniques, especially the Filipino way of it. It also made me conquer my fear of cooking and taught me to become more patient. I enjoyed this experience so much, and I hope you did too. Thank you for reading my blog, and I hope through it you were able to know more about the Filipino cuisine. If you were to pick a dish that embodies your culture, what would it be and why?

Works Cited:
Fontanilla, Marilen, and Anne Marie Ozaeta, eds. Timpla. First Edition ed. Makati City: Hinge Inquirer Publications, 2010. Print.

Sunday, January 22, 2017

America's Most Wanted Recipes - California Pizza Kitchen


America's Most Wanted Recipes - Sage Richardson

I don't know about you guys, but one of my favorite things to get at a restaurant is pizza!!! California Pizza Kitchen's pizza is delicious, and I couldn't resist from including one of it's recipes in my blog. I chose to do a simple pizza with pepperoni and olives, "a menu item that's been on the California Pizza Kitchen menu since 1985" (Douglas, 45). The challenge of this recipe is making the dough, as well as cooking the dough on the grill. This fire-grilled pizza is the alternative to cooking pizza in a pizza oven, which is something most of us don't have. Here are the details!

Ingredients
Rolled out dough

Dough
- 1/2 cup water
- 2 teaspoons olive oil
- 1 teaspoon salt
- 1 teaspoon yeast
- 2 teaspoons sugar
- 1 1/2 cups flour

Pizza
- Tomato sauce
- Pepperoni
- Mozzarella cheese
Adding toppings
- Cheddar cheese
- Sliced olives

(Douglas, 45)

Instructions

- Mix dough ingredients, let rise until size doubles
- Put dough out onto a floured surface
- Divide dough into 7 equal pieces
- Roll out dough into desired shape and thickness of pizza crust
- Place dough onto grill, cook until slightly crispy
- Remove dough from grill, let stand for 2 minutes
- Place desired toppings onto pizza, including tomato sauce, pepperoni, olives, and cheese
- Place pizza into oven on broil
- Cook until pizza toppings are melted 
- Cut pizza into slices

Finished product!
(Douglas, 45)


Cooked pizzas
I loved doing this recipe, because it made me feel like I was a cook in a pizza kitchen! Cooking the pizzas on the grill was definitely difficult, I had to be careful not to let any dough slip through the cracks. The second hardest part about this recipe was "making sure to not overcook the pizzas" once they were in the oven, since the toppings needed to melt but the dough had already been grilled (Douglas, 45). The fun of making different, crazy shapes of pizza made up for it though! Of all the recipes I've tried so far, this one was the most fun by far. My family even got involved and put toppings on their own pizzas. The recipe tasted very similar to the pizzas at California Pizza Kitchen, so I'd call it a success! If you were to choose, what toppings would you have on your pizza? Thanks for reading, I hope you can have as much fun with this recipe as I did!


Douglas, Ron. America's Most Wanted Recipes: Delicious Recipes from Your Family's Favorite Restaurants. 1st ed. New York N.Y.: Atria Paperback, 2009. Print.