Showing posts with label Music. Show all posts

Sunday, January 28, 2018

How To Make Your Electric Guitar Play Great!: Dealing with intonation

Intonation is tricky to deal with while tuning your guitar. This is the authors way of addressing intonation. "Play the open string. With the note still ringing in your mind or displayed on a tuner, play the fretted note at the 12th fret. The two notes should be the same-a perfect octave" (Erlewine 115). He references " playing a fretted note at the 12th fret", that means playing an open string, ensuring it is in tune, and on that string press down the 12th fret and play the same string. The note should be exactly the same. The 3rd, 5th, 7th, and 12th frets are commonly marked on guitars with a white dot on the neck.


That is a quick way to get to that 12th fret. If your intonation isn't set, (The note is not the same on the open string and 12th fret) there are a couple of options of what you can do to fix that issue.
 1. Ensure that the frets are level and the strings have a clear path through the neck. If that is your issue, going to a professional is your best bet.
2. If your strings are new, stretch them out before you install them.
3. If your problem persists, once again, a professional is the best way to go.

Intonation is tough to deal with but it is very relevant while playing the higher notes on your instrument. Has anybody had to deal with intonation on any instruments besides guitar? I would be interested to hear what you had to do. 

Flute Techniques: Part 5 Wrapping it all up

Flute Concertino (Cécile Chaminade)

Among flautists, legend has it that Chaminade wrote the Concertino to punish a flute-playing lover after he left her to marry someone else, wanting to make a piece so fiendishly difficult that he could not play it (though he supposedly did manage). 

To wrap up all of my blogs with this piece, this was one of the most difficult songs that I have ever played. Even to this day. I tend to struggle with some sections. But in the video below, it shows how far I have managed to go with only three months of practice. I decided to only perform bits of the piece because it wouldn't be as engaging to listen to the whole seven minute song. (This a five page song)


Corresponding to the second video, "the trill (or shake) consists of the rapid alternation of two tones. They are represented by the printed noted (called the principal note) and the next tone above in the diatonic scale. The interval between the two tones may be either a half-step or a whole-step," (Gower and Voxman, 60). Throughout this song, there are a variety of different musical elements represented, such as the trill.

What was the hardest piece you have ever played? (And to non-musicians) What genre do you think is the hardest to perform?

Saturday, January 20, 2018

Flute Techniques: Part 4 Melodic Interpretation

Rhythm generally means a "movement marked by the regulated succession of strong and weak elements, or of opposite or different conditions." This general meaning of regular recurrence or pattern in time can apply to a wide variety of cyclical natural phenomena having a periodicity or frequency of anything from microseconds to millions of years. 

"In rhythmic music in the more rapid tempi (marches, dances, etc.) tones that are equal divisions of the beat are played somewhat detached (staccato). Tones that equal a beat or are multiples of a beat are held full value. Tones followed by rests are usually held full value. This point should be especially observed in slow music," (Gower and Voxman 19). 

Music has always been unique for its' intricate rhythms. Whether it is heavily accented, smooth, or rapid paced, they all create a variety of different feels. 

What do you guys think is the most significant part to music? What makes it unique?

Sunday, January 7, 2018

How To Make Your Electric Guitar Play Great!: Stringing a guitar

When I first thought of re-stringing a guitar I was kind of intimated by the task, I didn't want to mess up the guitar somehow but the strings were wearing down and I knew it was time to replace them. Once again, I used my friends Fender to accomplish this. Cleaning the fret-board was a perfect opportunity to take off the strings to replace them. Once I had completed cleaning the guitar, it was time to re-string. Restringing a Fender guitar is a little bit tricky, you cannot cut the strings close to the tremolo bridge, or the string will be lost inside, and you will have to spend time fishing it out.

If you have cut the strings correctly, the neck should look like this. You then have to thread the strings through the tremolo bridge and up into the neck of the guitar where the strings are wrapped around the pegs.


 On one of the last rotations around the peg, make sure to tuck the string underneath itself, so it doesn't slide out while you're playing. "This extra string length creates enough winds around the post to force the string down close to the peg head... If you use too many winds, you're inviting the string to stretch and the tuning will slip" (Erlewine 11). Leave about a quarter of an inch excess of the string, then cut the string. Repeat that for each of the 5 following strings until you are finished. 

How to Make Your Electric Guitar Play Great!: Cleaning the fretboard

Cleaning the fret-board of the guitar is a very simple task and should take no more than 10 minutes to complete. "In the absence of deionized water, substitute warm water. Again, user this sparingly on a clean rag" (Erlewine 18).  To accomplish this, I had to first take the strings off of the guitar. I used my friends Fender for this objective. I unscrewed the back cabinet of the guitar and cut the strings out and pulled them from the guitar. I then took a slightly damp rag and wiped down each fret individually until each fret was clean. 

I wiped the rag in a circular motion to ensure that the entire fret was clean. I was surprised to see how much residue I had removed from the guitar by the time I had finished. This build up is very bad to have on a guitar because it messes up the sound. It adds a static-like noise which is not wanted while playing. 

Thursday, December 28, 2017

Flute Techniques: Part 3 Turns

In music, a turn is an ornament/embellishment. These are musical flourishes (added notes) that are not essential to carry the overall line of the melody (or harmony), but serve instead to decorate or "ornament" that line, provide added interest and variety, and give the performer the opportunity to add expressiveness to a song or piece.

The music that I play today rarely consists of turns. So I lack the ability to do turns due to the lack of practicing them, even though it's a simple topic. Even though they rarely appear, it is a good technique to learn about in order to become a better musician.


What to play based on where a turn is located:
  • To the right of the note - the principal tone is held (almost to full value), then the turn is played just before the next melody tone.
  • Between a dotted note and another note having the same value as the dot - the turn is played with the last note of the turn taking the place of the dot, making two notes of the same value. The turn sign after a dotted note will indicate that one melody note lies hidden in the dot.
  • Over a note - the tones are usually played quickly, and the fourth tone is then held until the time value of the note has expired.
(Gower and Voxman 64)
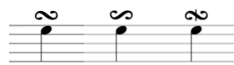
(Left to right) Turn, Inverted Turn (2)
Whenever you play your instrument, it
is good to have a comfortable posture
which will help produce quality sound.


The Turn

"The turn consists of four tones: the next scale tone above the principal tone, the principal tone itself, the tone below the principal tone, and the principal tone again." (Gower and Voxman 64)


Inverted Turn

"In the inverted turn, the order of tones is reversed, the lowest one coming first, the principal next, the highest third and the principal tone again, last." (Gower and Voxman 64)


What do you guys think about the idea of the turn (inverted or not)? Do you think that it is beneficial towards the whole piece? Why or why not?

Wednesday, December 27, 2017

Flute Techniques: Part 2 Double/Triple Tonguing

For wind players, it is typical to start off with singular tonguing. This technique is commonly used with wind instruments to enunciate a variety of different notes using the tongue on the reed, roof of the mouth, or a woodwind/brass mouthpiece.  A silent "tee" or "tu" is made when the tongue strikes the reed or the roof of the mouth causing a slight breach in the air flow through the instrument. 

Normally, I would use the single tonguing technique because most of the music that's given were doable with singular tonguing. Once the music became more complicated, singular tonguing would then be the worse option to use. Having to deal with rapid passages with an insanely high tempo (no slurring allowed) makes it impossible to tongue it singularly. This is where you would need to engage in double, or even triple tonguing.

Double Tonguing

The first time I played it normally (single tonguing) and the second time I played it as written (double tonguing). "Double tonguing is generally used only when single tonguing technic is inadequate. The articulation consists of a forward stroke of the tongue on T (tu) and a backward one on K (ku)." (Gower and Voxman 45)


Triple Tonguing

The first time is performed normally, while the second time it's played while using the triple tonguing technique. Like double tonguing, it consists of the movements of T and K. Instead, it is used in this sequence - T, K, T. It is used for passages of music that are made up of triplets. (Gower and Voxman 46)


(For wind players) What are some exercises that can help improve double and/or triple tonguing? And (for non-wind players) try this technique for yourself! (No instrument required) Do you find it simple or challenging to do? 

Tuesday, November 28, 2017

How to Make Your Electric Guitar Play Great!: Alternate Guitar Tuning: DADGAD

I have recently started playing guitar, starting back up with the acoustic I got when I was younger and never got around to playing then quickly I set my eyes on an electric Les Paul. I have never done anything out of the ordinary with guitar, nothing like Tom Morello playing his guitar with the audio cable even to Mark Knopflers advanced finger picking. I have decided to start my guitar journey off simple with changing my tuning. The standard form of tuning a guitar starting with the bottom string and working your way upwards is EBGDAE."This method of tuning was described in the Guild of American Luthiers data sheets..." (Erlewine 116). This is the standard form of tuning because it has the most versatility when it comes to playing triads and having an open range of sound.

This an example of what standard tuning sounds like on an acoustic guitar. Its very melodic and has more of an upbeat sound. 

"Open tunings such as DADGAD... sound much more pleasant on guitar..." (Erlewine 119). The tuning is called DADGAD because instead of the top and bottom strings being tuned to E like the standard form, it is tuned down to D. A similar ting occurs for the B string, being tuned to A. The author refers to an open tuning, open tuning is when a chord, such as D can be played on a single string, instead of using multiple. Legendary rockers such as Jimmy Page of Led Zeppelin and Keith Richards of the Rolling Stones use open tuning, making chords easier to play and complex progressions simpler. 
That is the DADGAD tuning demonstrated on a electric Les Paul guitar.  The DADGAD tuning is used in typically folk and Gaelic music. 


That is the song Kashmir by Led Zeppelin, played by guitarist Jimmy Page, the open tuning gives the riff a somber, more mellow feel. What songs would you guys be interested in hearing me play as I progress through the process of playing and modifying my guitar? I am open to hearing suggestions and willing to hear feedback.

Sunday, November 26, 2017

Flute Techniques: Part 1 Basics

Music is one of my favorite forms of art. Whether you listen to music or play an instrument, the music produced will always (without a doubt) express an individuals' imagination and emotion.


Playing the flute has always been one of my favorite hobbies. As much as I have practiced, there are still some techniques that I tend to struggle with. However, the Rubank Advanced Method book by William Gower and Himie Voxman, helps me improve my techniques. This book outlines a multitude of different exercises, techniques and tunes (which all vary due to their unique style)  - ranging from something simplistic to something complex.

But before we get to that, here are the basics of playing the flute:

  • Posture should always be tall (not slacking), while your shoulders are back and relaxed.
  • Breathing/airstream should consist of whispering, "too". The embouchure plate should rest against your bottom lip. 
  • Below shows an image of the flute fingering chart (correctly showing where to position your hands), your fingers should be arched and lightly rested on the keys.                                                                                                      (Gower and Voxman 2)


It is important to phrase properly and to use the right articulations. "Careful attention to the marks of expression is essential to effective use of the material." (Gower and Voxman 19) For this will then enable the emotions/impressions that are being played in the passages.

Some techniques that will be present during the next couple of blogs are:

Double/Triple tonguing.
Turns (including inverted).
Playing technical tunes (that are rapid paced).


I tend to struggle with these the most since movement has to be quick and precise. Below is an example (link) of where I would practice this one rapid passage (all slurred) in "The Black Pearl". One way for me to fully and accurately play a really technical passage was to first - practice it slowly, therefore the movements will be memorized. Then speeding it up slightly the next couple of times until I reach the correct tempo. "In all exercises where no tempo is indicated the student should play the study as rapidly as is consistent with tonal control and technical accuracy. The first practice on each exercise should be done very slowly in order that the articulation may be carefully observed." (Gower and Voxman 47).


What do you guys suggest I could do to improve? If you play an wind instrument, do you have any tips about the techniques listed above? If you don't play a wind instrument, what instrument(s) do you play and why? (Or if you don't play any, what's your favorite genre and why?)

Saturday, November 25, 2017

Learning the Piano: The Basics

Learning the Piano: The Basics
Nathan Cheng
How to Play Popular Piano in 10 Easy Lessons, Norman Monath

Learning a new instrument can be equally challenging and rewarding. Hopefully, as one's skills with the instrument progresses, so does their enjoyment. Learning the piano has always been something I had thought of doing (seeing as how there's a piano in my living room) but never had the time to do.

However, acquainting myself with a completely new instrument seemed... daunting. My contextual knowledge of music stems from being in school band where I play the clarinet. The thing with the clarinet is that it is limited to playing one note at a time. On the other hand, a piano can play multiple notes, which means it is able to play melodies and harmonies and chords.

In "How to Play Popular Piano in 10 Easy Lessons", Norman Monath explains in his introduction, "You will learn how to play melodies with your right hand... and how to play chords in different ways so that you can add interest and expressiveness to your renditions" (Monath 16). This excerpt illustrates the complexity of the piano (compared to a clarinet). It's ability to play chords and melodies makes it differ from other instruments (Monath 16).
Playing notes on right hand
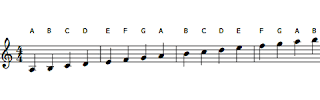
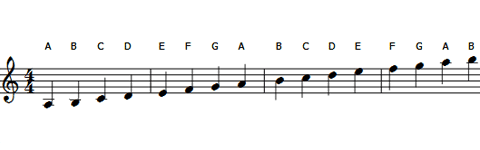
Playing the notes with my right hand was fairly straightforward. I'm familiar with the notes since it is the same treble clef (The swirly symbol at the far left of a sheet of music that dictates what the notes are) as the clarinet. For reference, here is the treble clef and its notes.
Treble Clef
Treble clef notes

Playing notes on left hand
However, acquainting myself with the bass clef notes on my left hand was, to be frank, a lot harder than I had perceived. Learning how to play chords was easy, but playing notes in the bass clef with my non-dominant hand was challenging. Since the notes are written the same way as the treble clef, I almost always instinctively think of the treble clef note, not the bass clef note. For reference, here is the bass clef and its notes.
Bass Clef
Bass clef notes


Verily, I think that memorizing the notes on the bass clef will be the most challenging aspect of learning piano, though once I pass this hurdle I think that this endeavor into the piano will have its rewards.

My question is; To those who play instruments on the bass clef, is there any acronyms or tricks to remembering the notes? For the treble clef, the acronym "Every Good Boy Deserves Fudge" can be useful for remembering the notes on the lines, and knowing that the notes on the spaces between the lines spell "FACE" is another trick to recalling the notes. Is there anything similar to the aforementioned that works with bass clef?

Monath, Norman. How to Play Popular Piano in 10 Easy Lessons. Simon & Schuster, 1994.

Monday, January 25, 2016

Ila Siliga- Warming Up

"No matter how easy the day is, start your practice session by stretching out. You want to get your entire body ready to sing, not just your singing muscles. For your breath to really move in your body, you need to be connected to your lower body" (Phillips 119). 

I found this quote in the book Singing for Dummies, I knew before that you need to relax your body to sing but I feel that I need to pay more attention to it in order to improve my sound. As said before by many other people, "your body is your instrument," when referring to singing. So because of this I feel like I should make it my daily routine to warm up, not just my voice  but my body as well.


The new daily routine that I have developed with the help of Singing for Dummies is to shake out tension of my body, release my head forward, move my head, gently stretch my neck, move all the muscles in my face, move my tongue around, work my shoulders, swing my arms in circles. stretch my sides, swing hips to loosen tension even more, warm up legs (stretching, bending etc.), ad take a deep breath to wrap things up. Now some of these warm-up techniques I have used before, while others I have not heard of before. The ones that I have not heard of are the ones that at first I thought had nothing to do with singing and were completely irrelevant. However, when I read the description of the exercises I see what each could contribute.


I practiced each of the techniques before knowing exactly what each was and decided to only take a picture of a few. The first and second picture demonstrate gently stretching your neck which is described as, "gently drop your left ear toward your left shoulder and pause. Inhale and, as you exhale, drop your head a little farther toward your shoulder," and as you can see I did not do it as directed (Phillips 120). This shows me that maybe gently stretching is more effective for singing purposes than just forcefully yanking my head in each direction. In the third and fourth picture demonstrates stretching your side which entails, "lift your left arm over your head and lean to the right. As you lean, feel the muscles between your ribs opening on your left side," and in the picture I am doing it correctly. By this time I had realized that each of the exercises all release tension in your body and this exercise really helped me. In the fourth I am doing the exercise a different way but it still had the same effect. For all of you out there who decide to try these exercises I hope they help release the tension in your bodies and prepare you for singing. If you do try the exercises, are they helpful for your singing, do they make a difference?


Sunday, January 24, 2016

Ila Siliga- Exploring the shape of front vowels

"Your tongue arches in the front of your mouth to sing front vowels. Your tongue does most of the work shaping front vowels sounds, but make sure that bother your lips and tongue are released and free of tension. The front vowels don't require as much lip action as the back vowels" (Phillips 97).

In my last post I talked about back vowels and how they have to be rounded and open, so in this post I thought I'd talk about front vowels. As we can see in the quote from the book Singing for Dummies your tongue does a lot of work with front vowels. From my previous knowledge of front vowels, I know that they make a "bright" sound. This means that when you're making the sound your teeth are more exposed and your tongue isn't covering the back of your throat. I also know that the vowels are all in the front of your mouth as opposed to the back (which explains the name being front vowels, obviously). One thing I didn't know about front vowels was that your tongue touches your teeth most of the time. This is explained in the book by saying, "another difference between back and front vowels is that, when the tongue arches in the front, the sides of the tongue also raise and touch the upper teeth" (Phillips 98). 

The front vowels are ee (as in me), ih (as in kiss), ay (as in day), eh (as in bed), and a (as in asked). And as said before, when saying all these vowels notice how you pronounce them your tongue touching the ridge of your teeth. With front vowels I have learned that your jaw drops slightly for the ee vowel (as in me) and the more forward the vowels gets the more you drop your vowel. (As seen in the diagram below). You probably have to drop your jaw more because the "brighter" your sound gets the quieter it gets, so then you need more room in order to produce a louder sound. Another thing I learned about front vowels is that, your lips open more as your jaw drops. Lastly what I learned was, your tongue arches more the more your jaw drops. After learning these new things about front vowels I realized that I needed to pay more attention to how I pronounce them the correct way. Also, the exercise showed in the video helped me apply these new found facts. For the readers looking at this description you might not understand or be able to visualize what I mean so I'm hoping the video of me pronouncing the front vowels will help as well as the diagram. Another tip would be for you to pronounce the vowels slowly and realize what your mouth is doing. Hopefully after reading my post you learned something new and can apply it to your life. Can you realize the difference between the back vowels and front vowels?


Recording the drums- Audio tracks

Finally, now that I have the entire drums mic'd up and tuned properly, we get down to the real business- setting up buses and tracks on the computer. Buses are what I will be using to digitally manage the different audio tracks. "a bus is a connection of many different signals, seen sometimes as a channel strip’s send. The send controls however much of the signal you want the bus to send or 'transport' to a specified location, such as an auxiliary track"(Major 143). Buses are important to use because I want to be able to edit each part of the drum individually so that I can have as much control as possible over the outcome of the sound.
I have created a bus for each microphone input 
To create a bus, first I have to open up the recording application that I am going to use, which in my case is garage band. Garage Band is probably the worst choice as it has the bare minimum need to record, but since it comes free with a the mac, I am using it because I don't have $600 to spend of ProTools, the "music industry standard" for recording music. Since Mike doesn't specifically explain how to use Garage Band, I had to fiddle around with it until I found how to connect the interface to the computer and create buses.
After I have finished creating the buses, now the time as come for me to lay down some tracks.

By the end of the book I'm hoping to do a drum cover of a popular song and post it, so if you want to you can comment any song I should do a drum cover for and hopefully i can do it! 

Singing with the piano

 Hello everybody!
Today I started learning to play a song that was included in my book. "In Exercise 50, the key signature tells you the song is in C minor. The time signature is in 4/4 time. The tempo is andante with a metronome marking of quarter note equals 96, and mf tells you to play the song medium loud"(Halpin 78). This is the first thing I read in this book, I believe that when you analyze a music you often can play it easier with more confidence. Something that was mentioned in the book was, to sing the song if it is possible for a better rhythm and this was difficult due to the fact that I couldn't really multitask. I had to think about the note that was coming next and also try to match my pitch with the piano. After playing the piece, I went back to the first part where the book was analyzing the exercise. I understood that I have to analyze my music before playing and this helped me a lot because I could play it with more confidence and easier.


Thursday, December 31, 2015

Samin Bahizad - Practicing left hand and playing octaves

 Hello,
After practicing my left hand I decided, this time, to practice my left hand again so I started from Exercise 13 again. In this lesson I understood what is allegro and the sign of f. "A few new symbols have been added to Exercise 13. The word allegro indicates the tempo, which means  'fast'. The f dynamic marking, which represents forte, means 'loud',"(Halpin, 30). After practicing my left hand again I tried to play octaves with the left hand. "In order to play an octave, you have to open up and stretch your left hand. The low note is played with your fifth finger, and the high note (located an octave above) is played with your thumb...Place your fifth finger on the low C key and your thumb on middle C and play Exercise 15... This is a good exercise to play often, so you can get accustomed to stretching the fingers on your left hand and getting the feel of playing octaves,"(Halpin, 31).
This was really because I have already practiced left hand so I was able to play octaves.


Wednesday, December 30, 2015

Recording the Drums- The Interface and Digitizing

After I finished setting up the mics, the real challenge starts with trying to find that sweet spot in the sounds of all the drums. Though your drums might sound good when you hear them live, its a whole different ball game when recording them. There are a lot of issues you need to make sure you have under control, or else your drum kit will end up sounding like a wet fart in the recordings.

a closer look at the interface
Set up of the interface and drum kit 
One of the first issues, and probably one of the most important is clipping. Clipping is goes over a certain sound limit and thus the audio waves flatten off and you get a strange grainy noise. You have probably heard this sound if you have been blasting a sound trap with the bass all the way in your car and for some reason everything sounds distorted. Though sometimes clipping can be used as a tool to make your beats more personalized and can be added to music tastefully, but that should be left to when you messing with you audio tracks on the computer. When recording something you want to have no clipping at all so that you can get the cleanest sound possible, because while you can clip audio intentionally on the computer, you can also take off the effect. Clipping your base recroding mean that your stuck with that sound because that is what the mics have picked up, and if realized that the recording sounds like absolute trash with the clipping, you would have to go back and rerecord everything. Luckily, the interface I am using for transferring all the sounds the mics pic up to the computer has a feature that allows me to know when each mic is clipping. on the interface, you can turn the mic sensitivity up and down; having it to high will likely result in the sound clipping, but you don't want it too low either or else your mics wont pick up all the tones that the drums are producing. In order to get that sweet spot, Mike Major recommends in his book that you check each mic individually. To do this you must first turn the mic sensitivity all the way up, and then start smashing the drum you are fixing so that you can see that is clipping; then you keep hitting the drums as hard as you can and turn down the sensitivity until the clipping stops but just barely. This way all the drums are turned up as much as possible with out them clipping.

Next, you've got to make sure each drum is mic'd up to the way you like it. By using something called a monitor you can get hear what each drum sound like through the mics before having to record anything. The interface has a plug in for this and monitors can be any kind of multi driver speaker you'd like- from a studio pair of head phones, to nice full speakers. At this point its just about your preference so its up to the person to angle the mics in the way they want them to sound. For me, I like my tones to be a little more on the warm side- which means softer tones and less harsh sounds.

Now that I've gotten the mics set up perfectly in the way I want them, the next part is to get my computer set up for recording!


By the end of the book I'm hoping to do a drum cover of a popular song and post it, so if you want to you can comment any song I should do a drum cover for and hopefully i can do it! 


Ila Siliga- Exploring the shape of back vowels

"Now you get the chance to explore your back vowels. You make these vowels by arching or raising the back of your tongue behind your bottom front teeth and keeping your lips rounded" (Phillips 94).


This shows the basics of what a back vowel is, it is important because when your are singing you need to know how to transition between these vowels and how to pronounce them correctly in order for your audience to understand what words you are singing. Obviously words you're singing have to be enunciated differently than when you speak, but the first step into singing the word you need to know how to pronounce the word. I explored the shape of the back vowels by reading and speaking a variety of different words from my book Singing for Dummies with different back vowels. The different back vowels are ooh (as in moon), OOh (as in foot), oh (as in old), aw (as in walk), and ah (as in father). The picture from the book shows how high your tongue has to arch in order to produce the vowel sounds: "Tongue arching higher in the back of your tongue on the ooh vowel sound and arching only slightly for ah" (Phillips 95).


Not only is tongue position in your mouth important for vowels but the shape of your lips are too. Your lips either have to be rounded, slightly larger, or slightly smaller for different vowels and even though the transitions don't seem noticeable they are key factors to the sound that comes out of your mouth. After trying this exercise with back vowels was very helpful, it made me more aware of my pronunciation of   words and how to contribute it to my singing. I learned that the most difficult vowels to pronounce are the OOh vowel (as in foot), and the aw vowel (as in walk) because they are farther back in the mouth. The ah vowel (as in father) and the aw vowel (as in walk) are hard to differentiate, but I have learned how to do so with the exercises. In the exercises from my book there were more words and sentences but for video time sakes I only said a few in order to get my point across. Now I know how to pronounce back vowels and how to differentiate them. Do you think that maybe learning front vowels will be easier, considering they are more forward in the mouth.


Tuesday, December 29, 2015

Ila Siliga- Dropping the jaw

When singing vowels your mouth has to be rounded and or defined depending on the vowel being sung. The shape of your mouth and how open your mouth is determines how precise the vowel will sound. Since the shape of your mouth is directly correlated to the sound, this is a very important step in learning how to sing correctly. The book I am reading titled Singing for Dummies addresses this point and how sound can get trapped in your mouth if it is not opened which can greatly affect your performance.

These images show me demonstrating how you can "drop your jaw." Dropping your jaw helps open space in the back of your mouth so when you sing the sound will resonate. To resonate is to produce or be filled with a deep, full, reverberating sound. Resonance is very important in order for your voice to be heard better. These techniques are helpful and noticeably makes the back space in my mouth feel larger. The steps also imitate what it is supposed to feel like when your voice is resonating. Not only does your mouth have to be open for your sound but your neck and jaw have to be free of tension and ready to move, which is helped by following these steps. Overall, dropping your jaw is important for the projection of your voice and can be practiced with the following steps.

The book says, "To practice dropping the jaw, follow these steps: 1. Massage all the muscles around your face to make sure that they're free of tension and ready to open. 2. Try yawning and dropping your jaw at the same time... 3. Yawning inside your mouth and throat without opening your lips..." (Phillips 61). Do you think that these techniques could possibly better my singing in the long run?


Wednesday, December 23, 2015

Playing piano with left hand!!!

Hello!
 I decided to challenge myself a little and try to play with my left hand which is what I struggled the most since I was little. When I was little I could never have my focus on both things and I have asked so many of my friends who played piano before how do they focus on both their hands. When I asked one of my really awesome friend ,who is a genius and an artist, she said that the trick is to not think about both hands but to focus on your right hand and then use your left hand. She said to play a song with your right hand then add your left so you won't confuse yourself. After getting some advice I read the book to see what I should do and how I should practice to use my left hand!
  According to the piano book, "For the most part, the left hand plays the bass line in a piece of music, which provides harmony to the melody played with the right hand....Let's assign numbers to the fingers of your left hand...Your thumb1, your index finger is 2, your middle finger is 3, your forefinger is 4, and fifth finger is 5," (Halpin, 28).
Well, when I practiced using my left hand I took the book's advice by numbering my fingers ( I obviously did not write numbers on my fingers but I did numbered them mentally).
Don't judge my nails!

Monday, November 30, 2015

Alfred's Basic Adult Piano Course - Jack Thorsland

What makes one pianist stand out from the others? what makes one pianist great? 

Hello Everyone! For me, learning piano was an easy choice. I believe that the piano is the most important instrument in music. It is arguable that the drums may be considered more important, due to them being the first of instruments, but the ability to play piano opens many doors in the musical universe. This consists of; The ability to identify notes, to gain a "musical ear", and to learn why things generally sound good or bad. Upon beginning my book, i learned one thing. There is a science to playing musical instruments correctly, actual theories that revolve around what makes a player not just good, but great.

The first words of my book, are quite literally "BE KIND TO YOUR HANDS!" (Palmer 4) The author is VERY confident in his belief of hand condition. He explains how it is necessary to wear gloves every time I have to lift a heavy object, or even use hand tools such as screwdrivers or wrenches. This is only the beginning. (Palmer 4)

"Before practicing, it is good to soak the hands for a few minutes in warm water. This promotes circulation. Many concert pianists use very warm water on their hand before beginning to play. Towel the hands vigorously until they are dry, then hold your arms out with the hands dangling from the wrist, and shake out your hands rapidly for a few moments." (Palmer 4)

I have already changed my outlook on playing piano. what Palmer is explaining is that there is much more to playing the piano, then just pressing your fingers against the keys. The conditions of your hands, and the way you prepare them upon practicing or even performing, these are the traits that differentiate those who are mediocre at piano, and those who can be great.

Now, looking back on my question, i answer with this statement, feel free to quote this one day.

The ability to play piano is not influenced by the time you practice, but the manner in which you practice, and the manner in which you prepare.


This one is for you Mr. Palmer! 

Honestly, dipping my hands in warm water was one of the best ideas ever. All the activities that involve using fingers are benefitted, especially playing the piano.