Showing posts with label Bhardeep Dhaliwal. Show all posts

Monday, January 25, 2016

Bhardeep Dhaliwal: Lightroom Editing- CityScape

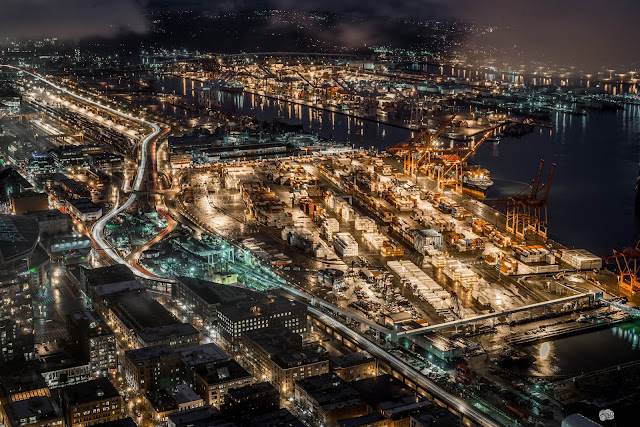
For my last and final post, I went to the Columbia Tower yesterday night and shot. I went to the observatory on the 73 floor and shot down. It turned into a beautiful city scape, and everything looks so small in perspective from above.

  • The night was sadly pretty foggy so i only got to take a few shots since the entire top half of the building was almost covered in fog. 
  • I had to wait till there was a break in the fog to take shot. I set up my tripod against the glass window and mounted my camera. I used the same sense as i always do which is the 50mm 1.4
  • The 50mm focal length provides the closest possible to the actual human eye which made everything realistic in size. 
  • The setting for the shot were a longer exposure of: 
    • Exposure: 15 Seconds
    • F/ 14
    • ISO: 200
  • The 14 aperture made sure that everything would be in focus
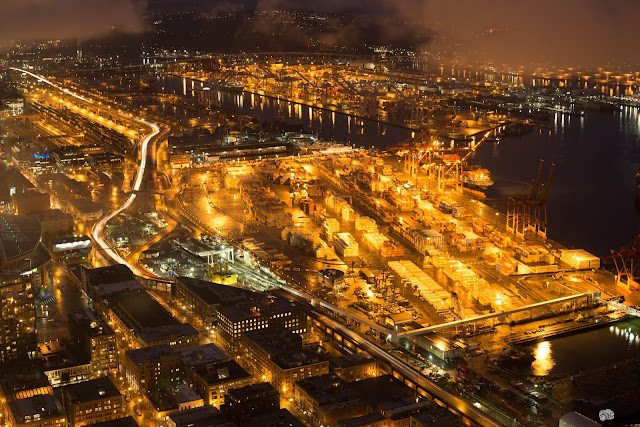
Shot straight from my camera, no editing

  • The shot came out how i wanted, everything was solid and i could edit things out in Lightroom that i didn't like so much.
  • First thing i did was bring out the shadows which revealed a lot more of the image and showed more details
  • Second, I used to tool that i discovered while reading the book. You can go into the Lens Corrections Menu and select Remove Chromatic Abberations. This makes sure all the lines in the buildings are straight how they should be
  • Next I brought down the white balance as always which removed all of the orange and it gave it way more of a realistic look. This really changed the entire shot. 
  • Fourth, I added clarity to the shot and fixed the whites and blacks. 
  • Finally i used the adjustment brush and took out any dirt spots on the lens and exported the photo
  • The Final Product 
MUY BIEN 


Bhardeep Dhaliwal: Lightroom Editing- Snowbaru STI

Earlier this week i went to Snoqualmie at night and took some shots for my friend, I figured this would be a good thing to use for one of my Blog Posts.
  • We went at night and Snoqualmie was full of snow, i had him park his car in a huge parking lot with the mountain side behind his car. We set it up like this so the car wasn't just the only thing in the picture. The snow is white and reflects light so i didn't need an exposure as long as usual. 
  • I set up his car, and then put my camera on my tripod and framed the shot how i wanted. Then i took a few tests shots and eventually found the settings that i thought looked about right. 
    • Exposure: 4 Seconds
    • F/ 13
    • ISO: 400
  • The shot came out solid, good exposure. Only thing off was that the snow and whole shot looked yellow because of the lights. 

  • First thing i did with the shot was shadows and highlights, i brought out the shadows and turned down the highlights as i always do
  • Second i messed with the blacks and white's, making sure everything was properly exposed. 
  • Then i added clarity to the shot as a whole. Then using the brush tool i learned about in the book, i added clarity specifically to the top half of the picture since it looked hazy from the fog.  
  • Next, i brought the white balance more to the blue side. I wanted the snow to look more white.
  • Doing the same thing as the last step, I used the graduated filter they talked about in section 4. I placed it from the top going down and added way more blue. I liked the color tone of the bottom half and only wanted to change the top mountain side to match it. This tool did that perfectly. 
  • Finally I decided to make the car purple, just because I'm a rebel and wanted too. I felt like it looked decent and was snazzy. 
EVERYTHING IS PURPLEEEEE


Bhardeep Dhaliwal: Lightroom Editing- Portaits?


  • For my 3rd post I wanted to try editing something i usually don't do. I chose to do portraits and trying out a workflow on them. My cousin TJ asked me if i could take some pictures for his graduation awhile ago and i had the pictures still laying around in my Mac.  He had just graduated from UW with a masters in psychology. (This was a not so serious picture)
  • We shot on campus at UW. I had him stand near some trees in the shade which allowed my to keep a low aperture and depth of field. I wanted to shoot at F 1.4 but that wouldn't even get half his face in focus so i went with 3.5
  • The shot's settings were:
    • F/ 3.5 
    • Exposure: 1/100
    • ISO: 100
Picture i took straight from the camera, no edit. 
  • First thing i did in both picture was cropped it so TJ was the focus of the picture more. It allowed it to have him as the center of the picture. I used to crop tool and also the angle tool so i could level out the picture and crop
  • Next i brought down the exposure a tad bit since the background was a little bit too blown out and white
  • Then i went and worked on the white balance and blacks, allowing the picture to have a warmer tone and more depth to it
  • 4th, i went to the whites and adjusted them properly. For this i used a feat i learned in The Adobe Photoshop Lightroom CC Book for Digital Photographers. If you press the Alt key while adjusting the white's it shows the burnt parts of the image, allowing you to tone them down so they won't be messed up when printing the pictures. I did this because i knew he would be printing out the final product
  • After that, I brought up clarity and added vignette to the picture to bring the focus to the center of the picture. 
  • Last i added even more clarity and color to the GOLD GRILL AND WATCH!!!
Final product after the work flow. 


Monday, December 28, 2015

Bhardeep Dhaliwal, Lightroom Post Processing- Light Trails


  • For my second post, I went out and took some shots of light trails at night. Light trails happen when you take a long exposure picture and have a light travel through the picture as the shutter stays open. The sensor catches the light traveling throughout the picture and captures it all.
  • For this shot I went to Seattle and found a rode that went over I5 and was perfect for the shot. It was nighttime around 7pm so 5 o'clock traffic was in full effect, which meant there were tons of cars with their lights on allowing me to capture their motion.
  • I set up the shot facing down at the free way under me, the frame captures the free way along with a few buildings in Seattle such as the Columbia Tower
  • The settings i used for this shot were:
    • Exposure: 7 Seconds
    • Aperture: F/8
    • ISO: 100
The original shot before post processing, the shot came out decent. White Balance is off


  • The shot came out well. I got all the essential things i needed like the light trail it's self, proper exposure, and no blur or grain. Next i
  • Next I imported it into Lightroom and began post processing using the techniques and tools it talked about in The Adobe Photoshop Lightroom CC Book for Digital Photographers 
  • Then i set my exposure and went to fixing the white balance. In the book it talks about how to use the white balance slider or you can pick a spot on the shot and copy the white balance from there. I chose to use the slider and went towards the blue side since the shot was way to orange/yellow for my taste. 
  • After that i went and brought out my shadows since the shot is dark and then brought up clarity. i prefer a crisp shot. Next i color corrected it. 
  • Finally, I went and fixed the distortion by clicking the "Enable profile correction's" option. I read about how this fixed and disproportions that your sense may cause. It fixed the shot a lot.
  • I then exported the shot and this was the final product. 

Wednesday, December 9, 2015

Bhardeep Dhaliwal, Lightroom Post Processing- Sunsets


  • The book i chose to do my blog posts on was, "The Adobe Photoshop Lightroom CC Book for Digital Photographers. This book is made to help photographers learn both the Lightroom and Photoshop programs which are made by Adobe. 
  • I've been shooting photography for awhile and thought the next step to progress further would be to learn how to edit pictures. No matter how good of a photographer you are, post-processing can always make any image better. 
  • For my first blog post i decided I would learn to edit pictures with sunsets, making it stick out more and be more vibrant. 
    • The picture i would be working on today is a shot that was taken of my brother's car in Bellingham along the water. 
    • The shot was taken with a Nikon D600 Full frame camera with a 50mm 
    • The shot was taken at 1/60th of a second, F4 and Iso 100
The original raw file how it came out the camera

  • Here's the original shot that i took. It's not the worst thing ever but then again it's allow not the worst. The foreground is terribly dark because when shooting for sunset, you expose for the highlights. There was a lot of work to be done but it's pretty simple
    • 1st i got my exposure set properly
    • Then, i turndown my highlights which brought more of the detail of the sunset back out. I turned up my shadows which illuminated my foreground so it wasn't so dark
    • Next i moved onto white balance, set it properly along which blacks and made sure there was nothing burnt.
    • 4th, i turned up the clarity and vibrance according to how i liked it.
    • After that, I set my white balance which i added more yellow and red to make the whole picture seem more like a sunset. 
    • Next i took a brush and brought more color and vibrance back into the sunset to match how it looked when i was at the place taking the picture. And lastly, i desaturated the foreground so it wouldn't be too warm. 
  • My end result looked like this. I'm extremely happy with it. 
The shot after i went through my entire editing flow on Lightroom, the final shot.