 | ||||||||
| This is the look that I did
For this look I used:

Starting off I put my Revlon photo ready foundation all over my eyelids to make my eyelids be one color.

This is where I modified the look in the Lauren Luke Looks book she added the gold to the eyelids then added the dark shades but from my own reserch(a.k.a youtube videos) I lerened that you should do a transtition then add the crease color, and that is what I did.
So, I put the color circled in red all over my eyelids and then the color circled in black all over my eyelids to be the starting transition.
 
Then I added a black eyshadow color to my outer corners, Making sure to blend using a "circular motion"(Luke 53).
 
As
you can see blending is crucial because if you do not blend the eyeshadow it
for one looks bad and second of all it just looks like a blob of a black
color(which is not appealing).
Next I added a gold eyeshdaow to my crease. The first one I put on was not to pigmanted(so you could not see the color that much).

So I wet an eyeshadow brush and got another gold eyshadow and placed it on my eyelids(wetting the eyeshadow brush made the gold eyeshadow more pigmanted and shimmary).

The next thing I did was out the a gold eyeshadow on my lower lash line, to show the allusiion that my eyes are bigger, making sure to not get any eyshadow in my eye. According to the Lauren Luke Looks her tip was to "Try not to get eyeshadow in your eye- It hurts!"(Luke 53), from expirence I can say I agree with that statment.
 
It's not to noticable though.
The last thing I did was put mascara on my eyelashes

I think this look turned out ok, I could have out the black eyeshadow a little bit more up to pop more, but all in all it look pretty good.
 
Even though in the book Lauren Luke adds the dark color afrtewards it still shows a clean look. I reallly didn't know the affects of the transtion color or why you need to add a dark color to the look. I know now that it gives a clean look and also ties the look together while giving it kinda dramatic effect.
Reading this post, do you think that this look is more of an everyday look? or a "date night" look. Would you recreate this look?
|
Showing posts with label basic. Show all posts
Showing posts with label basic. Show all posts
Monday, December 18, 2017
Eyeshadow look: Natural Glow
For my second look I decided to do another simple look which is called "Vintage Gold" in the Lauren Luke Looks book. The look wasn't super hard to achieve and the directions of the book were clear. I decided to modify it a little bit because from the background information that I know, but I still followed most of the steps.


Wednesday, November 29, 2017
Makeup Manual: Eye shadow Basics
I have always had a love for makeup, but i never knew there were so many "rules" you had to follow. I usually just sit at my vanity and play around with makeup trying new techniques, but ever since i started reading Bobbi Brown Makeup Manual by Bobbi Brown, i have learned that makeup is an art and there are different techniques for all skin types, eye shapes, brow shapes, and skin tones. Bobbi Brown has taught me that are multiple techniques in order to achieve a look that fits your eye shape, skin type and facial features the best.
Today i am focusing on eye shadow basics. Before reading this book I used any random color on my eyes not knowing if it would compliment my eye color. However, Bobbi Brown has taught me that there are certain eye shadows that compliment different eye colors. "For everyday application, pick shades of shadow that bring out the eye color rather than shadows that make a statement" (Brown 94).

This picture above is a guide that Brown placed in her book to help readers discover what eye shadow colors go best with their own personal eye color.
I have green eyes so i created a look using browns with hints of gold (Camel, Taupe; in picture above). When contouring (crease color or transition shade) your eyes , there are different ways to approach this technique depending on what eye shape you have. I personally have deep-set eyes and according to Bobbi Brown, when contouring your eyes, "Deep-set eyes need to be brought out with light and medium shades of shadow. Colors that are too dark recede and will make the eyes look even more deep set" (Brown 96).
Posted below is the look i created:

I took Brown's advice and used a medium to light brown in my crease to contour it to ensure that i did not make my eyes look even more deep set. I also placed light browns and golds on my lid to help compliment my green eyes.
There were many products used to create this look all the way from multiple eye shadow palettes to the best brushes possible to achieve this look.
For my eye shadow, I used the Urban Decay Naked 2 and the Urban Decay Naked Smokey:

Urban Decay Naked 2
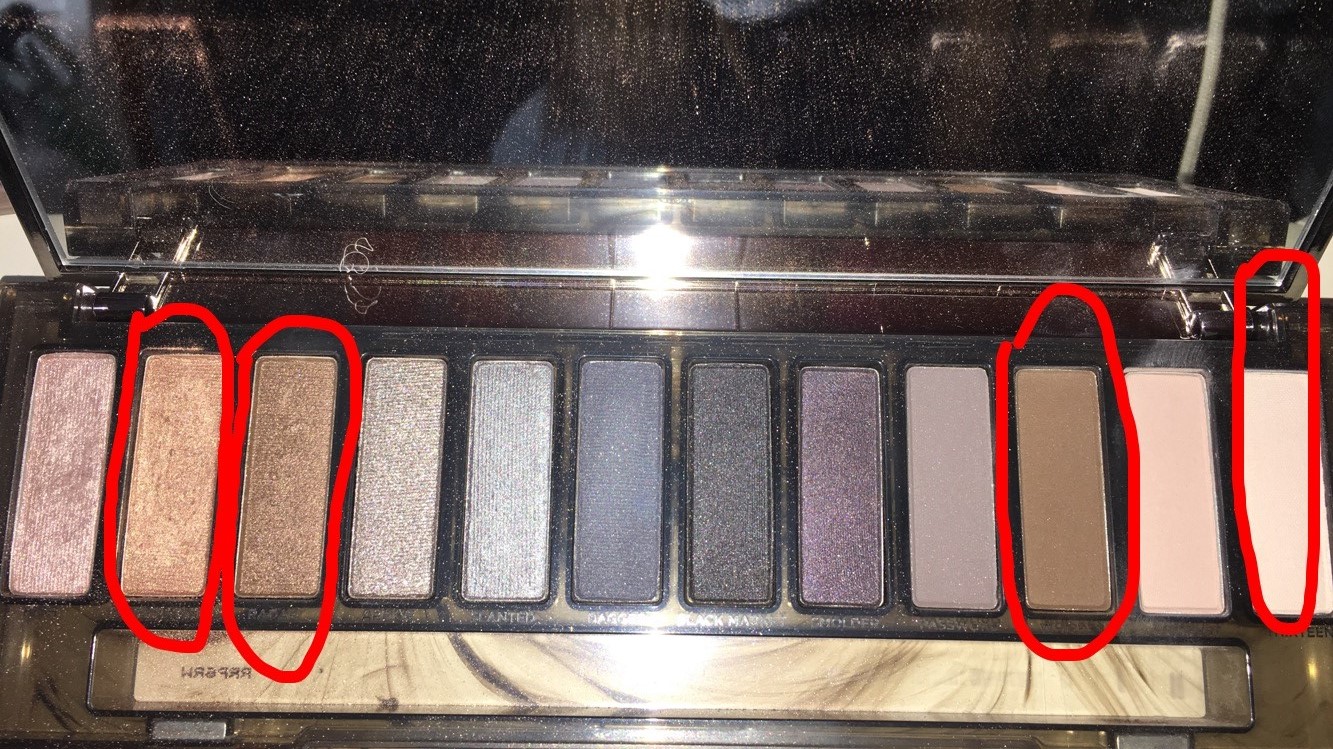
Urban Decay Naked Smokey
As you can see above, the colors circled are all colors that i used and that are meant to compliment my eye color and eye shape.
To create this look, i first used the light white matte color in the naked smokey palette and placed that all over my eye lid as a base color. Then i took the matte brown from the same palette and placed it in my crease to contour it. I then took the shimmery brown shade in the smokey palette and placed it on top of the matte brown in my crease along with the 2 colors on the far right and far left in the naked 2 palette to add shimmer. Finally, for my lid i took the middle color circled in the naked 2 palette and the far left color circled in the smokey palette to create a light brown/golden shimmer color for my lid.
The brushes that you use are also very important in order to achieve a flawless eye look. For this look i used an eye blender brush, eye smudge brush, and an eye shadow brush. Each of these 3 brushes all do different things.
I used the eye shadow brush to apply the color to my lid because "This brush has natural, soft, rounded bristles with beveled edges that deposit a sweep of shadow across the lower lid without leaving any harsh lines" (Brown 12). I used the smudge brush to help blend and place the color on the "outer v" of my eye. Lastly i used the blending brush to blend my crease colors and transition shades together because it is "a soft, fluffy, natural-hair brush with long bristles designed to blend eye shadow and eliminate lines of demarcation on the lids after applying multiple shades" (Brown 11).
Posted below are the brushes i used:

The brush on the far left is a dual ended brush. On the top there is a smudge brush and on the bottom there is a blender brush. The brush in the middle is an eye shadow brush and the brush on the far right is a blender brush.
Now that i finally know what colors work the best for my eye color and shape and what brushes to use in order to achieve it, i am much more confident in my eye shadow looks that i create. I hope that you can benefit from my tips that i learned through Bobbi Brown and i hope that those interested will try to create an eye shadow look that suits their eye color and eye shape the best.
Have you heard of these tips before? What eye color and eye shape do you have? Are you interested in creating this look?
Brown, Bobbi, et al. Bobbi Brown Makeup Manual: for Everyone from Beginner to Pro. Springboard Press, 2011.
Wednesday, November 30, 2016
Braid #1- French Braid done by Eve Waters
Hey everyone! My name is Eve if you didn't know and this is my first blog post for my Q2 IRP book. The book I chose to do is "The Braid" By: Sarah Hiscox & Willa Burton (of the Braid Bar). I chose this book because of how much braiding interests me and how I can easily improve if I practice on harder braids every single time. For my blog I have decided to show the braids that are more complex and the fun braids for everyone to learn how to do or at least get an idea on what it should look like in the end. My first braid I chose to do a French braid on Austin, because of how many braids base off of this particular one and how enjoyable it can be to wear a basic easy braid.
The first step (pic shown below) is to grab 3 strands of hair starting in the middle of your head.

You then should go over- under- over or sometimes like myself I like to start going under-over-under. There is not a difference of how the braid will turn out I just believe that the under-over is tighter. (pic below)

You then keep going under-over-under and make sure you keep tightening the braid so the braid is not lose. Your goal is to keep it tight along the head you are braiding. (picture below)

As you keep going once you reach the end of the head then make sure to have a hair tie near so you can tie the ends of you hair.

That is how you do a French braid and it will be most helpful for the more braids coming! Thank you for reading my post!! Any requests for a certain braid type?
The first step (pic shown below) is to grab 3 strands of hair starting in the middle of your head.
You then should go over- under- over or sometimes like myself I like to start going under-over-under. There is not a difference of how the braid will turn out I just believe that the under-over is tighter. (pic below)
You then keep going under-over-under and make sure you keep tightening the braid so the braid is not lose. Your goal is to keep it tight along the head you are braiding. (picture below)
As you keep going once you reach the end of the head then make sure to have a hair tie near so you can tie the ends of you hair.
That is how you do a French braid and it will be most helpful for the more braids coming! Thank you for reading my post!! Any requests for a certain braid type?
Subscribe to:
Posts (Atom)