Showing posts with label shading. Show all posts

Saturday, December 9, 2017

Shading and Positioning

        Drawing has always been a big passion of mine, but i lacked the skill (and patience!) to be able to create something from my mind. When I found this book called You Can Draw in 30 Days by Mark Kistler, I immediately thought it was perfect.


          The first lesson was drawing a sphere. I know, simple, just draw a circle. But there is more to it. Kistler says to determine a light source, and apply shading to make the drawing look 3-dimensional (12). He also explains that "Cast shadows are fantastic visual anchors that help secure your objects to the ground surface in your picture" (Kistler, 13). After drawing the cast shadow you put shading on the object to emphasize the 3-D effect. Here was my final product:


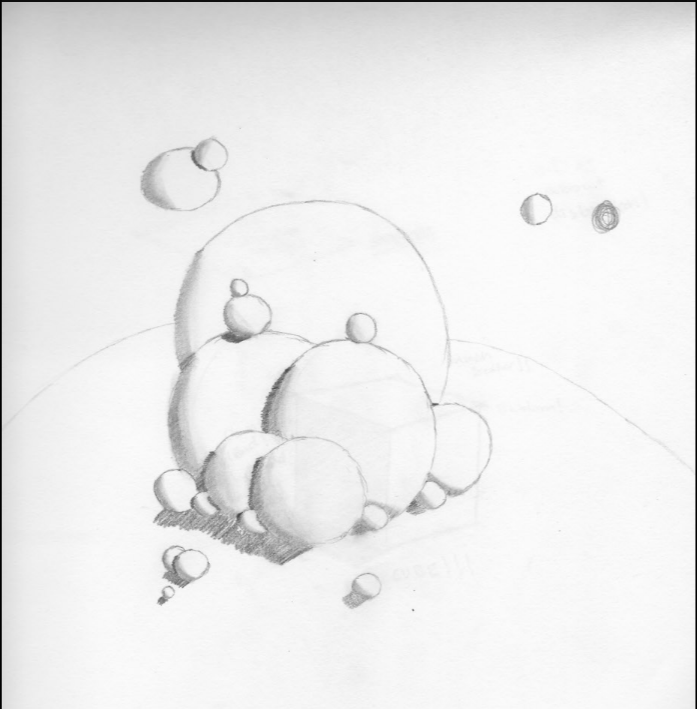
          In lesson 2, Kistler went on to explain how some drawing techniques can create an illusion to make objects seem further away. Kistler mentions three techniques to help create the illusion. Size, placement, and overlapping. Combine these techniques with shading, and you can get a drawing like this:


Do you think positioning and shading is all there is to 3-D drawing? Or do you think there is more?

Kistler, Mark. You Can Draw in 30 Days: the Fun, Easy Way to Learn to Draw in One Month or Less. Da Capo Press, 2011.

Tuesday, December 27, 2016

Realistic Drawing - Shading Practice

After looking at some feedback from peers and reflecting on my past drawings, I had decided to work on my shading techniques for drawing 3D objects. In the sketch below, I focused on using some basic 3D shapes as they are easy to practice on. In the book I am using, The Big Book of Realistic Drawing Secrets, the author gives many bits of advice when drawing shadows of objects, such as "Angular objects will have a more abrupt value change" and "Round objects will have gradual changes". There was a lot of tips, but to summarize, the author went into detail about how certain objects will be affected by certain light and where the source is. The book also stated to identify a source of light to find the natural shadows, which did help me make the shadows direction consistent. One final thing about shading was how "smudging", which is a technique where your use your finger to pull the lead on the paper and spread it, making it fade out, isn't a good technique and shouldn't be used.

Using the examples and tips in the book, I drew a rectangular prism and a sphere to show the different ways the shadows form on the two shapes. I chose not to smudge, since the author didn't advise it as being any good. I also made it so the shadows are coming from a source of light to the left and slightly above the objects

Overall, I think practicing this has helped me understand how to draw shadows consistently, and that learning this now will help me with future drawings. Is there any advice you would like to give me or any areas of improvement where I should focus on next?
Parks, Carrie Stuart., and Rick Parks. The Big Book of Realistic Drawing Secrets. Cincinnati, OH: North Light, 2009. Print.

Monday, January 25, 2016

Amarpreet Singh: Drawing a Tree

For my final post, I decided to put all of my skills to the test. Throughout my blog posts I’ve done many things such as shading, drawing curves freehandedly, and even more shading. Alright most of my blog posts somehow relate to the topic of shading. For this final drawing, I needed something that could show my improvement in overall drawing and shading as well.

That’s why I decided to draw a tree. Catherine V. Holmes, the author of my book called "How to Draw Cool Stuff: Basics, Shading, Texture, Pattern and Optical Illusions,” has a very detailed tutorial on how to do so. 90% of the drawing itself is shading the tree, which was perfect to show my improvement from drawing my first drawing freehandedly.

First, Holmes tells us to draw “a basic trunk and a few bits of branch stemming from it.” (Holmes 134) Holmes also suggests not to use a ruler as the tree’s trunk should be natural with lots of tiny imperfections.
Next, I drew the outline around the tree. I made sure not to make this symmetrical, as Holmes had stated “don’t make it perfectly symmetrical – trees are organic structures and are never exactly the same on both sides.” (Holmes 134)
Continuing on with the shading, I took note of the fact that there would be a light source. Of course, Holmes had a work around, shading darker on the left side of the tree while having some darker parts pulling off to the right.
Going on I darkened some parts of my tree, mostly the shaded leaves and the trunk itself, only to bring it out a little more in the mess of the shading.
Again, I used my technique of swiveling the pencil lightly around the parts I needed to shade, I learned to do this while drawing my eye.
Finally I erased the outline of the tree and added details to the trunk of the tree, noting the fact that the light would change how the trunk looked. Also drawing a cast shadow can be important as well.

What do you think, did I improve from my first post? Also, was my human eye better or this tree?

Overall I had fun learning about all these different techniques and things about drawing. I still need a guide or helping hand but practice makes perfect. 

Monday, December 28, 2015

Amarpreet Singh: Drawing a Eye

In my last Blog post I tried my hand at drawing for the first time. It wasn’t very impressive with the lopsided shading and the missing details. This time I thought I would try to add more details to my drawings. That’s why I chose to draw an eye. My book, "How to Draw Cool Stuff: Basics, Shading, Texture, Pattern and Optical Illusions" by Catherine V. Holmes, has a very detailed guide to drawing a simple yet very detailed eye.

First the author suggests you draw “an outline shaped like an almond, making the inner corner lower than the outer corner.” (Holmes 65) This technique of drawing and almond-shaped outline is great since it shows how easy it is to start the drawing.
 
After I drew the outline I drew the inner circle. Which wasn’t that hard, but I still need to practice free-handing circles to better my drawing skills.
 
Then I drew the pupil and the highlight. The author suggested to “draw the highlight first to extend the pupil off.” (Holmes 65)
 
I continued by filling in the pupil of the eye as dark as I could, the author suggested this as it shows adds more detail by putting the highlight above.
 
Drawing the eyelids and putting on a few lashes was the easiest part of this. Drawing little bits of lashes lets you go back to it later to add gender to the eyelashes. “The male eyelashes have lighter eyebrows while the female eyebrows have darker and taller eyebrows.” (Holmes 65)
 
I darkened the inner circle along with the outline of eye. Continuing by drawing lines into the pupil extending from the inner circle.
 
Then I shaded in the outer edge of the inner circle along with the pupil darker as I went on. It was suggested to add more lines to add more depth as well.
 
I drew darker and taller eyelashes for a female eye.
 
Now came the hard part. The shading of the eye. The author suggested to smudge the pencil shade with your finger but instead I swirled my pencil lightly over the parts I wanted to shade in a circle. It worked pretty well.
 
Tell me what you think of my second drawing and feel free to leave tips.
Have you ever drawn an eye? It was an interesting and surprisingly quite easy experience for me.