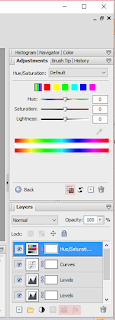
I used the software called Serif PhotoPlus Starter Edition and I admit that the program did intimidate me at first, but after I got used to the basics, it got easier.
The first thing I learned was applying exposure. In the program, there is something called "levels" and according to Gatcum, "While using Exposure allows you to make universal changes to your images, Level lets you control the shadows, highlights and midtones independently" (Gatcum 170). Keeping this in mind really helps my future photos because my worry for taking very dark/bright photos is less of an issue knowing that I can alter the exposure later on.
The next setting I learned was adjusting the contrast. The images below shows my adjustment of the contrast.
 |
| Before |
 |
| After |
In the photos above, I followed the author's tips. Gatcum states, "When you open a Curve dialog box, you'll see a straight line running across a box from bottom left to top right" (Gatcum 172). A curve box is the setting that allows you to change the contrast. The basic explanation of the curve dialog box is that if you add a point to the top right of the line, you can alter the highlights of the image by moving the image up [brightening the photo] or move it down [darkening the photo] (Gatcum 172). The same thing applies when altering the shadows, but you must press the left end of the curve (Gatcum 172). The last thing that Chris Gatcum states is, "The simplest way to boost a contrast is to create a shallow "S" shape" (Gatcum 173). I am surprised to say that by following that tip, my image did not turn into a complete mess; the "S" shape really does help!
The last setting I learned was boosting the color. The author talks about how hue is a huge way of boosting the color of an image. The author says, "Adjusting the Hue slider shifts the overall color bias of an image" (Gatcum 174). This means that changing the color of the Hue can change the color of the image itself, so I tried not to alter the hue too intensely since I did not want a yellow or purple tinted photo. Gatcum also states that "Saturation determines its intensity, usually from a scale of 0...to 100" (Gatcum 174). Now, Saturation is the setting I changed the most because I love creating intense photos in my images. The photos below the change of the hue/saturation.
 |
| Before: Hue: 0 Saturation: 0 Lightness: 0 |
 |
| After: Hue: -3 Saturation: 29 Lightness: -2 |
 |
| Before |
 |
| After |
My question to you guys is; Have you ever tried editing a photo using a program? If so, how did it turn out?
I have edited photos on my phone using a program called "Aviary" It has many different settings for blurriness, lighting, and filters.
ReplyDelete