Showing posts with label food. Show all posts

Sunday, January 28, 2018

Bigger, Leaner, Stronger: Fueling your body


             Bigger, Leaner, Stronger: How to eat properly 


       An important part of bodybuilding and staying fit in general is to eat healthy and stay fit. In the book Bigger leaner and stronger, the author Michael Mathews sheds light on eating healthy with this quote: "Some people say it's 70 percent of the game, while others say it's 80 or even 90 percent. Well, I say its 100 percent."(Matthew 75) Michael Matthew also says that "the building blocks of a great body are more like pillars than puzzle piece. Weaken one enough, and the whole structure collapses."(Meyers 75) I agree with Mathews points because to become bigger,Leaner and stronger you need to eat good food as "Fuel" to become Bigger, Leaner and Stronger. I start my meal prep with healthy foods, mostly protein based. In the image below, I make Chicken Afritada, a Filipino dish that mainly consists of Chicken, Tomato, Potato and Rice. This meal is lean and full of protein and carbohydrates. I recommend that if you were to start a diet in order to get leaner and stronger, that you prepare yourself foods that will allow you to obtain the right nutrients that your body needs.

Work cited

Matthews, Michael. Bigger Leaner Stronger: the Simple Science of Building the Ultimate Male Body. Oculus Media Group Llc, 2015.


Monday, January 22, 2018

Taste of Vietnam: That's a Wrap

Taste of Vietnam: That's a Wrap

Nước Chấm 

made by Brandon Nguyen 


OVERVIEW

As I had said before, cooking is no easy task. I wanted to prep something simple, so I decided to try out a nước chấm recipe in Ân: To Eat. 

Nước chấm is a dipping sauce Vietnamese folks use on mostly everything. I most commonly eat spring rolls with nước chấm. However, I wanted to prepare broken jasmine rice, accompanied with a fried egg, sliced tomatoes, and glazed beef. I enjoy this sauce for its versatility. It can be enjoyed on almost anything. As stated by Helene and Jacqueline An, "We use it as a dip for spring rolls, to brighten seafood, to add tang to protein as a dressing for noodles and rice, and as a marinade for meat" (An Helene & Jacqueline 274). 


PREPARATION

Cooking the beef was probably the hardest procedure. To give it flavor, I first had to glaze it, using my mother's recipe. For the searing, I referenced the book. In the section "Basic Techniques," Helene and daughter Jacqueline An explains to readers how to add protein. Most helpful was when they said that, "To sear quickly and correctly, food needs enough room. Don't overcrowd the pan, as that can lead to food steaming instead of searing" (An Helene & Jacqueline 35). Frying an egg was rudimentary, and slicing the tomatoes was not difficult at all; these were things I had done before and have mastered. 


For the nước chấm, I added sugar into warm water and stirred until everything was dissolved. I then added fish sauce, rice vinegar, and garlic. To balance all the flavors, I put in some chili paste. 


Making this was not a hassle. This is something I can make on my own. I am glad I chose to make this, for it is straightforward. After making the fried rice and noodles, I found that I was overestimating myself. It became manifest that I was doing more than I can bear. 


TAKEAWAY?

My takeaway is that mastering the art of cooking is not something that happens overnight. A book cannot simply make you a better cook; only you can do that. I advise all beginner cooks to start with basic recipes. Also, follow all the instructions. Later on, you can alter the recipe to best suit your taste, but make sure to do what the book tells you to. You will find that by taking baby steps, you will eventually grow.

Creating these recipes has given me a chance to explore my culture. Vietnamese cuisine is something that means a lot to me, especially since it reminds me of my grandmother. Though I may be American, I will never forget my Vietnamese roots. I thank you all for reading these posts! I hope I had taught you all something new. Has anything given you a hard time? How can you improve?


Works Cited: 
An, Helene, and Jacqueline An. Ăn: to Eat: Recipes and Stories from a Vietnamese Family Kitchen. Running Press, 2016.

Wednesday, December 27, 2017

Taste of Vietnam: Cheers for Chè

Taste of Vietnam: Cheers for Chè

Chè Chuối - Brandon Nguyen 


I remember the times when my grandmother would prepare special desserts for the entire family. Every night, it was something different; I don't know how she did it. Probably the most memorable dessert to me was her signature chè chuối, described in Ăn: To Eat, by chef Helene An and her daughter Jacqueline An, as "banana pudding" (An Helene & Jacqueline 252). I chose to make chè chuối on behalf of my grandmother, the wonderful dishes she would make for me, and my fondest memories of her that will forever live in my heart. 


The recipe calls for five bananas halved lengthwise. As I previously mentioned, cutting is extremely challenging for me. I am terrified of knives and hate being around them. I was relieved because bananas are super easy to cut. Despite the simplicity, cutting the bananas was good practice. From thereon, I realized that making this was like a walk in the park. 


The bananas sit in two tablespoons of sugar for 15 minutes after they have been halved.
Challenging for me was making sure that the tapioca pearls do not stick to the bottom of the pot. The trick is to watch your pot and stir gently for several minutes, making sure that the tapioca pearls do not "pop when stirring or they'll flavor the chè too early" (An Helene & Jacqueline 252). The pearls are ready when they appear to be translucent. I was ignorant and did not watch over my pot; therefore, I burned some tapioca that became stuck on the bottom of my pot. No one wants to do extra cleaning!

Moreover, boiling water in a pot was something that was new for me (it is humiliating, I know). In the chapter, "Basic Techniques" in Ăn: To Eat, Helene and Jacqueline An suggest leaving "enough room in your pot for the liquid molecules to expand as they heat up" (An Helene & Jacqueline 36). In other words, make sure there is enough space for your water to bubble; it was pretty straightforward and, in addition, I successfully boiled water.

Tapioca pearls are added once the water is brought to a boil.


Overall, this recipe was simple. I would play around with the level of sweetness, for my chè was not sweet enough. On top of that, it had a soup-like consistency and could have been a little thicker. If I were to make this again, I would just eyeball the ingredients instead of measuring them and make small adjustments from the book's recipe. Sure, the chè I made is nothing compared to my grandmother's, but I think I deserve a pat on the back. What do you think? Is it better to eyeball the ingredients and have a taste test or measure the ingredients out exactly? How can I improve? 


Resources: 
An, Helene, and Jacqueline An. Ăn: to Eat: Recipes and Stories from a Vietnamese Family Kitchen. Running Press, 2016.

Sunday, December 17, 2017

Taste of Vietnam: Wok 'n Roll

Taste of Vietnam: Wok 'n Roll

Fried Rice - Brandon Nguyen


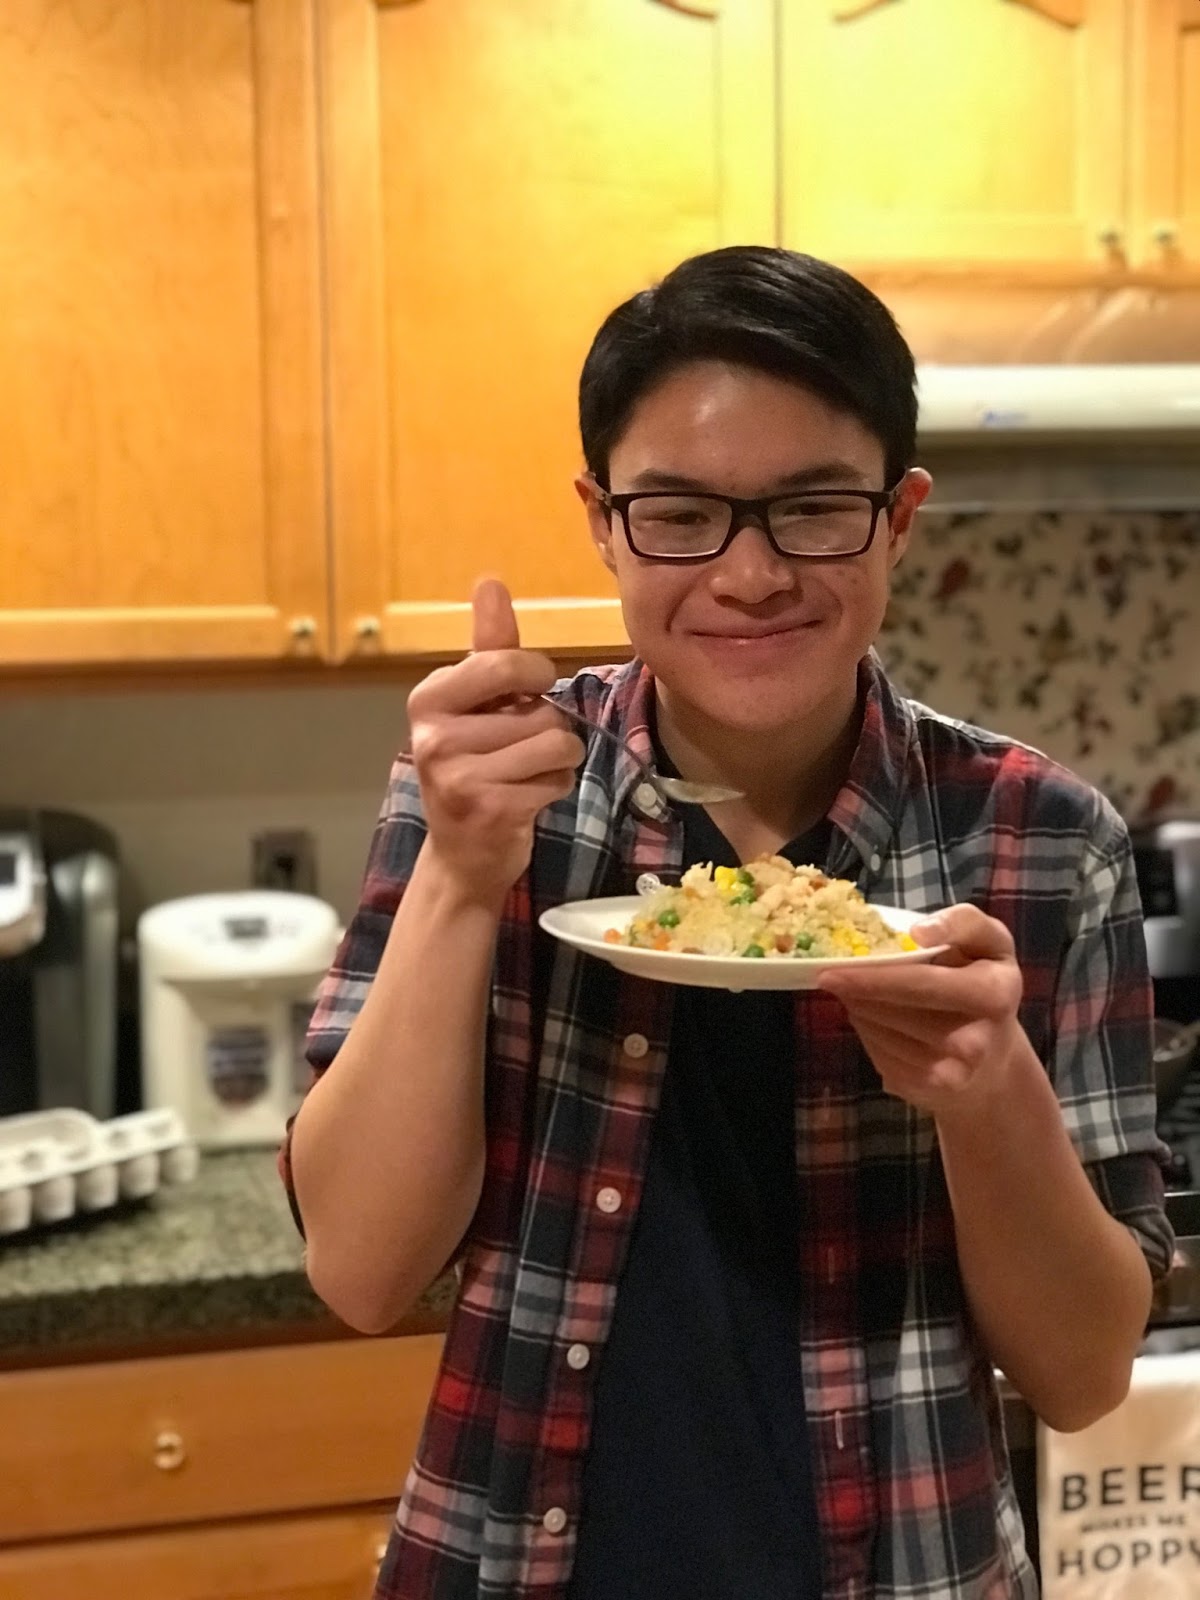
Rice has become essential to Vietnamese diet. Originated in China, rice has made its way downtown and has shaped our culture ever since. For this next dish, I am making fried rice, stepping it up to the next level and will be following the recipe and procedures directly from Ăn: To Eat, by executive chefs (as well as mother-daughter duo), Helene and Jacqueline An. 


Fried rice made in a wok. 
Fried rice has always been the "go-to" dish for my family. It was the ideal dish for when we were in a hurry and had little time to cook. Chefs Helene and Jacqueline An describe the dish as "easy and quick, this dish is a weeknight favorite. . ." (An Helene & Jacqueline An 62). 

For the best result, it was extremely important to follow the recipe and procedures accordingly. I added onion and cloves of garlic for a "fragrant kick" (An Helene & Jacqueline An 62) and salt, sugar, and Maggi seasoning sauce to bring out all the flavors. In addition, I put Chinese sausage (lập xưởng), fried egg, carrots, peas, corn, and shrimp. I also decided to modify the An's recipe and added some squid.

Typically, fried rice is made in a wok (left), a bowl-shaped frying pan. As a Vietnamese, I can proudly say that we use woks for everything; from frying egg rolls to whipping up chow mein noodles (mì xào). 

The rice turned out to be perfect, but in reality, I was nervous. Everything was fast-paced, and I had to work quickly in the kitchen. The rice was not too dry but moist, and the squid gave the dish an interesting texture, making it "fun to eat." 


The carrots were shaved and then diced. 
Probably the most challenging procedure for me was cutting the vegetables (right). Fried rice requires you to either mince or dice vegetables into small, easy-to-eat pieces. To be completely honest, I have never cut anything smaller than an apple. The good news was that I did not lose any fingers and that I gained a bit of experience; however, I will never lose the fear of being around sharp objects, such as knives. 

My tip? Get creative and let your imagination roam free; don't always rely on the recipe. What was the first dish you made? How did it go? If you haven't made anything yet, what do you plan on making? Do knives scare you as well?


Resources: 
An, Helene, and Jacqueline An. Ăn: to Eat: Recipes and Stories from a Vietnamese Family Kitchen. Running Press, 2016.

Wednesday, November 29, 2017

The Frugal Gourmet: Cheese and Tomato Omelet

I've always loved seeing people cook; any given Saturday morning my mom is usually chopping onions with ease and turning a few simple ingredients into a masterpiece. Food is a personal thing. Recipes reflect a person's taste. I, myself, am not very talented in the kitchen. Baking is more my forte; but this time, I decided to step out of my comfort zone.

I decided to turn to Jeff Smith's book, The Frugal Gourmet, to help me become better at cooking for myself. Today, I attempted Smith's cheese and tomato omelet.

For breakfast, I tend to turn to cereal. This time I decided to put a spin on eggs, something that I could eat as an alternative for breakfast. Jeff Smith offers his own method to make a basic omelet, and mentions, "Never use milk in the egg mixture. Use only water. Milk makes your omelet watery since it will not blend with the eggs. Water blends and keeps the omelet high" (Smith 106). This technique was foreign to me; I'm accustomed to seeing omelets made with milk. When I did add the water into the mixture, it was more thick than I'm accustomed to seeing. It kept the eggs smoothly together rather than separating apart.

Whipping the eggs

Heating up the pan
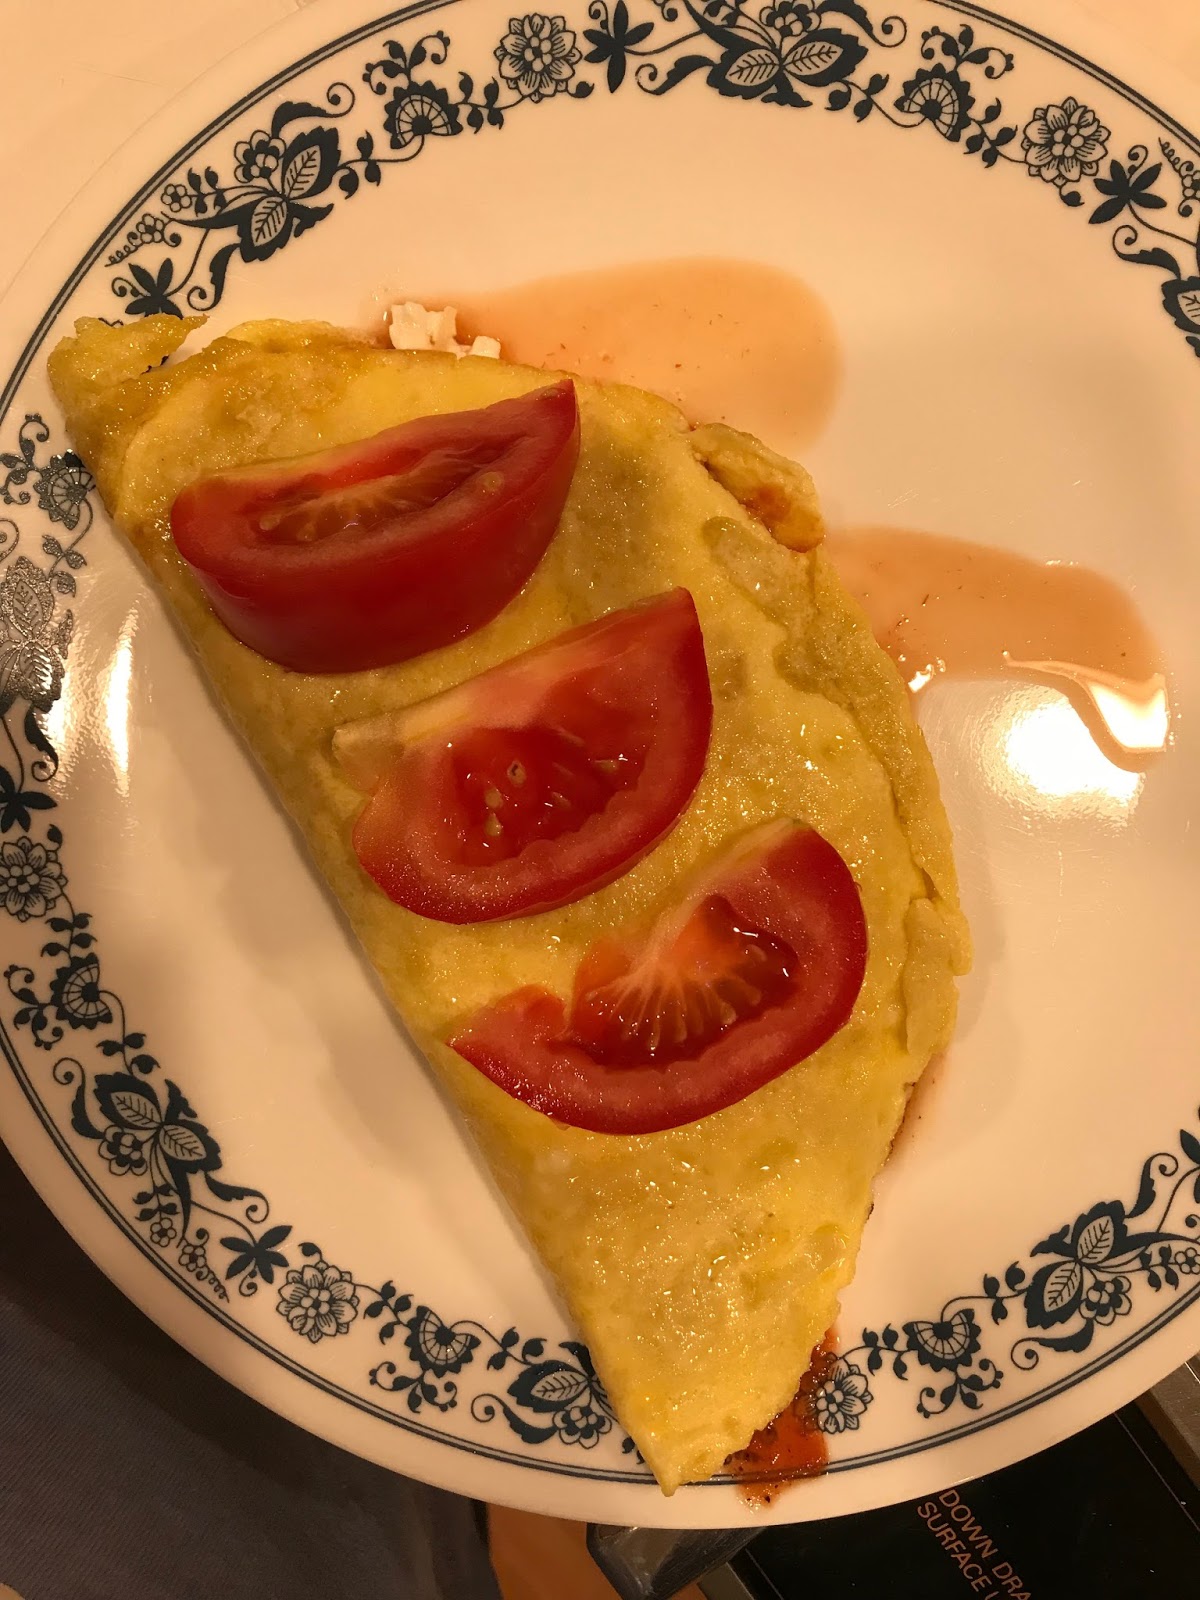
I then heated up the pan with oil and butter. Cooking the eggs wasn't challenging, but getting the uncooked egg to drip down the sides and cook was hard. Instead, I flipped the omelet over.  It was fluffy and rose as mentioned, the kind of omelet you usually want. I think the fluffiness is on account of Smith's technique, which mentions to skip mixing salt into the omelet mixture and instead adding salt when the egg is cooked to prevent hard eggs (Smith 106).  When I have made eggs in the past, I made this accident.  They turned out to be rubbery if not eaten freshly cooked. Eggs should be fluffy!

Overall, the recipe consisted of making a basic omelet and adding the cottage cheese, sauce, and then Parmesan. This recipe isn't for a grab'n'go breakfast. It's for days when you have a little extra time. I did like the combination of familiar flavors; cheese and tomato are versatile ingredients that you can whip up into any meal. Overall, this recipe is a nice shake up if you want to try something new for breakfast! It reminds me a lot of spaghetti because of the sauce inside, but it also is creamy because of the cottage cheese and Parmesan.

Finished product-some sauce spilled over
Which dish for breakfast have you made that requires a little bit more prep time? Is a meal for breakfast you would never attempt to make?


Smith, Jeff. “The Classic Omelet.” The Frugal Gourmet, Ballantine Books, 1984, pp. 105–108.

Tuesday, January 24, 2017

White Chocolate Macadamias

Vicki Nguyen
Period 4
White Chocolate Macadamias

I forgot to take a picture before I used the ingredients
but here are the left over ingredients I had left.
For my final blog post I decided to pick something different than what I normal make. In the book I found a recipes for white chocolate macadamias cookies. The macadamias will bring a crunch and textural to the already soft cookies, "The cookies was kind of chewy, which we liked, but I thought they needed more spice and more crunch" (Kit Forcey 3).

Ingredients
  • 1 cup of soften butter
  • 3/4 light brown sugar
  • 1/2 cup of white sugar
  • 2 eggs
  • 1/2 teaspoons of almond extract
  • 2 1/2 cup of all purpose flour
  • 1 teaspoons of baking powder
  • 1/3 teaspoons of salt
  • 1 cup of macadamias nut
  • 1 cup of white chocolate chips     (Forcey 3)

Direction

  1. Preheat oven to 350F degrees.
  2. In a large bowl, cream together the butter, brown sugar, and white sugar until smooth.
  3. Beat in the eggs, one at a time, then stir in vanilla and almond extracts.
  4. Combine the flour, baking soda, and salt.
  5. Mix in the macadamia nuts and white chocolates.
  6. You will want to bake the cookies for 10 minutes.
Overall, I really like these cookies! Kit Forcey the creator of these cookies is right about the extra crunch you get when taking a bit of the cookie. The macadamias nuts does add extra to the cookies. Also adding the white chocolate chip did help the favoring of the cookies.

Do you guys prefer soft or chewy or crunchy cookies?


Sterling, N/A. Sterling Publishing Co., Inc., The Barnes & Noble Cookie Bake-Off: Top 75 Recipes from Around the Country New York 2015,


Saturday, January 21, 2017

1 minute mug cake

Vicki Nguyen
Period 4
Hot Cocoa Cake in a Mug

For my fourth blog post I will be make a simple cake. My last blog post was about hot chocolate cookies. I still have some left over hot chocolate powder, so I found a recipe that also includes hot cocoa. The best part of this recipes is that all you need is a microwave! If you're a chocolate lover than this is just for you, "...used better-quality chocolate for all of my chocolate lover" (Jennifer Adams 104).

Ingredients
  • 4 tbsp of all-purpose flour
  • 2 tbsp unsweetened cocoa power or hot chocolate packages
  • 1/4 tsp baking powder
  • 2 tbsp of granulated sugar
  • pinch of salt
  • 5 tbsp of milk
  • 2 tbsp of vegetable oils (Adams 104).
Direction 
  1. Mix the dry ingredients first. Mix the flour, cocoa or hot chocolate powder, baking powder, sugar, and salt all together.
  2. Add the milk and oil in the same bowl and mix well.
  3. Place the batter into your mug.
  4. Microwave for 60 or more seconds at 1200 watts, adjust time according to the power of your microwave.
  5. After taking the mug cake out let it cool down and enjoy. (Adams 104).
My thoughts on the cake mug is that it is super easy to do and is really good. Also, when you are making this with the measurement it only filled half of my mug. At first I thought it wasn't going to be good because the cake is made from a microwave and not an oven. . But I was wrong this is probably my favorite desserts I made so far on this blog. 

Do you guys prefer cakes or cookies?


Sterling, N/A. Sterling Publishing Co., Inc., The Barnes & Noble Cookie Bake-Off: Top 75 Recipes from Around the Country New York 2015,

Monday, January 16, 2017

Winter Delite Cookies

Vicki Nguyen
Period 4
Hot Chocolate Cookies

For my 3rd post I decided to make hot chocolate cookies. As you already know the weather is changing and  it's been getting really cold. Hot chocolate are the best winter drinks to stay warm in the winter. So why not make it into a cookie! Everyone loves hot chocolate, "Hot chocolate is one of my favorite drinks, and it's even better in cookie form. I came up with the idea when I was stuck outside in the cold waiting for a delayed train on a winter night" (Thomas 86).

Ingredients
  • 1 3/4 cups of all-purpose flour
  • 1/3 cup hot chocolate mix
  • 1/2 teaspoon salt
  • 1/2 teaspoon baking soda
  • 1/2 cup unsalted butter
  • 1/2 cup granulated sugar
  • 1/3 cup brown sugar
  • 1 egg
  • 2 tablespoons 2% milk
  • 1/2 teaspoon vanilla extract
  • 1 cup mini marshmallows (Thomas)


Procedures
  • Preheat the oven to 350*F. Line baking sheets with parchment paper.
  • Stir together the flour, hot chocolate mix, salt, and baking soda.
  • Cream together the butter and both sugars until light and fluffy. Add in the egg, milk, and vanilla and mix. Slowly add flour to the mixture.
  • Roll the dough into balls and place them on the tray,
  • After taking out the cookies place marshmallows on top and it will start to melt on top of the cookies. (Thomas)

Overall, the cookies were pretty good. I'll have to say these aren't really my favorite. As you can see in the picture the cookies was kind of dry. The cookie never vent flat. It was more of a dome shape. I followed the direction and measurement, but it went dry and dome shape. The overall flavoring of the cookie was really good.

Do you guys have any tips on making the cookies flat and not a dome shape?

Sterling, N/A. Sterling Publishing Co., Inc., The Barnes & Noble Cookie Bake-Off: Top 75 Recipes from Around the Country New York 2015,

Monday, January 9, 2017

Behind the Scenes: Editing Photos for the Gram and how to Correctly Take Food Photos!

Editing and Food Photos!


In the last blog post, photographing landscapes and creating exceptional captions was the topic at hand. As always, the photo recap! One week since the photo was posted and it received 460 likes. This definitely did not get as much attention as I would have liked it to get but it was to be expected because it was mainly to fit my feed and take a nostalgia trip to old my style of editing.

Editing is everything that happens after you take a photo so I like to call it the behind the scenes. The goal for editing, as stated by Aimee, is that "You don't need to transform yourself or your photos into an unrecognizable state... rather, use them to enhance the sharpness, color saturation, brightness, and other technical elements that make an amateur shot look super professional" (Song Aimee, 52). The apps that she recommends would be Snapseed, VSCO Cam, and Facetune (Aimee, 52). The functionality of each application varies and has different purposes for the photo that needs to be edited; which can all be found in your app-store. Her regime includes: "Snapseed for brightness and contrast, then Facetune for any unwanted clothing wrinkles or acne abolishment, and then VSCO cam for a very, very light filter so that the images in my grid all look uniform" (Aimee, 53). For the reason that Facetune is not free, I'll be switching it out for an app called PicsArt which essentially has the same capabilities. I've already gotten the feel of how to use each app so I'll give my take on how I personally use them to my Instagram advantage.


Snapseed has a selection tool that most editing software doesn't have which allows me to choose different parts of a photo and increase its brightness, contrast, or saturation. For example, if my face was too dark in a photo or I wanted my outfit to pop out, this is what I'd utilize. PicsArt is helpful because it acts in the same way as Photoshop and many helpful features but I mainly focus on its selection and blemish removal tool. Self explanatory and allows me to remove impurities that would taint a photo. Keep in mind with PicsArt and Facetune that you want to make your Instagram photos authentic, don't make them look too edited and fake. Lastly, VSCO Cam is an application I've used since I first started Instagram. It has it's own grid function so planning out feeds can be extremely useful on this app. There's a multitude of editing options to change the look of an image and it has copy and paste edits functionality. It is a must for anyone who wishes to get serious with editing photos and the best part of it is that it's free. Smart, and proper use of each app (and consideration of my feed theme) has allowed me to take my photos to the next level to strive for uniqueness.

Applying what I learned from editing, I will be demonstrating it on a food photo! My sister started Instagram first and I always got annoyed at her for taking photos of the food because I just wanted to eat, oh how the roles shifted. I visited a Hawaiian-Asian fusion restaurant in Seattle called Sam Choy's Poke to The Max and ordered a chicken katsu with pulled pork dish. The aroma of the small area had been welcoming and was decorated nicely with an open well-lit modern style room.This was a perfect time to show the things I have learned from my book!

Five of the essential things that Aimee explains are important when capturing a food shot are: timing, arrangement, lighting, angle, and most importantly; styling the shot. Here's the photo that I took.

NOT EDITED!

First, Aimee points out to always take your food photos before people start to eat as it can be quite annoying to have someone pull out their phone right in the middle of dining, unless you're eating by yourself of course; just remember to make sure your food doesn't turn cold! Next, I neatly arranged the dishes on the table to give it the look I'd like to have when I take the photo. Lighting comes next and the most important tip about lighting for food photos would be to "Snag a booth by a window whenever you can" (Aimee, 125). Remembering to always aim for natural light we sat near a window spot. The best kind of angles for photos such as these are the bird's-eye view from overheard or straight on (Aimee, 126). This gives the full depth of all the food you're trying to portray and gives it a clean, professional look. Lastly, styling your shot! The last piece of advice to remember would be: "Don't add anything too distracting or busy that takes away from the real star of your shot - your edible subject" (Aimee, 126). In other words, keep complex objects away from the main focal point to highlight the dish you're trying to portray. All of this was taken into consideration when I took this image!

Now comes the less fun part, the editing. I always turn to VSCO Cam first to put a preset filter (HB2 if you want specifics) to set the mood I wanted for the image and then put a bit of fade to match my theme. I turned the temperature lower by a little to offset the brown and to give it a slight tint of blue. Moving onto Snapseed, I saved the image from VSCO Cam and imported it into the application to make the dishes pop out more. I selected both dishes and increased their contrast. Facetune didn't need to be applied here and this is the finished product!

EDITED!

Maintaining an Instagram looks easy but to me there is a certain science to it that I'm truly passionate about. I hope you've learned something while reading this blog post and the photo will be uploaded shortly after this has been posted as usual. The next topics I'll be covering are flat lay photos and growing your audience!

 What are the photo editing apps you've discovered besides the one's I've stated previously? What are their advantages?


Works Cited
Song, Aimee, and Erin Weinger. Capture Your Style: Transform Your Instagram Images, Showcase Your Life, and Build the Ultimate Platform. New York: Abrams Image, 2016. Prin


Saturday, December 31, 2016

A Healthy Lifestyle

Foods all Soccer Players Should Eat
All players should have an equal balance of nutrition in order to stay healthy on and off the field. If you read my previous blog, you’d know that exercise is a critical component to keeping your body in shape. Ace McCloud, the author of “Soccer Strategies” says that “In addition to the exercise that you should be doing and the drills you need to practice, you need proper nutrition to keep the body going” (McCloud 10). Staying on top of your nutrition will allow you to become a better soccer player because they carry the necessary nutrients that will help you stay energized throughout the entire 90-minute game.

Turkey and Chicken
Turkey and chicken are lean sources of meat that will help you get the protein that is necessary for an athlete. These are great ways to acquire protein without all the added calories and fat that other food groups have.
Image result for chicken breast

Complex Carbs
Complex carbs include many different grains such as cereals, potatoes, pastas, bread, and rice. Eating these carbs in their whole wheat or whole grain forms is when you’ll get your best results. Loading up on carbs before a game or practice can help you play longer and have the energy you need to perform at a high level.
Image result for complex carbs

Milk
Drinking milk a few times a say is a good way to get a lot of nutrients into a meal. Choosing a low fat or skim variety will be giving your body lots of great nutrients, such a calcium, as well as avoiding the extra fat.
Image result for slim milk

It is very important to maintain a healthy diet while being an athlete. Eating these three basic foods will help to keep your energy throughout the entire game. I believe that a healthy lifestyle will allow you to improve and grow into a better player and will allow you to do more on the field.
What is your go-to meal before an important game? Do you think it helps you play better?


McCloud, Ace. Soccer: Soccer Strategies: The Top 100 Best Ways to Improve Your Soccer Game. Charleston, SC: CreateSpace, 2015. Print.

Tuesday, December 27, 2016

Peanut Butter Cookies - Vicki Nguyen

Vicki Nguyen
Period 4


Peanut Butter
For my second blog post I decided to make peanut butter chocolate chips cookies. It's still the same as my first blog with chocolate chips cookies, but with a twist. By using peanut butter as the base for the cookies. Peanut butter is a rich ingredient in the recipes, "When I was a child, my mom would bake peanut butter cookies around the holiday" (Laura Gilbert 46).
I forgot to take the pictures of the ingredients
before I used them, but here are some of them.
Ingredients
  • 1 cup of peanut butter
  • 1 cup of brown sugar
  • 1 cup of white sugar
  • 1 cup of butter
  • 2 eggs
  • 1 teaspoon of baking soda
  • 1 teaspoon of baking powder
  • 1 teaspoon vanilla extract
  • 2 1/2 cups of flour     (Gilbert 46).
Directions

  • Cream butter, peanut butter and sugars together.
  • Add eggs and beat it well.
  • Stir in flour.
  • Roll into balls, roll in sugar and flatten the cookies.
  • Bake on cookie sheet at 350 degrees for 6-7 minutes or adjusted.
  • Take the cookies out and let them cool for 5 minutes.
I usually don't enjoy peanut butter, but for this peanut butter cookies I really like it. Even if you're not a big fan of peanut butter, these are still pretty good. I made these during the Christmas day and my family really enjoyed eating these cookies.

Do you guys like peanut butter? If so, what kind of desserts do you like that has peanut butter in them?

Sterling, N/A. Sterling Publishing Co., Inc., The Barnes & Noble Cookie Bake-Off: Top 75 Recipes from Around the Country New York 2015,


Friday, November 25, 2016

Triple "C" Cookies

Vicki Nguyen
Period 4
Triple "C"
(chocolate chip cookies)

I always love baking, but I usually don't make homemade cookie. I always tends to buy cookie mixes, but this time I choose to make my own. My favorite cookie is the classic chocolate chip cookie.
Bring out your inner Cookie Monster because here is the best recipe for chocolate chip cookies. Forget store brought cookies and make fresh homemade cookies because homemade are always the best. For my first blog post it will be about baking chocolate chip cookies.

"My fondest memories as a child are connected to the kitchen" (Giagrande 11). No matter how old you are we all have something in common. Which, is baking in the kitchen with your family. So let get started and start baking.

Ingredient
  • 1 cup butter, softened
  • 1 cup white sugar
  • 1 cup packed brown sugar
  • 2 eggs
  • 2 teaspoons vanilla extract
  • 3 cups all-purpose flour
  • 1 teaspoon baking soda
  • 2 teaspoons hot water
  • 1/2 teaspoons salt
  • 2 cups semisweet chocolate chips


Direction
  • Preheat oven to 350 degrees F (175 degrees C).
  • Cream together the butter, white sugar, and brown sugar until smooth.
  • Beat the eggs one at a time, then add in the vanilla.
  • Dissolve the baking soda in hot water. Along with salt.
  • Then stir in the flour, chocolate chips, and nuts.
  • Drop by large spoonful onto the wax pans.
  • Bake for about 10 minutes in the preheated oven, or until edges are nicely browned.


After I made the chocolate chip cookies, it turned out great. It was really soft and chewy. The only problem was after leaving it out for an hour or two it turned hard. But overall I recommend  this recipe.

What kind of cookies do you like?

Sterling, N/A. Sterling Publishing Co., Inc., The Barnes & Noble Cookie Bake-Off: Top 75 Recipes from Around the Country New York 2015,

Monday, November 30, 2015

Eating Paleo with Elise Jones

Having "gone paleo" before, I have had a continuing interest in the topic, therefor leading me to read the book Practical Paleo, and have learned more about the fundamentals, and purposes around the paleo lifestyle. I'd like this first post to explain what the paleo way of eating is, and what it does for the human body. First off, it is not considered a diet, it is a change in one's lifestyle that leads to long-term health benefits. Also, when hearing about paleo; people commonly think "why would I eat like that, didn't cavemen only live to be 30?". This belief can be shattered with the fact that there is now modern medicine, lack of vulnerability to predatory animals, and the average person is less vulnerable to the elements due to advancements in shelter....you know advancements in the basic needs of survival.  Instead of harming, paleo has actually proven to heal a person's body, "It has helped countless individuals overcome what were seemingly insurmountable, chronic, or even unrecognizable health problems." (Sanfilippo, 18).
 
To summarize the author's views and opinions: the paleo lifestyle surrounds the idea to eat whole foods and avoid modern, possessed, and refined foods. Also today's modern, factory made foods  have commonly led to child-obesity, behavioral disorders, early-onset puberty, and autoimmune conditions. This can be explained with how the USDA's guidelines are not based on sound and scientific theories, and are more set on illogical and potentially dangerous hypothesis, whose use is to mass produce food in order to mass produce food to feed the world's growing population. Where as foods involved with eating paleo are nearly identical to what is already in nature.(Sanfilippo, 32). These reasons have influenced me to choose this lifestyle, and the following ideals will be incorporated into the recipes I prepare from the book.
 
Do eat whole foods...
  • meat, seafood, and eggs 
    • pasture raised, cage free, vegetarian fed, free range, naturally raised, organic, natural, or wild caught
  • vegetables and fruits 
    • local, and/or organic
  • nuts and seeds
    • local, and/or organic
  • fats and oils
    • organic, cold-pressed, and from well -raised animal sources
Don's eat refined foods...
  • refined grains
  • whole grains (today's whole grains are still refined and produced in factories)
  • packaged snacks
  • dairy products
  • certain beverages
  • sweeteners (yes, this does include sugar)
The ideals of paleo, commonly scare people away, because of how this way of eating cuts out foods that are most familiar to them. "We live in a time when up is down and black is white. We have been taught to believe that the foods coming out of factories are safer and healthier than foods your great-grandmother ate." (Sanfilippo, 32) I believe this is a significant quote from the text, as it explains how people are so used to eating what the government produces, that most people don't realize that going back to the basics would be the best thing for them.


The paleo lifestyle is not for everyone, as it takes quite a bit of knowledge and a lot of commitment. But given the increase of organic foods and places to get these foods, it has made the paleo lifestyle as easy as ever. Which leaves the question, would you try going paleo, or not?