Showing posts with label Origami. Show all posts

Sunday, January 29, 2017

3-D Geometric Origami Post #5

Nathan Cho
Geometric Origami #5

For my last post I decided to make a Three-Loop Cubohedron. Personally the piece seemed really easy until it came to assembly which was the most difficult and confusing part of the piece. The books says "When reading a step of the diagram you must pay careful attention to all of the information in the step" (Gurkewitz and Arnstein 10). The way the book usually shows directions that are pretty easy to follow but this piece got pretty confusing towards the end. A quick note all  make before going into how to  make it, the module pieces are fold the exact same way as my very first piece, the Puzzle Cube.

Step 1: You're going to want to start with six of the modules used to create the Puzzle Cube
 Step 2: Next, you're going to want to connect two modules by unfolding the center of the piece and put the point of another piece into the center of the open module and fold it closed. Connect four of them to create a circle and connect the remaining two together.
Step 3: For this step you're going to collapse all the triangles inbetween the diamond patterns on the circle and other piece.
Step 4: The assembly process of both parts isn't easy to describe but one tip i have is to make a a triangle with three of the diamonds like shown in the picture below.

Notes:
I definitely think the easiest part was creating the modules because of how i had already made it before. Without a doubt the hardest part of this creation is that the assembly. Not only is the assembly process awkward and difficult but the instruction are pretty vague and unclear.

Question:
So when the instructions to something aren't clear do you try to decipher the directions or do you go on your own trying to do it you way? 


Origami Rose

Since this is my final post, I wanted to try a particularly tricky origami. I picked the rose since it not only look complex, but it also required attaching multiple parts with difficult folds.

The piece started off with making six of the same piece. This starts off by folding the paper in half diagonally and then to fold it corner to corner to create a crease.

The next fold is to fold the triangle corners against the crease I just created. Since this is a fold that typically ends up messy for me, I turned to the beginning of the book to see if there was a trick that could help me. The books says "hold the corner in place with your left forefinger and make the crease with your right thumb" (Nakano 6). I'm glad to say that my fold turned out significantly cleaner than it was previously. 
The book then says to "overlap the two front flaps and glue them together" (Nakano 57). 
I repeated this five more times as stated by the book to not only have everything ready for the next step but to also let the glue dry for each piece. 
Once every piece was dried, I folded the overlapped corners forward as instructed by the book (Nakano 57).
I then glued the sides to each other as shown in the book. However, I ran into a problem with gluing as I used liquid glue as well as the fact that I did not wait for the glue to dry because I wanted to just glue it all at once. I also felt that I did not understand the diagram well as the folded corners got in the way when I tried to attach it all. I guess it was a little too complex for me.
The final product doesn't look the best. I'd like to be able to create a vase of origami flowers. So, is the any other way to fold the rose origami or just any other flower origami, that anyone knows of? 

Saturday, January 28, 2017

3-D Geometric Origami Post #4

Nathan Cho
Geometric Origami #4

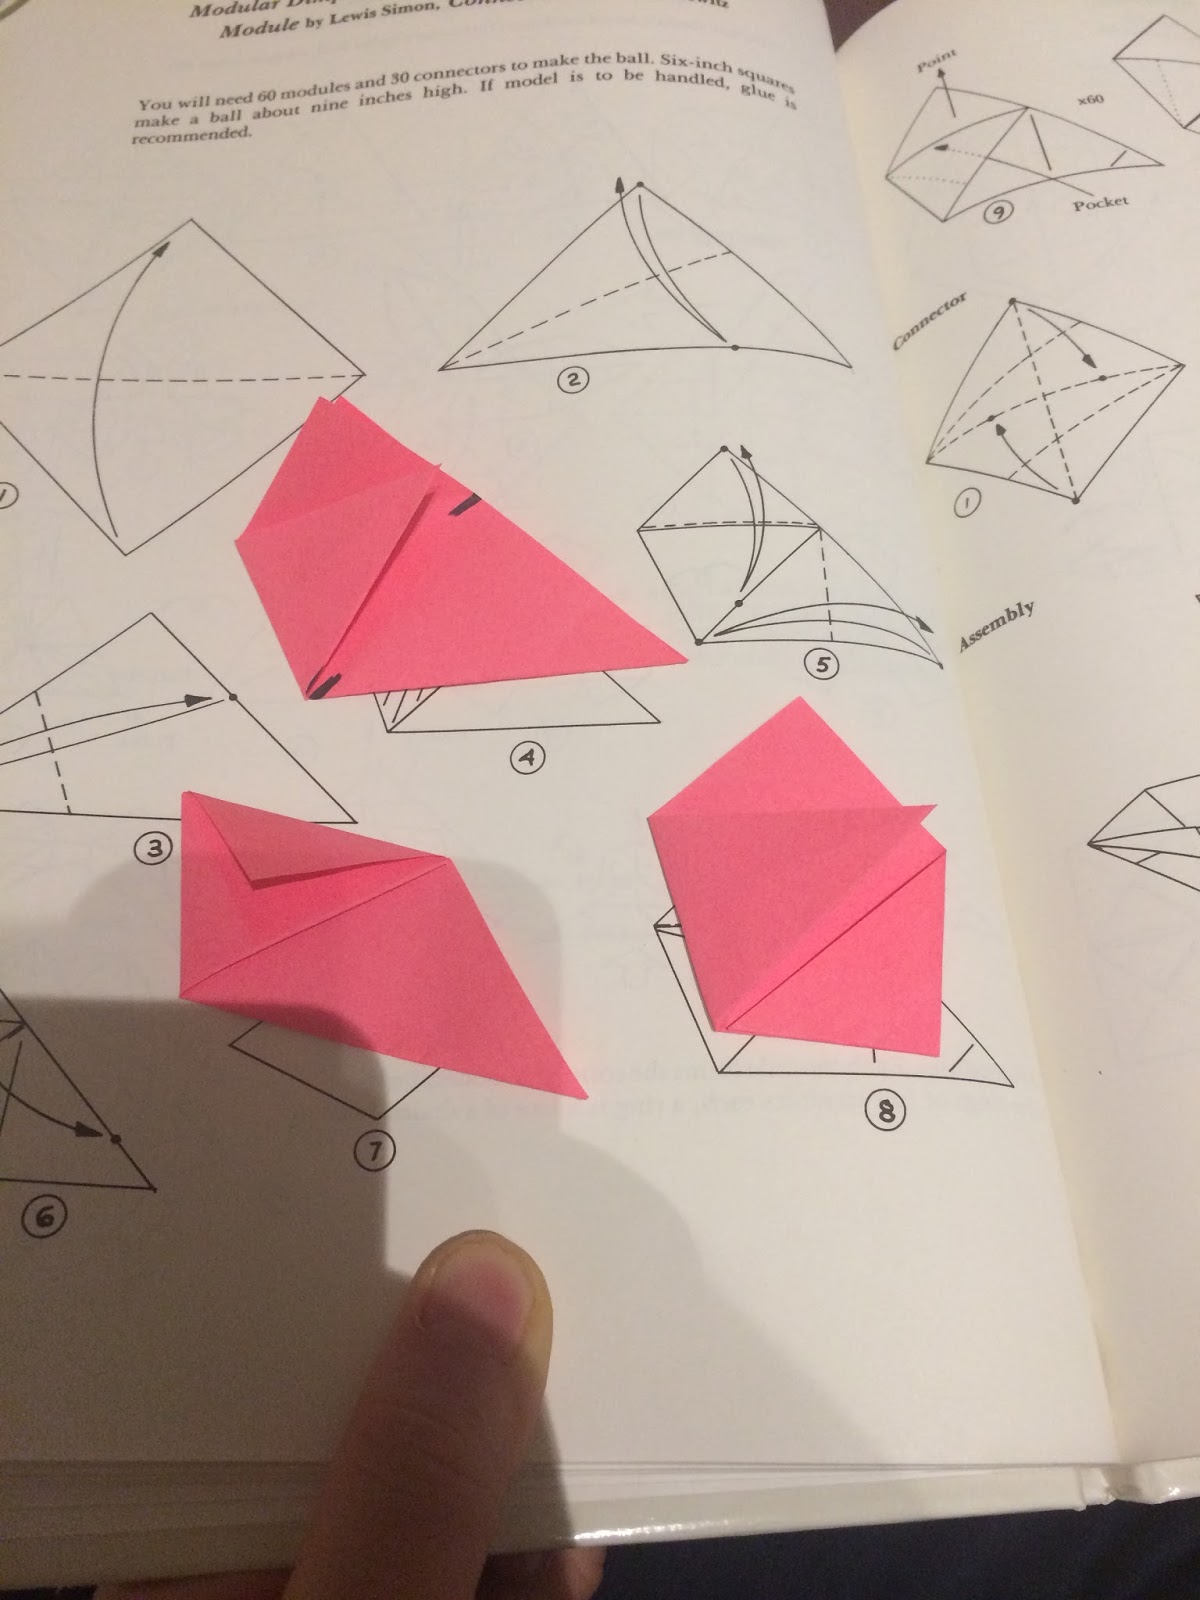
So a common theme or trend among my past folds was that they were very square or cube like. The module in this post is called the Modular Dimpled  Dodecahedron Ball, the differences of this piece is that the general shape of is triangular and it requires a connector to connect the modules. Since there are two different parts you can either fold all parts then go assembling or fold each part and add as you create more parts. The authors says "One might try to put modules together in groups of three and then put the groups together. I find this style more difficult than having a model 'grow' piece by piece" (Gurkewitz and Arnstein 12). Personally i just added piece by piece for this piece but i don't think it was a major factor into making it.

Step 1: To begin with you're going to want to start with a square piece of paper and fold it in half, corner to corner, and create a triangle. On the triangle fold and unfold on side so it touches the bottom of the triangle
 Step 2: Using the crease for a guide , fold a corner to the end of the crease line
 Step 3: So for this step you're going to fold and unfold the top part on the line. Then on the very lowest triangle fold it in half and unfold it.
 Step 4: You're going to next fold the top half over the bottom so that a tip is poking out and then fold and unfold the tip over to the main body. Then unfold the upper half

 
 Step 5: Separate the top piece fold the front piece into the pocket in the middle piece.
 Step 6: These modules use the pockets and points. The pocket is underneath the center piece where the arrow is pocket and the point is found on the top piece, the point is also highlighted in black. If connect six different modules you'll create a cone.

 Step 7: To create the connector take a square paper and fold the corners so it'll form a parallelogram. Then on the shorter sides fold the corners into the center again.


 Notes:
Overall, this piece was pretty easy even though it's kind of different from all my other modules. The fact that this one had connector didn't make it anymore difficult. I think that these modules were easier than the previous.

Question:
The question I want to ask you guys is when making a multi-part creation do you build all the pieces first before assembling or do you assemble each part as you create them 

Wednesday, January 25, 2017

jumping origami frog

origami 

Hello everyone! Today we will be making something fun easy and a little funky, this a middle level of difficulty but also can be fun to make, according to the book Michelle talks about “frogs signifying friendship” “by pressing on the hind legs the from will jump” a moving origami, how much cooler does that get! Let us get started!


1.     Fold the paper in half sideways to make a rectangle.
2.     Fold the corners down and unfold them right away, repeating this for both top corners of your rectangle.
3.     Flip the paper over and fold the top of the paper down at the spot where the diagonal creases meet. Unfold right away.
4.     Flip over once again, and fold the two edges toward you so they meet each other. The top of your rectangle will fold down to form a triangle
5.     Fold the bottom of the paper up so that its edge meets the bottom of your triangle. Fold the two corners of the triangle up to form the "front legs" of the frog.
6.     Fold the sides inward to meet at the center.
7.     Fold the bottom of the paper upward so its edge touches the bottom of the "legs," and unfold right away.
8.     Insert your fingers into the inside of the flaps, and pull the bottom corners outward to the sides, so that the bottom edge comes up to touch the bottom of the "legs."
9.     Fold the corners down so they meet at the bottom of the figure.
10.  Fold the bottom corners outward to form the "back legs" of the frog
11.  Create a zigzag fold at the bottom of the figure, folding the bottom half up and then the bottom quarterback down.
12.  All done 


how far did you make your frog jump?

The Art of Origami

The Art of Origami Part 5


For my very last post i made a Birdwing Butterfly. About a few post ago i made a moth. What is different about this is that the Birdwing Buttefly from the moth, is that this butterfly has more detail. The authors describe the birdwing as "incredibly beautiful, geometric markings " (Lafosse, Alexander 101).  When i made this butterfly i have to be honest, this butterfly was the most complex piece i have made out of all of my previous creations. As i created the butterfly the authors recommended "using a black and indecent green duo washi for this model" (Lafosse Alexander 102).I used a plain black and white sided paper since i didn't have washi paper and also i didn't want to mess up on one of the more fancy papers i had. What made this difficult is that the large amount of detail it contains.   Although the outcome was very worth the amount of difficulty i caused.


Which is your favorite origami piece that I've made?


LaFosse, Michael G., and Richard L. Alexander. Origami art: 15 exquisite folded paper designs from the Origamido Studio. Tokyo: Tuttle Pub., 2008. Print.

Tuesday, January 24, 2017

3-D Geometric Origami Post #3

Nathan Cho
Geometric Origami #3

Today's modules are very similar to the previous build as they both have the same shape and purpose. The module is called the Simple Square Module which is by Bennett Arnstein which is very similar to the Flat Unit which I made last time. The reason why i chose this is because I don't think I built the previous module well so i wanted to try again by making the Simple Square Module. I think one of the reasons why i had trouble with the previous module was assembling all the pieces together. Gurkewitz and Arnstein write "In this book the main type of lock used is what we call the Point and Pocket" (Gurkewitz and Arnstein 12). The Point and Pocket system has the each module contain a point and pocket where each point fits into a pocket.

Step 1: So to begin with you're going to want to fold the sides to the opposite sides and the corners to the opposite corners. Using the folds as a reference point, fold the corners into the center of the paper.

Step 2: Turn the paper around and fold the bottom of the paper into the center so you'll have a triangle sticking out. Repeat this for all other sides of the and you should have something what looks like a square again.


Step 3: Like any other module the Simple Square Module uses Points and Pockets to help lock piece together. The points of this module are the corners and the pockets are on both sides of the module so each point has a pocket. Using 12 modules you can create a cuboctahedron.
Notes:
So folding all the modules and assembling the modules took around an hour. Again the hardest part was the assembly as I some points wouldn't stay in place or some pockets were too small. to help keep the modules together I used tape to hold some pieces together

Question:
So while folding I easily lost track of time and the hour flew by pretty quickly. The question I want to ask is, when folding origami of any kind are you conscious about the time you've spent on folding or do you just zone out and time is no longer a factor to you  

Monday, January 23, 2017

The Art Of Origami part 4

The Art of Origami part 4

For my 4th post i made a bird. In my previous post i would say that the origami i was trying to make was complex and difficult, although i did some research on the types of folds i would not understand. It took some time to understand the folds but it was worth it. As i read the book i notice that the authors also struggled at first, "Each had been frustrated by the simplicity of the traditional models" (Lafosse, Alexander). So this then made me realize that origami is frustrating to all but not impossible to create. 

When i made this bird i didn't use anything special like different paper. I decided to keep it plain in simple. The authors Lafosse and Alexander consider the bird a graceful creature considering they describe it as "the most elegant perched birds" (Alexander, Lafosse). This was very simple but creative due to the pleasant outcome. All in all i say this was one of the origami projects that has a smooth process.


If you were to make something out of paper what type or print or pattern would the paper have?

LaFosse, Michael G., and Richard L. Alexander. Origami art: 15 exquisite folded paper designs from the Origamido Studio. Tokyo: Tuttle Pub., 2008. Print.

Wednesday, January 18, 2017

Origami Box: But Really Flat

I decided to create an origami box as it has proven to be simple enough for me to understand, but has also helped in learning a new technique that I could use for future origami projects.

For the first step, was to fold the paper in half horizontally, unfold, and then fold the sides into the center of the paper where the crease was created (Nakano 40).

Then, fold the corners of the rectangle against the line of blank paper and then pull out the hidden corners (Nakano 40). I had not understood this when I read this, but after looking at the helpful picture provided, I figured it out.

The hardest part was creating the "pull-to-perpendicular fold." According to the book, "hold the paper as shown... and draw the upper layers toward you. At the same time, push against the folded edge with your thumbs" (Nakano 40). As told, I pulled the edge from underneath the paper and pulled it upwards to stand it up as a side of the box. I did the same for the other side to create my origami box.

It's not as expertly folded I would've liked, but it certainly is a good place to put my phone charms, so I'd say this was a success. Does anybody know of other variations of origami boxes? I'd like to get a deep, sturdy one to hold my pencils.


Monday, January 9, 2017

origami heart

origami 

     Today we will be doing a heart, this is defiantly easier than the ninja stars that we did, but is as fun and cute. This heart can be made into any size same or large, and makes for a really cute and personalized gift. All you will need is one pieces of paper of any color and size depending on your preference


1.     Start with a square piece of origami paper with white side up. If you only have regular 8.5x11 paper, follow these instructions to make it into a square sheet.2.     Fold the paper in half by folding the top corner to the bottom corner, and then unfold.3.     Fold the left corner to the right corner, and then unfold.4.      Fold the top corner to the center5.     Fold the bottom corner to the top edge.
6.      Fold the bottom left and right edges to the center crease.
7.      Fold the top and side corners back.
8.     Fold the bottom left and right edges to the center crease.9.     Fold the top and side corners back.


     Thats all, and now you know how to make an origami heart! Easy, wasn't it? Would this make a great gift for mother day, father’s day, birthday and valentine’s day?

Friday, January 6, 2017

The Art of Origami Part 3

The Art of Origami part 3


For my 3rd post i decided to make a Monk seal. This project was way more complex than the others which was as expected since i talked about it before, The authors got the idea of creating an origami Monk Seal when they first encountered the Seal in their trips to Hawaii. According to the book the authors say "we enjoyed seeing a pair of endangered Monk Seals at the Honolulu Aquarium" (Lafosse Alexander,67). So ever since they seen the seal they've decided to create an origami version.

When i created this seal i decided to use a different type of paper. Authors Michael LaFosse and Richard Alexander state that " many origami artists are usually happy to just find paper that handles the required folds well - "suitable", if not "perfect" paper. it may not be exactly what is desired, but it will do." (Lafosse Alexander 31). This got me wondering whether or not the type of origami paper would make a big difference. So when i made the Monk Seal i decided to use fabric paper to see how much of a difference it would make. As i made the craft it became difficult to create due to the lack of detailed instructions and photos. The paper of the other hand had a different texture and was thicker than the original origami paper and printer paper that i used in my previous creations. i eventually had to make some alterations to make it actually look like a seal but not so much that it looks completely different than the original photo. All in all this creation was successful but once again the instruction lacked detail as well as the photos.


What would you do if you could change the instructions in the book?

LaFosse, Michael G., and Richard L. Alexander. Origami art: 15 exquisite folded paper designs from the Origamido Studio. Tokyo: Tuttle Pub., 2008. Print.

Thursday, January 5, 2017

Making a Lantern

Lantern

In my last post I mention that as I post more that I would try to do more advance origami. In the picture that you are going to see it will not look like more of an advance from the last origami that I tried but the folding's and the directions on the book seems more advance than shown on the origami itself.

In my book easy origami by John Montroll it mentions how the lantern is a very achievable origami to do but its also difficult do to the directions(Montroll 29). The lantern at the end was very manageable to make and also very calming. Sometimes doing origami is very stressful but be patient origami is suppose to be a relaxed activity and rushing through the directions will not help (29).

As time went on Origami has grown on me and its probably my new favorite thing to do during my spare time. Some people know origami as just folding papers and making it into some kind of shape but origami is very calming and keeps you busy if there's nothing else to do.


Tuesday, January 3, 2017

Creating a origami hat

Origami Hat

As my last post says I really enjoy doing art but didn't know what kind of art I'll be doing so I decided to try out origami. As my experience grown I will be trying to do more difficult origami then before and this time I decided to go with making a hat out of the origami paper. Also as this project continued I have found a new hobby in doing origami during my spare times.

In my book Easy Origami by John Montroll he mentioned that "Fold the creases very well will help the shapes"(1 Montroll). As I mentioned before creasing and folding the paper is very difficult for me and that's one of the main points of doing origami by folding papers and creating the design that you want.

John Montroll mentions that if the folds are not well folded than the shape you want will not have a successful origami. He also mentions tips for having a successful crease which is running your thumbnail along the creases.

What's your tips for having a successful crease on the paper?


Saturday, December 31, 2016

3-D Geometric Origami Post #2

Nathan Cho
Geometric Origami #2

So the next thing I decided to make was the Small Rhombicuboctahedron designed by Rona Gurkewitz. This module is definitely more difficult than the previous one I built as the Rhombicuboctahedron required much more time and patience. The process of folding and arranging the module wasn't as cleanly done as the book instructs but the end result is alright. Again like last time i'm going to walk you guys through the steps of creating the module.

Step 1:
You're going to want to begin with a square piece of paper then fold and unfold each corner to the opposite corner. Then fold each corner into the center of the paper and unfold it. With the smaller triangles on the corners fold the tips into the base of the triangle and refold the whole triangle back to the center.
 Step 2:
You're going to want to turn the paper around and again fold the corners into the center of the square so there's a cross in the middle. Finally fold the tips of the square again but point the tips upward and you'll be done with the first module. You're going to need to create a total of 18 of these modules in order to create the Rhombicuboctahedron.
 Step 3:
Once you have all the modules you're going to want to connect them by folding down the tip of a point and insert it into a the pocket of another point and repeat until you're able to link eight of them in a circle.

 Step 4:
Link three more modules and attach it to the top of the circle by inserting a point on one end and insert a point on the opposite side of the circle
 Step 5:
Add two more modules to the remaining points of the top middle piece creating a kind of dome
 Step 6:
Recreate the dome on the bottom and you'll have  a Rhombicuboctahedron.
Notes:
So overall the entire process of creating this thing took over an hour for me as creating over 18 piece as some had to be scraped because they didn't fit or didn't turn out as i wanted. Arranging the Rhombicuboctahedron also took some time as some points wouldn't fit or stay in place so I kind of cheated and stapled some points together to keep the module together. Folding the pieces was pretty easy but arranging the pieces was definitely the hardest task and the book even says " The difficulty of assembly may be intermediate even though the difficulty of folding the individual modules is simple" (Gurkewitz and Arnstein 10).

Question:
So i definitely scrapped some pieces due to them being less then ideal but i also kept many which were close to being good but weren't. My question is, when folding origami or creating anything, do you guys keep going when you make a small mistake or do you redo it and do it perfectly?

Bird and Wreath Mobile

I decided to do a bird and wreath origami mobile since I wanted to create a larger project with more steps as well as to add more spice to my bedroom. The book uses two of previously taught origami to create the mobile, the flying saucer and the hen origami.

I had folded the hen origami first as I had learned it prior to the book. The book didn't really give me any tips, so there was nothing to really improve my folding.
image3.JPG
The flying saucer was an origami that I had not learned to fold and was my main concern to making this. The origami consists of multiple parts being connected.

First, I made eight of the pieces. The pieces are made by a diagonal fold from corner to corner, then a fold of the bottom corner to the top corner (Nakano 28).
image8.JPG
A tip that is given in the book to make connecting the units together, "if you open the pocket by pressing down on the ridge... it makes it easier to tuck the point in" (Nakano 28). Unsurprisingly, this helped significantly on tucking all of the pieces together.
image7.JPG

One thing that I had not thought of folding the flying saucer was gluing the pieces together since my perception of origami has been strictly to folding. When sticking the pieces together, "Make sure each point fits tightly into the pocket and fix it in place with a little glue" (Nakano 28). This made it stabler and held it together even when I accidentally dropped it.
image5.JPG
The final step was to attach it all together into a mobile. The book tells us to use cotton thread and needle. The thread goes through the middle of the hen, then to the center of the saucer with a piece of scotch tape to prevent the hen from slipping (Nakano 34).
image2.JPG
It now hangs on the ceiling of my room and looks great. Does anyone else know any more decorative origami? I would love to have a whole matrix of hanging origami.
image1.JPG