Showing posts with label Arndt Grace. Show all posts

Sunday, January 28, 2018

Makeup Manual: Ten-Step Guide To Perfect Makeup

Hello! Welcome to my final post! Today i am going to be talking about how to get perfect makeup in under 10 minutes! I personally take a long time on my makeup because i am a perfectionist and everything has to look perfect before i can leave, i usually spend 30-40 minutes on my makeup. I wanted to find a way to do my makeup perfect but in less time and that's when i came across a book called Bobbi Brown Makeup Manual by Bobbi Brown herself. When i found out that she had a ten step guide to perfect makeup in under 10 minutes i was so excited! I now could get perfect makeup in over half the time. She states, "Makeup is simple. When you know how to apply it and have an organized makeup drawer, it should take only five to ten minutes. Practice is the key" (Brown 117).

A basic, simple look requires ten steps. So, today i am going to be sharing with you ten steps in order to achieve the perfect makeup look for everyday. But, make sure you apply makeup in the correct sequence.

STEP 1: PRE-MAKEUP

  1. Begin with applying moisturizer to your face. Moisturizer is the key to a fresh looking face. It will create the perfect base for your makeup. 
  2. Next, apply a lightweight eye cream to ensure that your under eye makeup goes on smoothly and evenly. Your under eyes are one of the few places that don't produce sweat so they tend to be dry, this is why it is important to use an eye cream.
  3. Lastly, apply a primer. Primer will help make your makeup last all day long and it will help you foundation not slip off of your face. Use a primer suited for your skin type. 

Left side: Primer (Hourglass Veil Mineral Primer, Smash box primer water, too face primed and peachy) Top Right: Moisturizer (First aid beauty ultra repair face moisturizer) Bottom Right: Eye Cream (Garnier anti-puff eye roller).

STEP 2: FOUNDATION
  1. First, find your perfect foundation shade. Swatch a few shades on your cheek and which ever one matches the closet, use that one. 
  2. Next, use a sponge, brush, or finger to apply your foundation. I recommend a sponge because you get an airbrush look.
  3. Lastly, if you have blemished, spot-apply your foundation on your blemish and blend.
I use a morphe sponge to apply my foundation. I mix two foundations together to get my perfect shade. I use the Maybelline dream velvet and the Maybelline dream liquid mousse.

STEP 3: CONCEALER
  1. First, neutralize darkness with a pink or peach toned corrector to cancel out darkness.
  2. Next, choose a yellow-based shade of concealer and layer it over the corrector under your eyes, and any point of your face that you want to highlight, (bridge of nose, forehead, chin). 
  3. Lastly, apply it on any breakouts for extra coverage. 
Bobbi Brown states, "Applying concealer on the spot next to the inner corner of the eye will open up your eyes and give you a fresh, bright-eyed look" (Brown 118).
I use the Tarte Shape Tape to highlight the high points of my face since it is lighter. I use the Urban Decay Naked Skin to conceal my under eyes because it is yellow-based. 

STEP 4: POWDER
  1. First, apply a loose powder with a sponge to the areas of your face that crease the most and or get oily. I apply this under my eyes, chin, nose and forehead. Press the powder onto your skin and let it sit there while it "Bakes" After a minute or two wipe it away.
  2. Finally, apply a pressed powder to the rest of your face with a powder brush to set everything in place.
I use the Maybelline Fit me loose powder to bake. Then i use the Rimmel London Stay Matte pressed powder for the rest of my face.

STEP 5: BROWS
  1. First, define brows but using a brow pencil or pomade. I use a pencil to be more precise and natural looking.
  2. Next, set brows in place with a clear eyebrow or mascara gel.
    I use the Maybelline eye studio brow define+fill duo to define my brows. Then i use the Maybelline Great lash clear gel to set my brows in place.
STEP 6: EYESHADOW
  1. First, apply a neutral brown/orange shade to your transition/crease.
  2. Next, apply a darker brown shade to your crease.
  3. Lastly, apply a shimmer light shade to your lid.
I use the Anastasia Modern Renaissance Palette for my eyes. 

STEP 7: BRONZE
  1. First, find your perfect shade. If have fair skin use a lighter warm brown shade. If you have a darker complexion, use a deeper shade.
  2. Next apply it to the halos of your cheeks, jawline, nose, and forehead. 
According to Bobbi Brown, "To add a warm tint to the skin, use a bronzer on areas where the sun normally hits the face, cheeks, forehead, nose, and chin.
I use the Hoola Bronzer from Benefit because it is the perfect shade for my skin tone.

STEP 8: BLUSH
  1. First, smile and apply the blush to the apples of your cheeks. 
  2. Then, blend the product upwards toward the hairline and then downward to soften the color.
I use the Tarte Blush in the shade paaarty because it is the perfect color for my skin.

STEP 9: HIGHLIGHT
  1. First, apply the highlight to your cheek bones.
  2. Then, apply the highlight to the areas of your face that glow when the sun hits it, (bridge and tip of nose, temples, brown bone).
I use the Becca Highlight in Champagne Pop.

STEP 10: MASCARA
  1. First, curl your lashes with an eyelash curler so your eyes look more open.
  2. Then, use a black mascara and apply it to your upper and lower lashes.
I use all L'Oreal Mascaras because i believe they have the best.


We have now completed our makeup look!
You can finish off this look with a lip balm and setting spray and head out the door. Obviously you don't need to use all of these products to achieve a perfect look, do whatever you may wish to do!

How much makeup do you wear? How long does it take you to do your makeup in the morning?


Brown, Bobbi, et al. Bobbi Brown Makeup Manual: for Everyone from Beginner to Pro. Springboard Press, 2011.

Makeup Manual: Skincare Basics

Hello! Welcome back! Today i am going to be talking all about skin. Beauty starts with smooth, healthy, glowing skin. A lot of people don't realize how important taking care of your skin is in order to get a perfect makeup application. Personally, I have had pretty good skin, until recently. I have had a lot of breakouts and i was not happy with it, so i decided to do something about it. I started reading Bobbi Brown Makeup Manual by Bobbi Brown herself, and she has taught me so much. There are so many aspects that go into what makes your skin, your skin. Yes, taking care of your skin on the outside is important, but what you put in your body also affects your skins outcome. Being able to understand how lifestyle impacts the condition of the skin, how the skin works, identifying skin types, and how to properly take care of your skin will allow you to become a skincare expert!

There are three main topics that i am going to be focusing on today; lifestyle, identifying skin types, and how to properly care for the skin.

But first i am going to be telling you guys a little bit about my skin so you can have some background knowledge.

My Skin Care Journey:
Personally, i have been through many ups and downs with my skin. I am going to start off with telling you a little bit about my skin. I have combination/sensitive skin. My skin gets red and it burns when i put acne products on my face or anything with a fragrance. I am a teen so i don't have the best diet, but i'm working on that. I workout 2-3 times a week and have been working on consuming more water. Okay, so here is where it all starts, at around the age of 13 i started to get pimples because i entered the stage of puberty. Before then i had amazing clear skin that i never felt the need to cover with makeup. As i approached the age of 14 and 15 i got into makeup and was now going through puberty intensely. I was stressed because of school too. Stress, puberty, and makeup are all factors that contribute to breakouts. Since i had clear skin before i never took into consideration in buying a ton of skincare products. I used an average face wash and face moisturizer and that's it. To take off my makeup i just used makeup wipes. In October of 2017 my skin changed drastically, my breakouts were horrible and i wasn't confident in my skin so i would cover it up with makeup, which in the end made it worse because it clogged my pores. I didn't know what to do and i didn't really care either, i just thought, "they will go away eventually." Once December hit, my skin was worse than ever, and i was fed up with it so i decided to start researching, watching videos, and reading books all about skin. I was invested now. I have invested a tone of money into many skin care products and i think i have finally found my perfect skin care regime. I have been using this for about a month and i am definitely seeing a difference. Yes, i will get the occasional break out, but it is what it is. I have also started a new thing where i am not eating or drinking dairy for 30 days because dairy is known as a main cause of acne. I am also eating a lot healthier and drinking tons of water because it is proven to give you a nicer complexion. 


LIFESTYLE:

According to Bobbi Brown, "Beautiful skin begins with a healthy lifestyle. Skincare basics include eating the right foods, drinking plenty of water, exercising, getting enough sleep, protecting your skin from the sun, not smoking, and limiting your intake of both caffeine and alcohol" (Brown 24). 

Nutrition: The health of your skin begins with good nutrition. The growth of new cells is dependent on vitamins, minerals, and hydration. You should eat at least five servings of fresh fruits and vegetables every day! 

Vitamins:
  • Vitamin A: Essential for the growth and renewal of new skin cells. May boots collagen production and promote skin cell turnover. Some food items that contain Vitamin A are: Egg Yolks and Dairy.
  • Vitamin B: Increases fatty acids in the skin, promotes exfoliation and firmness. Some food items that contain Vitamin B are: Yeast, eggs, liver, and vegetables.
  • Vitamin C: Gives skin its structure, tone, and elasticity. Building block of collagen. Some foods that have Vitamin C are: Citrus fruits, broccoli, peppers, berries, and tomatoes. 
  • Vitamin D: Essential for the development of skin cells. Some foods that have Vitamin D are: Egg yolks, salmon, fortified milk, and other dairy products.
  • Vitamin E: Antioxidant that will help build and maintain healthy skin tissue. Some food with Vitamin E are: Wheat germ, leafy products, nuts, and whole grains.
According to Bobbi Brown, "Vitamin A and C are the most important for healthy skin and they are found plentiful in fruits and vegetables" (Brown 24).


IMPACTS:

Exercise: Skincare essential. When you raise your heart rate through hard workouts, it increases blood flow which brings more oxygen to the skin. This will cleanse impurities from the body through sweat.
Sleep: This is the time when body's cells have a chance to repair and regenerate. Not getting enough sleep stresses the body's system and skin.
Sun: Excess sun exposure is the skin's number 1 enemy. Sun can cause premature aging, hyper pigmentation, and wrinkles. Worst of all, it causes deadly forms of skin cancer. At least, wear SPF 15 in the winter on your face and 30 in the summer.
Stress: Can cause adult acne and other skin problems. Try to eat healthy and exercise during these times.
Alcohol: Causes allergic reactions like hives and rashes.
Smoking: Causes skin to age. Robs the skin of oxygen, causing it to look dull and gray. 

TIPS FROM BOBBI BROWN:
  • Drink 8-10 glasses of water a day, it will help flush out toxins and keep skin clear.
  • Smile, be positive, breathe, and take a vacation once and while.
IDENTIFYING SKIN TYPES:

There are many different skin types, and everyone's skin is different. Knowing your skin type is very important so that you know how to properly care for it. There are a couple questions you can ask yourself if you are stuck on what type of skin you have. Bobbi Brown suggests that you ask yourself 5 main questions:

  1. "Look at your own clean, unmoisturized skin in the mirror. Is the overall texture flaky (dry), shiny (oily), or smooth (normal)?" (Brown 32).
  2. "How does your skin normally look by midday? Is there oil breakthrough or dryness even though you have moisturized?" (Brown 32).
  3. "Does your skin have noticeable sun damage? How are you protecting yourself against the sun?" (Brown 32).
  4. "How does your skin feel after you wash it with your current cleansing regime? Tightness through the forehead is an indication of dry skin" (Brown 32).
  5. "What lifestyle factors are influencing your skin's current condition: Stress? Hormonal fluctuations? Sun exposure? Diet?" (Brown 32).

Main Skin Types:

  • Normal
  • Dry/Extra Dry
  • Oily 
  • Sensitive
  • Combination 

Analysis and Care:

Normal:

  • Analysis: Smooth, cheeks are driest area, may have some shine, water and oil content in this skin is balanced, comfortable-feelings.
  • Care: This skin type needs daily cleansing with a foaming cleanser. Exfoliate twice a week, moisturize with light wight moisturizer, use a sunscreen to keep it healthy.
Dry/Extra Dry:
  • Analysis: Feels tight after washing, may look dry/flaky, dehydrated, feels uneven and rough, pores are small, may be sensitive.
  • Care: Requires special care!!! includes a healthy diet with foods high in water content, use richer cleanser, use a lightweight face oil, then layer a rich cream over that.
Oily:
  • Analysis: Shiny through T-zone (forehead, nose, chin), large pores, frequent breakouts, few signs of aging.
  • Care: Cleanse the face twice a day, use alcohol free astringent to remove excess oils, use oil free moisturizers. 

Sensitive: 

  • Analysis: Range from oily to dry, easily irritated, prone to redness, itchy or blotchy.
  • Care: requires non perfumed cleansing products. Use alcohol free toner for sensitive skin. 
Combination:
  • Analysis: Oily through T-zone, Dry cheeks, spot dehydration, larger pores on forehead.
  • Care: requires regular cleansing, toning, moisturizing of the oily areas. 
HOW TO PROPERLY CARE FOR YOUR SKIN:

Cleansers:
The purpose of cleansing is to remove bacteria, makeup, dirt, sweat, and oil that build up throughout the day. 

Cleanser Options:
  • Soap: Deeply cleans the skin, leaves it feeling fresh and cleansed.
  • Gel Cleanser: Foam or lather, formulated to dissolve oil buildup and fight blemish-causing bacteria without stripping the skin. Best for oily or combination skin types.
  • Cream Cleanser: lightweight, water-based, recommended for normal to dry skin types.
  • Oil Cleanser: work best on the driest of skins.
  • Exfoliating Cleanser: gentle for all skin types, contain glycolic or salicylic acid, use twice a week. 
 Top Left: Gel Cleanser, Bottom Left: Oil Cleanser, Top Right: Cream Cleanser, Bottom Left: Exfoliating Cleanser

Toners:
Toners stimulate circulation in the skin, removes dead skin cells and greasiness to give skin a smooth texture. Toners can be helpful for those who have oily skin or wear lots of makeup. I personally use a toner because it makes sure that your skin is completely cleansed and all your makeup is gone. I use the toner after i wash my face and then i apply the toner with a cotton round. This insures that all dirt and makeup residue is completely gone and off my face.

I use this toner because it is alcohol free so it doesn't harm your skin and its also perfect for all skin types.

Facial Moisturizers/Hydration:
  • The most important step to skincare is ensuring that you hydrate your body by drinking water.
According to Bobbi Brown, "Moisturizer is the true foundation of youth. They hydrate and plump up the skin so that it looks smooth and bright" (Brown 38).

-Dry Skin: Needs a heavy oil-bases moisturizer that will absorb completely into the skin.
-Normal Skin: Needs a water-based moisturizer that contains lightweight oils.
-Oily & Combination Skin: Needs either an oil-free or water-based moisturizer.
-Sensitive Skin: Needs a moisturizer that does not contain fragrance.
-Extra Dry/Mature Skin: Needs nourishing oils, dense creams, and balms.

These products are my favorite for moisturizing my skin!!! I have combination skin so these products work the best for both oily and dry skin.

How To Apply:

  1. Once the face is cleansed and toned and while it is still slightly damp apply the moisturizer.
  2. Use a nickel-size amount.
  3. Warm the moisturizer between your palms.
  4. With firm, upward strokes, gently press the product into the skin until it is absorbed. DO NOT rub the moisturizer in harshly, this will cause redness, wrinkles, and irritated skin.
Sun Protection:
According to Bobbi Brown, "Lines, dark spots, and uneven skin texture are not the inevitable effects of aging but are often the result of too much sun exposure" (Brown 41). 

How To Apply:

  1. Apply sunscreen at least once a day.
  2. Clean the skin before applying.
  3. Apply to cool, dry skin, this will allow the sunscreen to bind effectively.
  4. Apply twice; to cover any missed spots.
  5. Apply moisturizer and makeup over the sunscreen.
  6. Reapply during the day depending on the amount of sun exposure you get.

So, what is your skin type? Did you ever realize how much work it was to take care of your skin? What products do you use on a daily to keep your skin hydrated and glowing?


Brown, Bobbi, et al. Bobbi Brown Makeup Manual: for Everyone from Beginner to Pro. Springboard Press, 2011.


Thursday, December 28, 2017

Makeup Manual: Foundation Application

Hi, welcome back! Today i am going to be focusing on how to apply your foundation and how to find the perfect shade for your skin tone! I started wearing makeup towards the end of 6th grade. I was the kid who would go into her moms bathroom and put on her makeup without anyone knowing. I just wanted to grow up faster. In 7th grade my mom bought me my first makeup products and ever since then makeup has been a huge passion of mine. I tried to teach myself by watching YouTube makeup tutorials for hours but i never learned much from them because all i was doing was watching someone put on makeup, there was no explanation to it. I then came across the Bobbi Brown Makeup Manual by Bobbi Brown and this book is the perfect guide for beginners and pros. This book explains everything you need to know and i have learned so much from it. 

As i mentioned earlier, today i am focusing on foundation. Foundation is a huge part that can make or break your makeup look. I never knew that there were so many different aspects that go into making sure your foundation looks flawless, for example, the base before your foundation and how you set your foundation. They all play a part in making sure your foundation looks flawless and not cakey.

The first step and one of the most important parts is making sure you find the perfect shade of foundation and the perfect formula for your skin type. 

According to Bobbi Brown, there are 10 types of formulas to choose from, "Tinted moisturizer, tinted face balm, stick foundation, liquid foundation, moisturizing compact, whipped foundation, oil-free liquid foundation, oil-free cream foundation, oil-free powder compact, and mineral powders" (Brown 56). Each formula associates with each persons skin type

Below is a picture from Brown's book that shows what skin type is best for each formula:

I personally like to use liquid foundation because i have normal to combination skin but more towards the dry side. There are two types of liquid foundations, dewy and matte. Matte is more suited for oily skin and Dewy is more suited for dry skin. I never knew this till recently. I used to use matte foundations which made my face look and feel dry and dull because i have dry skin. I recently switched to a dewy foundation and my skin feels amazing, glowy, and hydrated.

Once i have the perfect formula chosen for my skin type, it's time to find the perfect shade. Bobbi Brown shared with me a couple of tips in order to finding the perfect shade, she stated, "Make sure the foundation is yellow based, test several shades, double-check the selected color on the forehead, and always test foundation in natural light" (Brown 57). 

I tested three different liquid foundations. The one on the far left in both pictures is the Wet n Wild photo focus foundation, the one in the middle in both pictures is the L'oreal Infallible pro glow foundation, and the foundation on the right in both photos is the L'oreal Lumi foundation. 
As you can tell in the photo above the far left shade and the middle shade are took dark for my skin tone and the one on the far right is the best fit for me. You want to make sure to match your foundation to your overall skin tone not just your neck. 

Now i have found the perfect shade and formula for my skin! It is now time for application!

We are going to start off with the base of all of our makeup. The base is very important in order to make sure your makeup lasts all day long.

First step: Moisturize!!!!
I use cetaphil because it can be used on all skin types and it's a light weight hydration formula that is fragrance free and doesn't irritate the skin.

Second step: Prime your skin!!!!
I use a lot of products to prime my skin because i truly believe it's the most important step. Pictured above is the Smashbox primer water, Tarte rainforest of the sea mist, Mario Badescu facial spray, and the Becca back light priming filter. These are all hydrating primers that help moisturize my dry skin while providing an awesome base for my foundation at the same time.

Third step: Foundation Application!!!!
There are many different tools you can use to apply your foundation, for example: sponges, brushes, fingers. Bobbin Brown suggests to use your fingers "to warm up a product before application" (Brown 58). However i find that to be messy so i use a beauty blender to create an air brush effect. You can use a brush but i find brushes to be streaky. 

I am using the shade on the far right, because it matches my skin tone the best.

Now its time to apply!

Bobbi Brown suggests "Begin applying a small amount of foundation around the nose. Blend the foundation upward into the hairline. Apply foundation all over or only parts that need it, Use your fingers to press the foundation into the skin to fully blend" (Brown 59).

After the foundation is blended you want to set it into place with a powder to lock it all in and make sure it doesn't get oily or crease.
I used the Laura Mercier loose powder to set my makeup.

Our application is finally complete and we have flawless foundation now!

Naturally i have some acne and redness but as you can see that is all covered up due to the foundation application procedure! 

Do you wear foundation? What do you use? Did you ever know that it was this much work?


Brown, Bobbi, et al. Bobbi Brown Makeup Manual: for Everyone from Beginner to Pro. Springboard Press, 2011.

Makeup Manual: Eyebrow Shape & Definition

Hello, welcome back! Today i am going to be focusing on how to create the perfect brow and how to make your eyebrows the best for your hair color and shape of face. I have never known the correct way on how to fill and shape your eyebrows because i usually leave the house with my natural brows. I naturally have thick, medium/light brown eyebrows so i have never really focused on the eyebrow aspect of my makeup routine, until recently when i read Bobbi Brown Makeup Manual by Bobbi Brown herself. She taught me that eyebrows frame your eyes and there is a huge different a nice "frame" can make to your "painting". She means that the canvas is your face and you can create a painting on your face of whatever you desire using makeup. And the eyebrows are what seal the deal and frame the look. I never thought that your eyebrows had such a huge impact on your makeup look, but after reading her book i finally can understand why.

So, today i am going to be teaching you all how i achieved the perfect brow shape for my face and how i defined them to be perfect and precise. 

The first step is to make sure you find the perfect shade for your brows. 
The chart above is from the Bobbi Brown Makeup Manual book. The chart shows you how to match your brow hair color to the perfect color of brow pencil, shadow and shape tones.

Personally, i have light brown eyebrows so the color of pencil i would want to use to fill them in is the color "Sable" which is a tiny bit darker than my natural brow color. The shade i would want to use to "clean my brow up" would be a light concealer shade.

The second step would be figuring out what type of brows you have. According to Bobbi Brown, there are four special cases, "Nonexistent brows, bare spots, brows to far apart, and tadpole brows" (Brown 90). I would classify my brows as "bare spots." According to Brown, "Bare spots can be filled in with light strokes of pencil or with powder shadow. If neither works, try layering both" (Brown 90). 
Above i inserted a picture from the Bobbi Brown Makeup Manual that explains how to fill in each type of brow since everyone's brows are different!

So, now that we know what kind of eyebrows we have and what shade to fill them in with, we can finally jump into filling them in! Since i only have a few bare spots throughout my natural brows i am only going to be using an eyebrow pencil, a spoolie brush, and a clear gel to set my brows into place. 

Pictured below are the products i used to create my brow. I used the Maybelline Eye studio Brow Define + Fill duo, the elf spoolie brush, and the Maybelline Great Lash Clear Gel which is perfect for setting your eyebrows into place so they do not move around.

I am going to start by outlining my brow very lightly to create the shape for my brow. I already have a decent shape naturally so i used a "light hand" while applying this product. According to Bobbi Brown "The start of the brow should follow an imaginary line drawn from the outside of the nose to the inside corner of the eye" (Brown 90).

There are two sides to the eyebrow pencil, one side to Define and one side to Fill.
The left side of the picture is the "define side" and the right side of the picture is the "fill side"

With the Define side i am going to start at the front of my brow and make sure i fill in all the gaps in my brow hair. Then i am going to bring the brush to the center, creating an arch and then turning the brush and going down making sure my brow is the enough. I am going to do this to both the top and bottom outline of both brows.

Once i have my desired shape i am going to take the define side and create small "fake hairs" and the front of my brow super lightly so it doesn't look to harsh. Then as i get towards the middle, arch, and tail of my brow i am going to take the fill side and lightly fill in the bare spots of my brow.

Once i have completed filling in my brow i am going to "clean it up" to make sure it is precise. I am going to use the Maybelline Master Concealer in the shade fair/light and the Morphe Y21 brush.

Once i have cleaned up my brow i am going to highlight my brow bone, this will create the appearance of a more arched brow and it will rise your brow which will be more flattering. I am going to use my Becca highlight in Champagne Pop and my Morphe Y22.

In the end my brow is more defined but still natural looking. I filled in the bare spots and outlined my brow to better frame my face.
The picture on the left is my natural brow and the two on the right is my filled in brow. As you can tell they look very similar however the two on the right are more defined which is the whole point.

Do you fill in your eyebrows? If so, What are your techniques? If not, Will you ever consider filling them in after reading my post?

Brown, Bobbi, et al. Bobbi Brown Makeup Manual: for Everyone from Beginner to Pro. Springboard Press, 2011.


Wednesday, November 29, 2017

Makeup Manual: Eye shadow Basics

I have always had a love for makeup, but i never knew there were so many "rules" you had to follow. I usually just sit at my vanity and play around with makeup trying new techniques, but ever since i started reading Bobbi Brown Makeup Manual by Bobbi Brown, i have learned that makeup is an art and there are different techniques for all skin types, eye shapes, brow shapes, and skin tones. Bobbi Brown has taught me that are multiple techniques in order to achieve a look that fits your eye shape, skin type and facial features the best. 

Today i am focusing on eye shadow basics. Before reading this book I used any random color on my eyes not knowing if it would compliment my eye color. However, Bobbi Brown has taught me that there are certain eye shadows that compliment different eye colors. "For everyday application, pick shades of shadow that bring out the eye color rather than shadows that make a statement" (Brown 94).


This picture above is a guide that Brown placed in her book to help readers discover what eye shadow colors go best with their own personal eye color.

I have green eyes so i created a look using browns with hints of gold (Camel, Taupe; in picture above). When contouring (crease color or transition shade) your eyes , there are different ways to approach this technique depending on what eye shape you have. I personally have deep-set eyes and according to Bobbi Brown, when contouring your eyes, "Deep-set eyes need to be brought out with light and medium shades of shadow. Colors that are too dark recede and will make the eyes look even more deep set" (Brown 96).  

Posted below is the look i created:


I took Brown's advice and used a medium to light brown in my crease to contour it to ensure that i did not make my eyes look even more deep set. I also placed light browns and golds on my lid to help compliment my green eyes.

There were many products used to create this look all the way from multiple eye shadow palettes to the best brushes possible to achieve this look.

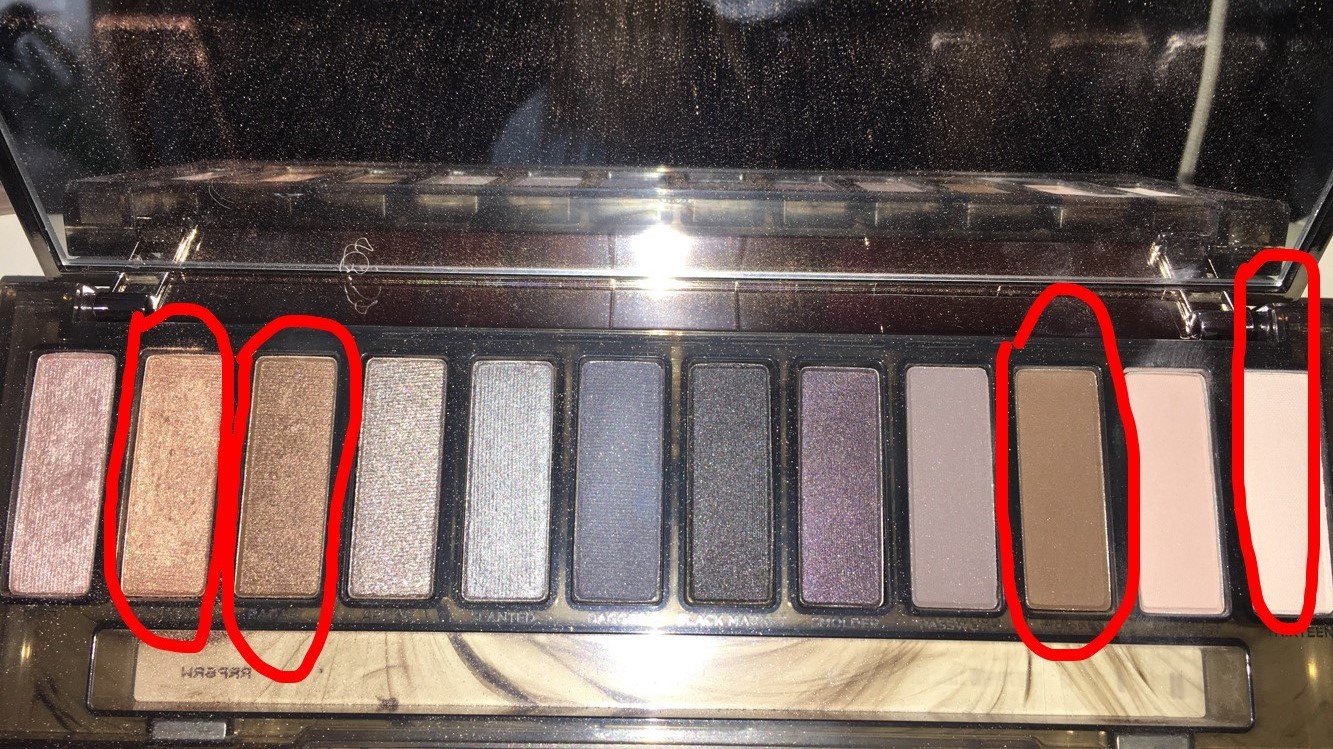
For my eye shadow, I used the Urban Decay Naked 2 and the Urban Decay Naked Smokey:

 Urban Decay Naked 2

Urban Decay Naked Smokey

As you can see above, the colors circled are all colors that i used and that are meant to compliment my eye color and eye shape.

To create this look, i first used the light white matte color in the naked smokey palette and placed that all over my eye lid as a base color. Then i took the matte brown from the same palette and placed it in my crease to contour it. I then took the shimmery brown shade in the smokey palette and placed it on top of the matte brown in my crease along with the 2 colors on the far right and far left in the naked 2 palette to add shimmer. Finally, for my lid i took the middle color circled in the naked 2 palette and the far left color circled in the smokey palette to create a light brown/golden shimmer color for my lid.


The brushes that you use are also very important in order to achieve a flawless eye look. For this look i used an eye blender brush, eye smudge brush, and an eye shadow brush. Each of these 3 brushes all do different things. 
I used the eye shadow brush to apply the color to my lid because "This brush has natural, soft, rounded bristles with beveled edges that deposit a sweep of shadow across the lower lid without leaving any harsh lines" (Brown 12). I used the smudge brush to help blend and place the color on the "outer v" of my eye. Lastly i used the blending brush to blend my crease colors and transition shades together because it is "a soft, fluffy, natural-hair brush with long bristles designed to blend eye shadow and eliminate lines of demarcation on the lids after applying multiple shades" (Brown 11).

Posted below are the brushes i used:


The brush on the far left is a dual ended brush. On the top there is a smudge brush and on the bottom there is a blender brush. The brush in the middle is an eye shadow brush and the brush on the far right is a blender brush. 

Now that i finally know what colors work the best for my eye color and shape and what brushes to use in order to achieve it, i am much more confident in my eye shadow looks that i create. I hope that you can benefit from my tips that i learned through Bobbi Brown and i hope that those interested will try to create an eye shadow look that suits their eye color and eye shape the best.

Have you heard of these tips before? What eye color and eye shape do you have? Are you interested in creating this look?

Brown, Bobbi, et al. Bobbi Brown Makeup Manual: for Everyone from Beginner to Pro. Springboard Press, 2011.