Tuesday, January 26, 2016

Swan Balloon animal!

Finkbeiner 1
Zack Finkbeiner
Mrs. Meara
Honors English 10
November 24 2015

Hello everyone, as you already know my name is Zack and for my IRP Q2 book I chose "Crazy Creatures Balloon Modeling" by Top That!. The reason I chose this book was because I wanted to be able to make cooler and more sophisticated balloon animals. Last post I showed you how i created the Humming bird. This post I will show you how I continue to develop my skills and try to create harder animals such as the swan. Since creating the humming bird was so easy i decided to try something that looked a little more difficult. The reason i felt that the swan would be more difficult is because it takes two balloons instead of just one. Creating the swan was easier than i expected but it was still very hard. one of the most difficult things about creating the swan was when i had to connect the two balloons to create its body. As the book says "Twist an 8 inch bubble in the second balloon to make the body" (24, Top That!). Another part that i found challenging with creating the swan was bending the neck into the right angle and then drawing the details on to it. bending the neck was difficult because it always seemed to be twisted every time i tried to bend it past a certain point. Eventually i was able to bend it so that it only looked a little bit off.
  Other than bending the neck i also had trouble drawing on the details of the wings and eyes. As you may notice i only show one side of the swan, and that is because on the other side i drew the feathers all backwards and i drew the eye way to small. "Complete your model with features and eyes drawn with permanent felt-tip or marker" (37, Top That!). 
 You may also notice how my swan is pink instead of white or black, this is because i didn't have any white balloons and I also wanted to put my own artistic touch on the swan. Do you think that the swan would have came out better if i had made it with white? Or is there another color you think would have looked even better, if so what?

Recording the Drums - Equalizing, and Finalizing

Once I have finished recording all the tracks, you might think all my work is done, but yet, there is still a long ways to go. Unless your drum set is completely perfect, there will always be something that you want to change before exporting your final product, and the best way to fix your audio is to use eq'ing, or equalizing. "The appropriate treatment of the drums in a mix with EQ and compression can make the difference between a lifeless, vague sound and an exciting, textured and genuinely rhythmic drum track." (Major 170). Equalizing will allow you take get rid of any unwanted tones and bring out the sounds from the kit that you will want to hear, which is why it is such an important part of audio mixing.
To get started I need to know the what sounds I need to bring out in each piece of the drum kit. "80Hz-100Hz – If there isn’t enough bass in the kick drum, boost between these frequencies to give the kick a more rich sound.
200Hz-250Hz – Cut around
200-250Hz in order to add clarity and decrease any boomy noise that can be picked up on on the kick 300Hz-600Hz – If your kick is sounding particularly ‘boxy’, it’s a good idea to EQ around these frequencies. See what works best for you by having a play around, as every kick drum sounds slightly different.
To make my bass sound "clickey" I boosted higher frequencies 
 2kHz-4kHz – If your kick sounds too ‘thumpy’, EQ between these frequencies in order to give it some extra kick and more snap"(Major 178). Here is an example of somethings I am looking for when eq'ing the drums. For this example you can see that Mike is talking about the bass drum.  Hz referrers to Hertz, which is the frequency of a sound(i.e. the pitch), altering which pitches (or Hz's) are heard is basically the point of Equalizing.  I basically have to do this for all the drums. And of course because each drum kit sounds different, and every person's taste is different, there is no perfect way to eq, and so it took me a lot of messing around to create presets for each part of my kit that I think sound good.
Now that the drum is finally eq I am pretty much finished and ready to finalize that track. I have created a recording for you to hear. One is eq'd and one isn't so that you can hear the different between equalizing and not. Unfortunately one of the cables for my tom drum was broken and so one of the toms do sound off, but hopefully you can still here to the rest of the kit well enough!


Gifty Minhas- Soccer Tricks (Final)

Gifty Minhas

Ms. Meara

Honors English Period 4

Soccer Tricks

Hello everyone, and welcome to my final blog post. These blog posts have really helped me track my progress of learning new, challenging, and exciting tricks. I never thought keeping a blog about a hobby would help out so much, in fact, this blog has helped me to receive criticism, look at my mistakes and correct them, and also simply see the process of learning new tricks. Sean D'arcy, the author of Freestyle Soccer Tricks, has really helped me to learn tricks I never thought could be done. The clear step-by-step instructions make learning all the glamorous tricks simple and a matter of a little practice. Focusing on the juggling aspect of soccer has helped my overall play in game also, it now allows me to be even more confident on the ball and relaxed in pressure because I can rely on skill and keep my poise. Now, getting to the final trick, I've decided to go back to a more fundamental trick from the book that is very useful to prepare for volleys and shots. The trick is called the Heel Pop.
  1. "Stand shoulder width apart with your body directly behind the ball. Maintain focus on the center of the ball" (D'arcy 58) 
  2. "Bring your stronger leg to the front of the ball and twist your standing heel towards the ball" (D'arcy 59)
  3. "Backheel the ball onto your standing heel while simultaneously twisted your heel a little to pop the ball up and set up for a shot or volley" (D'arcy 60)
    1.
    2.
    3.
    Final Question: Did you guys find these blog posts cool or interesting?


Monday, January 25, 2016

Extreme Sports Drawing - Moto X Bike

For my final blog post, I decided to do something creative. Instead of following directions that my book gave me to create a drawing, I created a drawing solely from my thoughts. I took some of the methods that the book gave me in order to do this drawing, such as the method of drawing in shapes. On the first page of instructions in my book it states, "By combining simple shapes and lines, anything can be drawn" (AV2 4) I used this method throughout my blogs when I was attempting to draw something new. Another method that I used from my book to create my final drawing was the method that states I should start a drawing by creating a stick figure like frame, as it says when instructing on how to draw a formula one car, "Start with a stick figure frame of the car." (AV2 8) Another thing that I noticed the author(s) kept consistent throughout each drawing was the detail that each drawing had. In my final drawing, which was of a Moto X Bike, I tried to create as much detail as I possibly could.

My final drawing is as follows:
When I draw, my mind does not think of objects as 3D as well as it thinks of them as a 2D form so I decided to do my final drawing in 2D. I decided not to color it either because in my last drawings I did not like how they turned out after I colored them.

Thank you for following me as I improved my drawing skills with the help of blogging. I hope you enjoyed all of the drawings that I put hard work into. I would really like it if you left feedback on my final drawing. Do you think I improved my drawing skills? What could I have done better to improve my drawing skills? If I were to draw another picture, what should I draw? 

Amarpreet Singh: Drawing a Tree

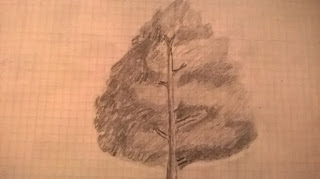
For my final post, I decided to put all of my skills to the test. Throughout my blog posts I’ve done many things such as shading, drawing curves freehandedly, and even more shading. Alright most of my blog posts somehow relate to the topic of shading. For this final drawing, I needed something that could show my improvement in overall drawing and shading as well.

That’s why I decided to draw a tree. Catherine V. Holmes, the author of my book called "How to Draw Cool Stuff: Basics, Shading, Texture, Pattern and Optical Illusions,” has a very detailed tutorial on how to do so. 90% of the drawing itself is shading the tree, which was perfect to show my improvement from drawing my first drawing freehandedly.

First, Holmes tells us to draw “a basic trunk and a few bits of branch stemming from it.” (Holmes 134) Holmes also suggests not to use a ruler as the tree’s trunk should be natural with lots of tiny imperfections.
Next, I drew the outline around the tree. I made sure not to make this symmetrical, as Holmes had stated “don’t make it perfectly symmetrical – trees are organic structures and are never exactly the same on both sides.” (Holmes 134)
Continuing on with the shading, I took note of the fact that there would be a light source. Of course, Holmes had a work around, shading darker on the left side of the tree while having some darker parts pulling off to the right.
Going on I darkened some parts of my tree, mostly the shaded leaves and the trunk itself, only to bring it out a little more in the mess of the shading.
Again, I used my technique of swiveling the pencil lightly around the parts I needed to shade, I learned to do this while drawing my eye.
Finally I erased the outline of the tree and added details to the trunk of the tree, noting the fact that the light would change how the trunk looked. Also drawing a cast shadow can be important as well.

What do you think, did I improve from my first post? Also, was my human eye better or this tree?

Overall I had fun learning about all these different techniques and things about drawing. I still need a guide or helping hand but practice makes perfect. 

Piano and Swing Feel

What is the hardest style of music to play?

Answers may vary depending on who you are, but I am in strong belief that Jazz is the hardest style of music to play.

All of my past posts apply to jazz; Preparation, Originality, Rhythm, and Minor/Major chords. Jazz is quite basically the mother load of music. It incorporates various feels, sounds, and rhythms. This is why Mr. Palmer introduced the swing feel last. For those who don't know, Jazz is primarily triplets. Practically every note played in jazz is in the placement of triplets. If you were to play eighth note triplets all the way through a sheet of jazz music, it is more then likely that you would of played in the spot of all written notes.

Mr. Palmer represents this by making us play eighth note triplets continuously, according to him "continue to play triplets each time three eighth notes are joined by one beam" (Palmer 142). After attempting, and completing this, I suddenly got more of a feel for swing as a whole. Now i am in the jazz band for Kentridge, and i do understand swing. But i never really thought of it in the manner of triplets. By applying my new knowledge of Jazz, it is ten times easier to play the swing feel.

Me practicing triplets by playing a B flat chord


Chef Pres - Baking Part 5

Preston Viltz

Meara

Honors English P4

Blog

January 25 2015

For my fifth and final time baking for you guys I decided to bake something other than cookies. I feel like cookies are the easiest baking item to make so that is why I started off baking them. But now I feel like my skills have improved to the extent that I was ready to try something new. So for my final bake I made cornbread. Cornbread is very different than cookies, it has a much different texture and look, as well as many different ingredients. I chose cornbread because my ancestors grew up in the South and a frequent meal they had down there was cornbread. So in respect for my culture I decided to make something that meant a lot to my family. The cornbread was a much more difficult task then the rest. A major difference was that it had to bake for 45 minutes instead of the regular 8-10 min for the cookies. My experience was quite fun and I'd like for you guys to take a look so here is my time making cornbread.

"Ingredients

  • 1 cup yellow cornbread
  • 3/4 cup all-purpose 
  • 2 to 3 tablespoons sugar
  • 1 tablespoon baking powder
  • 1/2 teaspoon salt
  • 1 cup milk or buttermilk
  • 2 eggs
  • 1/4 cup butter"
First I set the oven to 425 degrees. Then I mixed all my dry ingredients together in a mixing bowl. I whisked my liquid ingredients together in a separate bowl. Finally I mixed them together and "stir until just moistened". Pic below:


Next I "pour batter into the prepared pan". Then I put the pan in the oven and baked at 425 degrees. Pic below:


After 45 minutes I took the cornbread out of the oven and "cool slightly; serve warm". Pic below:


And lastly this is me enjoying my baked good. I loved my creation. Pic below:


Now that I have finished all of my baking experiences I am proud of how far I have came. I really admire how I stepped out of my comfort zone to bake something that wasn't related to cookies. My family enjoyed the large batch and my dad said it was "just like home". Overall I am joyous that I chose to bake for these blogs. I feel like I can now admit that I am not such a beginner anymore and am comfortable baking for my entire family. This was much fun.

If I opened a bakery would you eat there?

Chapman, Natalie. Baking. Des Moines: Houghton Mifflin Harcourt, 2013

Weird yet dope braids

For my last blog post I wanted to try some of the braids that I was scared to try before. I first tried the leave out braid, then the upside-down braid. Both of these styles actually took me a month to master, this is why I had to make it my last one. These two styles I tried out on my soccer team mates, on our trip to Spokane. First up was the leave out braid, it is a french braid, but you only take out a little piece of hair, then skip a few inches down and grab another. It is difficult to explain in words, but the point of it is to look like a cool pattern, rather than to pull your hair back. At first this braid is quite simple, you start of with just a normal braid, next from the book I read, "Carefully grab a small section of hair and bring it to the braid, repeat this like a french braid. It's pretty much the same except you  have to go down an inch before you take another piece, making a noticeable gap in the braid" (Smith 1222). At first when I read this I was very confused, but after I tried and looked at the pictures it made sense. It took me 17 tries, but finally I got what it is supposed to look like:
This is my good Friend Katherine, (our right mid) everyone say "Thanks for modeling Kat". OK Now that one wasn't too hard for me, it was time to do the scariest of all, the upside down braid. I have tried this before and failed. It is a french braid on the back of your head instead of the top, typically girls will do this when they have their hair in a pony-tail, for instance I have seen girls do this for soccer. I did not really know how to go about this braid, but my book had some suggestions for doing this on someone else. "Have the model lay on a bed or some sort of flat surface, you must be above them. Make sure they tuck their chin in, and have all of their hair forward" (Smith 1734). I combined this new technique with what I have already learned about French braiding from my first post. Surprisingly it turned out really cool! a big thank you to Taylor for modeling (her hair is colored and it makes it look cool) Well that is all for my blogs, I hope everyone learned some valuable tips on braids because I sure did! I challenge you ladies or dudes with long hair to try rocking some cool braids to school! Bye guys!

Making Huevos Rancheros with Kenny Goliff

In my last blog on eggs benedict at http://mearaquarter2independentreading.blogspot.com/2016/01/making-eggs-benedict-with-kenny-goliff.html, I alluded to a huevos rancheros recipe in my book. Huevos rancheros is a Spanish dish where fried eggs are paired with a spicy tomato sauce. Honestly, I’ve never liked huevos rancheros before trying this recipe. That being said, the recipe was still amazing. Unfortunately, it takes several hours to prepare and make, so I am only willing to make it for special occasions when I have enough time. As always, there were a few techniques in the recipe that were new to me that I thought were very interesting.


The first interesting aspect of the recipe was how the sauce itself was made. Overall, there were 4 basic steps to making the sauce. The first step was to take four small cans of diced tomatoes and strain them to separate the juice from the actual tomato. Then, letting the tomato sit, I took the sauce, discarded some of it, kept a few cups, and added some spices to it. While those spices dissolved, I put some onions, garlic, and other spices and herbs into bowl, then mixed the leftover tomato into that. I took that new mixture, put it in a casserole pan, baked it a few times, and then put the original sauce from the tomatoes back in (Card 55). I thought this process was very interesting, as separating the sauce from the tomatoes only to put it back together sounded kind of pointless. However, the reasoning behind it explained exactly why it wasn’t.

According to Matthew Card, the maker of the recipe, “To evoke the charred flavors in huevos rancheros, we roast vegetables in a hot oven” (Card 54). If the sauce was left in with the tomatoes, leaving them soggy and gross in the oven, they wouldn’t be properly roasted, creating the delicious flavors huevos rancheros, when done right, has to offer. So, alternatively, the moist (as opposed to soaked) diced tomatoes are roasted by themselves first, then the sauce is added in later.


In this recipe, spices like chile powder, cilantro, and garlic are used to form a very unique salsa-resembling flavor. What other kinds of spices do you think would go well with a recipe like this?

Piano: Minor Vs. Major?

What sounds better; major chords or minor chords?

I rarely use minor chords in my personal music, I stick with the same C scale, and all of its major chords. But this doesn't necessarly mean i like the sound the best. Any experienced piano player would tell you they love minor chords, and the reasoning is simple. They sound good. Major chords don't express emotion as well as minor chords. Every time you are watching a movie or show, and you begin to cry at whatever scene you're watching; there is a 99.99% chance that the composer was using minor chords in that segment. For those who don't know, minor chords are theoretically the opposite of major chords, and they have a strong influence of sharps and flats. According to Mr. Palmer, "Every MAJOR KEY has a RELATIVE MINOR KEY" (Palmer 128). So which one sounds better? the answer is neither.

Now, i could throw quotes at you such as "Music is a preference", but the truth is, change is the true beauty. This can be applied to any form of music. If you play the same 3 chords an entire song, chances are that it will be boring. Truly good music introduces different feels, different rhythms, different sounds. 

Mr. Palmer has started to develop this idea in the book. I've noticed a pattern in is work. After every major scale, he teaches the contrary minor scale. Then shortly after that, he combines the two scales into a song. Shortly after mastering A minor, we were introduced to "The Stranger" (Palmer 129), and shortly after learning D minor, we were introduced to "Scarborough Fair" (Palmer  135).

Mr. Palmer is trying to get the readers to play music with influence in both minor and major keys, which personally, is a great importance in good sounding music.
Me playing a major chord

Me playing a minor chord


Rhythm and its Importance

Why is it hard to understand rhythm?

In my opinion, music is polar. What i mean by this is, you either understand it, or you don't. Music has surrounded me my whole life; my aunt was in a band, and many family members have had somewhat of an experience with a musical instrument. There are people out there, that can't seem to get the idea of rhythm right. Whether they can't play in time, can't read music, or can't play at all. But me, i've always understood music. I can look at an instrument, or a sheet of music, and everything just makes sense. So i guess the answer, for me, is that it's not. 

Mr. Palmer has a hand exercise about halfway through the novel in which he puts our rhythmic understanding to the test. The challenge is really simple actually, all you have to do is play a C scale with one hand; In time. I completed this on my first try (No bragging intended). Now this section of the book is literally named "These Hands Were Made For Playing" (Palmer 102). He explains how you can't move on to the more challenging concepts until completing the exercise I addressed above. According to Mr. Palmer, "Rhythm may be the most essential part of music. It is a particularly important factor in playing a keyboard instrument" (Palmer 102). 

I have mastered rhythm, and am truly prepared to take my piano skills on to more challenging concepts.

Me using a metronome to practice time-keeping

Different Planes

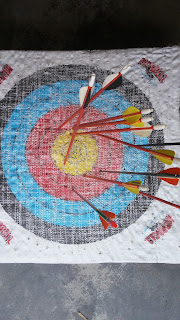
For my final post, I decided to test author and experienced archer Brian J. Sorrells theory of shooting arrows from different planes. According to Brian J. Sorrells, he explains, "Canting, or tilting the bow to the side gets the upper limb out of the line of sight for normal shooting" (Sorrells 52). What Sorrells is explaining is that the more tilt you have in your bow, the increased chance of hitting your target (because nothing is blocking your view). Another plane Sorrells suggested was, "When bare shaft tuning, do not cant (tilt) the bow, but hold it as close to vertical as possible" (Sorrells 52). Unlike before, Sorrells is telling the reader that you can shoot with your bow being vertical, however he doesn't elaborate on whether or not it is better than the first method suggested.

To test these ideas, I decided to shoot arrows with my bow being on horizontal and vertical planes. I chose a horizontal plane because at that angle, no part of the bow is blocking your view of the target. While I was testing these methods, I noticed that the horizontal plane had more arrows scattered throughout the target and a greater distance from the bull's eye than the vertical plane. The conclusion I drew from this test was that the vertical plane gave me a better chance of hitting the bull's eye than the horizontal plane. What do you think the author's purpose was for including the cant (tilt) method if it didn't work?

Horizontal Plane Results
Vertical Plane


Recording the Bass guitar

This s about me finding out the best way to record my bass to get the best sound and tone and have a usable recording
I'm using Akai EIE Pro audio interface, Reaper audio software, and my Schecter Damien platinum 5 bass.

Displaying 20160125_144918_HDR.jpg


This is me setting up the interface alongside the audio software

Paleo Cooking - Elise Jones

While reading the book, Practically Paleo, I have learned more about what the paleo lifestyle is and what it entails. For example how it isn't a diet, but a lifestyle and how it can heal a person's body inside and out. "We live in a time when up is down and black is white. We have been taught to believe that the foods coming out of factories are healthier and safer than foods your great-grandmother ate" (Sanfilippo, 32). The text discusses how people have began believing refined foods made/processed in factories are the healthiest and safest foods available. But that is not the case! This is mainly because the guidelines set by the USDA are not based on scientific theory or conclusive proof, but based on illogical/potentially dangerous ideas. We need to remember that we are not smarter than nature, we cannot make better food than nature, and that we need to eat real, whole food-period (Sanfilippo, 33).


Paleo is all about eating whole foods, as I have mentioned in previous posts, and is all about putting in good in order to feel good. Paleo is known to help digestive function, blood sugar levels, and other various health goals (like shedding those stubborn extra pounds). So instead of looking to the media for what to eat, turn to the stuff our species began on, real, whole foods! Things like free range eggs and meats, wild caught seafood, and organic fruits and veggies. Leading me to what I decided to make today, tomato soup.


The recipe used included:
  • garlic
  • tomatoes
  • basil
  • carrots
  • onions
  • celery
  • bone broth (chicken)
All of the vegetables I used were of course organic and the bone broth was made from a free range, antibiotic free chicken. Bone broth is an essential to paleo cooking, as it is extremely high in nutrients and makes a great stock for soups and sauces. It is made from slow cooking bones (chicken, veal, lamb, etc.), allowing them to release nutrients and flavor into water and your selection of herbs, cider vinegar, and veggies. Bone broth is mainly known for its healing and protecting abilities, as the nutrients come from the bone marrow of the animal (Sanfilippo, 234).


The soup I made turned out very good, given that tomato soup is one of my favorite foods and I will definitely be making it again. It was very easy, only taking me around 30 minutes to make and was great to eat after a day of finals.


After reading this book, I have discovered many different ways to further incorporate the paleo lifestyle into my everyday life. I have also found many things that I eat regularly, that already fit in to this way of eating as well. This leads to the question, do you eat any foods in your day-to-day life that are paleo?

Photography - Kayla Treat

The final post I will be making involves how you position yourself when trying to take a picture.


"Good photographers are contortionists" (Carroll 110).


The author I believe is trying to say that you may need to get in some uncomfortable positions to get the best shot. You have to be able to see the image you want and that may mean laying on the ground or any other odd position in public. They say that to capture a different and more interesting photo it takes more than a head level image. When I read it clicked in my head that most pictures I really liked have been from more than head level. I put this to the test and tried bending down and changing it up to capture these images.


When I took these images, an issue came up that I cant see the camera screen when I was attempting and realized that I have to get even lower. After uploading these, I realize the odd positioning on the ground was worth it and created images with different angles that I really liked. Have you ever been in the situation where you want that image but you don't want go on the ground? Tell me about it in the comments!! Enjoy these images I took below.


Balloon birds!

Finkbeiner 1
Zack Finkbeiner
Mrs. Meara
Honors English 10
November 24 2015

Hello everyone, as you already know my name is Zack and for my IRP Q2 book I chose "Crazy Creatures Balloon Modeling" by Top That!. The reason I chose this book was because I wanted to be able to make cooler and more sophisticated balloon animals. Last post I worked on creating a mouse and a parrot. This post I will show you how I continue to develop my skills and try to create harder animals such as the humming bird. Before I began to create the Humming bird I expected it to be really hard and expected to mess up a lot and have to try multiple times just to get it right. What i later found out was that the humming bird is actually one of the easiest, if not the easiest balloon animal to make. As the book says "This little character is easy to make and uses just one balloon" (36, Top That!). The most challenging part of creating the humming bird was drawing the eyes and the wings. On all of my other creatures I never found the drawings of the eyes or other designs to be that hard. The book says that i needed to "Finish your model with a face and some feathers on its back" (37, Top That!). 


The way that the book states it, it makes it sound way easier than it actually is, because on my first humming bird i felt that i messed up on the drawing of it so i created another one to try again, but feel as if it just looked worse than the first. What do you think, do you think the first one (right) or the second one (left) looks better?


If you are good at drawing are there any tips you could give me for drawing on a weird surface or along a curved surface? If so please tell me them below.

Reflection

As the quarter comes to an end, I reflected upon my progress in organization. How have my organizational habits changed? Well, I went from my parents demanding that I clean my room every weekend to begging my parents to let me help them organize something. I have essentially become addicted to cleaning!


With my first project, cleaning my bathroom, I realized just how many items didn't bring my joy; items that I hadn't used for months or even years. Cleaning my bathroom also proved to me how easy it was to get rid of items, and how much stuff I just didn't need.


Cleaning my bedroom was definitely the most time-consuming project, but without a doubt the most satisfying. The energy of my room has totally transformed- it went from stressful and overwhelming to peaceful and calm. I appreciate the space and what I own much more than I did before.


The organization of the linen closet proved to be difficult in a different way. I had to cater to the needs of myself and my family, adding time to the project. I could make decisions much more quickly when organizing for myself rather than taking others and their belongings into account.


Organizing the pantry was a reminder of how accessibility is essential because it can quickly demonstrate what you have and what you may need. The efficiency this change has provided to my family and what we eat for dinner or buy at the store has been immense.


Overall, this process and lifestyle change has proved to be extremely beneficial to me and my family. I had no idea something as simple as organization could have such a significant impact on my life. I would also like to thank Marie Kondo, the author of this book and creator of this method. Even though organization isn't truly necessary, its definitely beneficial. (Kondo 203). This book has revolutionized the way I live my life!


Kondo


Shooting Form


According to Brian J. Sorrells, “A solid stance is the foundation of good shooting form” (Sorrells, 58). What Sorrells is trying to convey to the reader is that a good stance (like standing up or kneeling) is heavily reliant on the shooting form you have. I decided to test this quote by using two different shooting forms. One way was having my feet parallel to the target and having my feet turned 90 degrees away from the target. While I performed this test, I observed that neither shooting form hindered nor improved my accuracy. The conclusion I drew up from this test was that there was no one shooting form that worked better than any of the forms that you can use. If you were currently in archery, which shooting form would you use?

Results of Shooting Form 1
Results of Shooting Form 2